GreenRADIUS v6.1 Admin Guide
![]()
Green Rocket Security's GreenRADIUS is a complete two-factor authentication solution supporting a variety of tokens, such as YubiKeys (OTP, OATH, FIDO U2F, and FIDO2), other FIDO tokens, Google Authenticator, our own Green Rocket 2FA mobile app, and much more. It validates traditional RADIUS logins as well as offering a modernized Web API for web applications. GreenRADIUS can also enforce 2FA for Windows Logon, whether PCs are domain-joined or not, online or offline, and for both desktop and RDP logins.
This guide describes how to configure and operate your GreenRADIUS instance. Administrators will find the guide has been arranged by topic, making it easy to refer to specific sections for information.
© 2026 Green Rocket Security Inc. All rights reserved.
Overview of GreenRADIUS
What is GreenRADIUS?
GreenRADIUS is a two-factor authentication platform. It augments the traditional username/password security model by requiring users to provide a second factor to prove their identity. This helps secure users and organizations against various password-related attacks.
GreenRADIUS takes the form of a multi-protocol server. GreenRADIUS
validates each user/password/second-factor login attempt and responds with
either ACCEPTED or DENIED.
GreenRADIUS supports the traditional RADIUS protocol, which has wide industry acceptance and is used by a considerable amount of existing client software.
In addition, GreenRADIUS also exposes a modern web API, which makes the development of modern web-centric applications (or browser-based 2FA validations) very easy.
GreenRADIUS can also enforce 2FA for Windows Logon, whether PCs are domain-joined or not, online or offline, and for both desktop and RDP logins. Contact us today to learn more.
Distribution
GreenRADIUS v6.1 is distributed as a virtual machine (VM) packaged in the Open Virtualization Format (OVA). It is available as a free preview download from our website at http://www.greenrocketsecurity.com/greenradius
If you would prefer an AWS instance of GreenRADIUS, please contact us, and we would be happy to share our GreenRADIUS AWI with you.
Minimum Requirements
GreenRADIUS is a lightweight virtual appliance, and, at a minimum, requires the following:
- 2 CPUs
- 4 GB RAM (8 GB RAM is recommended)
- 80 GB hard drive space
© 2026 Green Rocket Security Inc. All rights reserved.
Default Login Information
By default, the login information for GreenRADIUS is:
- Username:
gradmin - Password:
GreenRocket!23
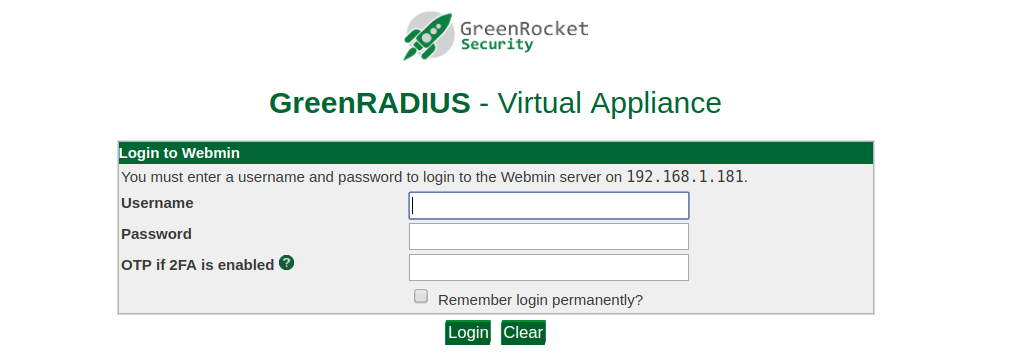
This username and password are used to log in to the command line. Most configurations for GreenRADIUS are performed through the web admin interface, served at https://<IP address of GreenRADIUS>/admin.
Note: The web admin interface is only accessible after the network has been set up. See the next section for information on how to do this.
We would recommend changing the password, both for the console and the web admin interface. The password for each is stored separately.
To change the command line password, run the passwd command from the command
line in the terminal console.
To change the web admin interface password, go to the "Webmin Users" link (found under the Webmin menu in the left panel), and click the username whose password you would like to change.
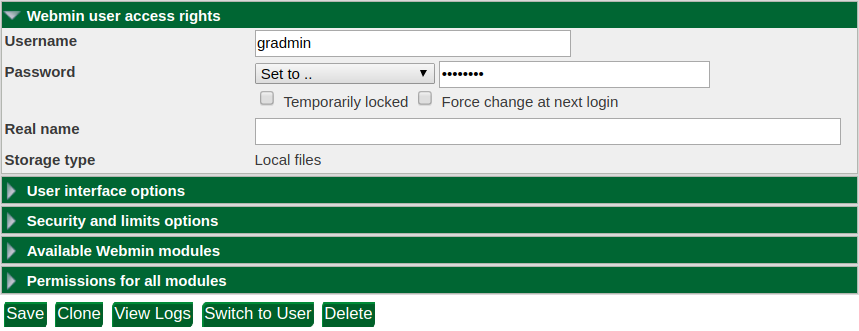
Make sure the password mode is "Set to..." then type the new password into the field to the right. Click Save to record your changes. The next time you log into the web admin interface, the new password will be required.
This username and password are used to log in to the command line. Most
configurations for GreenRADIUS are performed through the web admin interface,
served at https://<IP address of GreenRADIUS>/admin.
© 2026 Green Rocket Security Inc. All rights reserved.
Authenticator 2FA for the GreenRADIUS Web Admin Interface
The GreenRADIUS web admin interface itself can be secured with two-factor authentication (2FA). This is easy to do with any Authenticator app, such as Google Authenticator and Microsoft Authenticator.
-
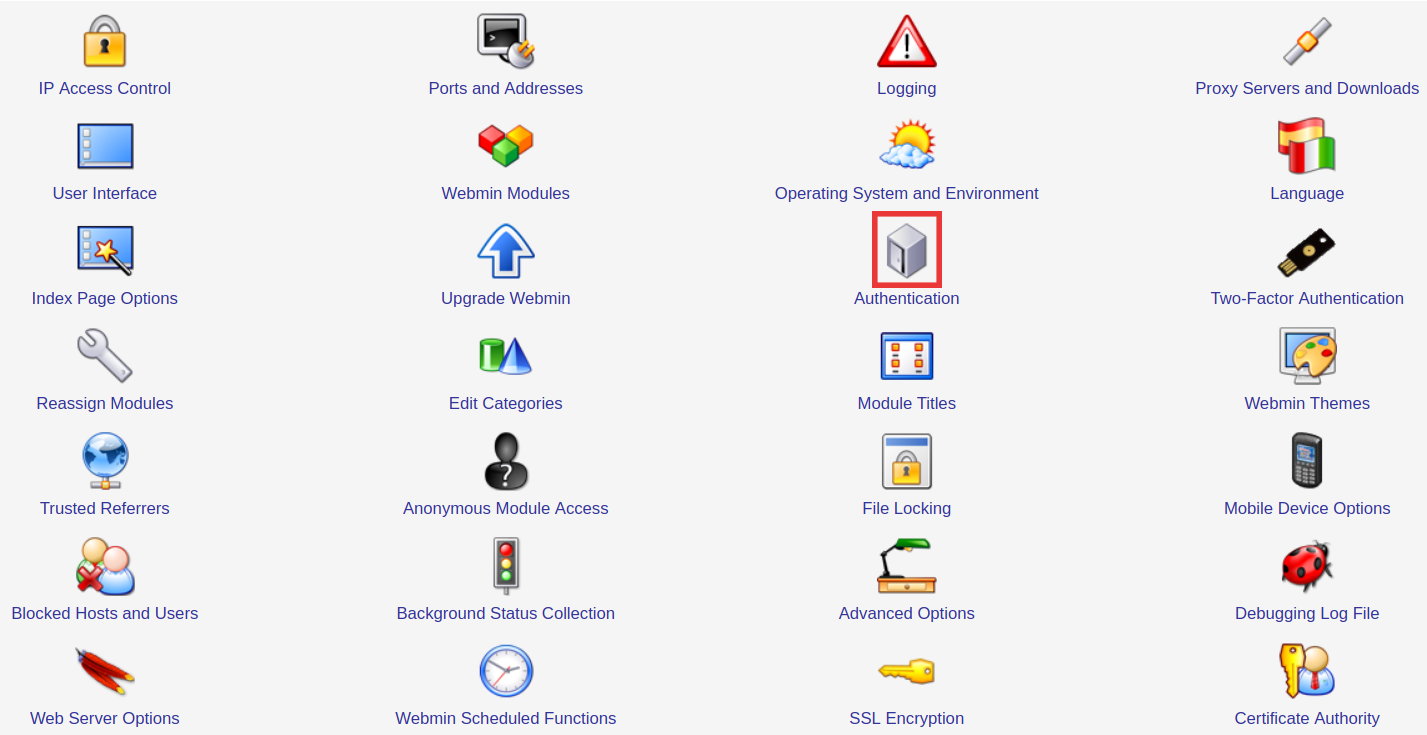
Open the Webmin Configuration link (found under the Webmin menu in the left panel.)
-
You will be presented with a grid of configuration menus. Select "Two-Factor Authentication."
-
From the two-factor authentication options, select Google Authenticator:
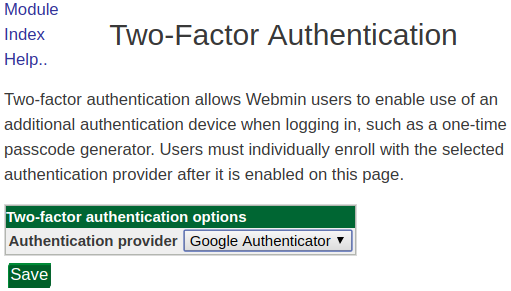
Click Save to commit your changes. This will require the server to restart, so there will be a slight delay.
- Open the Webmin Users link (also located under the Webmin menu in the left panel).

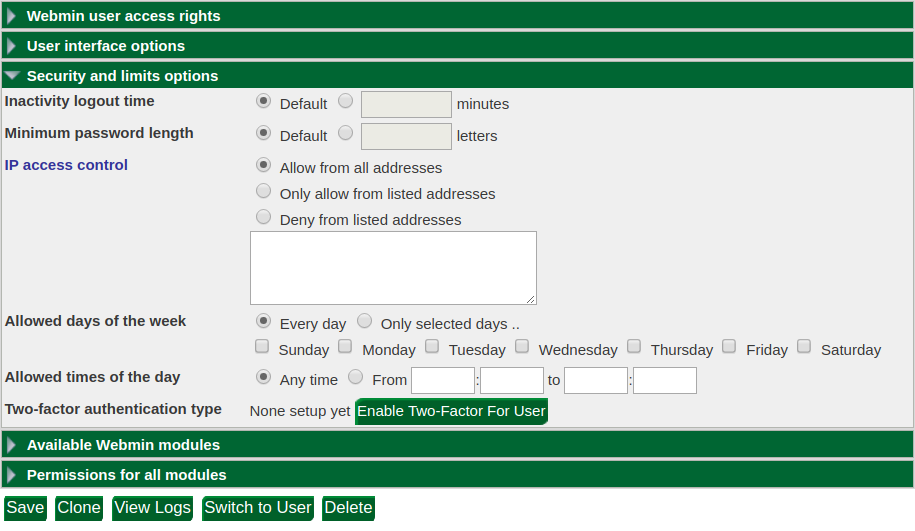
- Select the user for whom you would like to enable two-factor authentication. You will be presented with a series of configuration dropdowns. Select "Security and limits options:"
-
Click the "Enable Two-Factor for User" button.
-
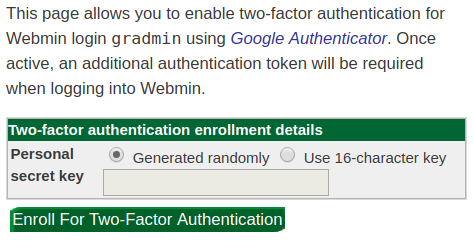
Select "Enroll for Two-Factor Authentication:"
-
A QR code will be generated which you can scan with your authenticaton app of choice.
-
The next time you attempt to log into the web admin interface, an OTP dialog will appear. Input the six-digit Authenticator code here:
Two-factor authentication is now enabled for the GreenRADIUS web admin interface.
© 2026 Green Rocket Security Inc. All rights reserved.
Automatic Logout for Web Admin Interface
To mitigate session reuse attacks, the web admin interface can be configured to log users out after a certain period of inactivity.
- Log into the web admin interface.
- From the left panel, select Webmin→Webmin Configuration.
- A series of options will be displayed. Select "Authentication."
- A page of configuration settings will appear. Edit the setting labeled
"Auto-logout after [ ] minutes of inactivity." When finished, select the
"Save" button at the bottom of the page to commit your changes.

- Users will now be automatically logged out after a period of inactivity.
© 2026 Green Rocket Security Inc. All rights reserved.
Network Configuration
Before GreenRADIUS can be accessed, the network settings must be configured.
Log into the command line. Then run the following commands:
cd /opt/grs/greenradius/scripts/ip-configuration-scripts
sudo python configure_ip.py
Example:
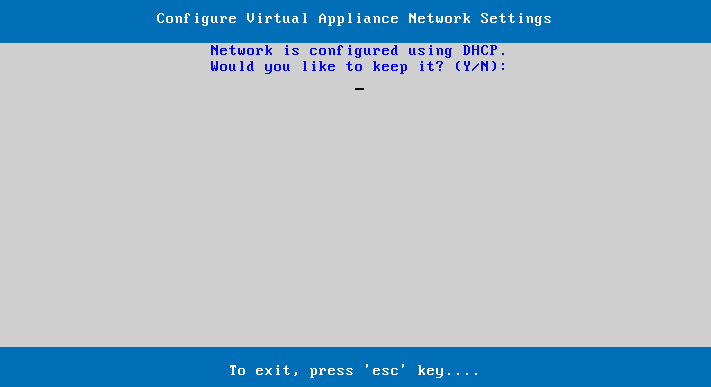
You will be presented with a series of prompts. Select either DHCP or static IP address. If you select DHCP, GreenRADIUS will communicate with your routing device and automatically choose an IP address for you. If you select static IP, you will need to choose an IP address yourself, as well as configuring the network access point and DNS server.
WARNING: If you opt for Static IP Address, ensure that the IP address chosen does not conflict with any existing devices on the network.
Ports
The following ports need to be open for proper communication to and from GreenRADIUS:
| Port | Description |
|---|---|
| 22 | SSH for remote administration |
| 389 | LDAP |
| 443 | access to the web admin interface, self-service portal, use of the GreenRADIUS Web API, for Windows Logon, for mobile app |
| 636 | LDAPS |
| 1812 UDP | RADIUS authentication |
| 9443 | for Windows Logon, mobile app |
Once the network setup is complete, your GreenRADIUS instance is ready to use.
© 2026 Green Rocket Security Inc. All rights reserved.
Domains
Domains hold collections of users in GreenRADIUS. They are independent and their configurations are separate from one another.
You can freely create and remove domains. There is no limit to the number of domains a GreenRADIUS instance can hold. Domain names may only contain alphanumeric characters, periods, and underscores.
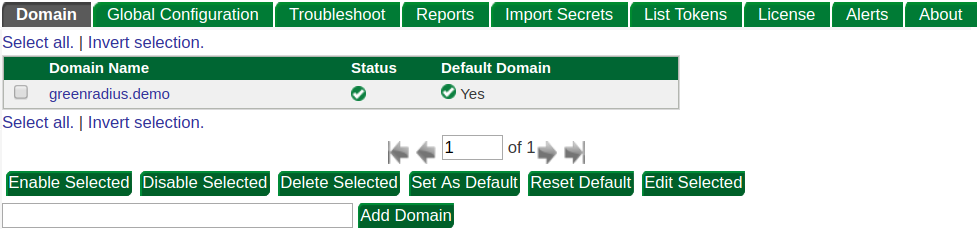
Clicking on a domain in the web admin interface brings up a set of domain-specific tabs:
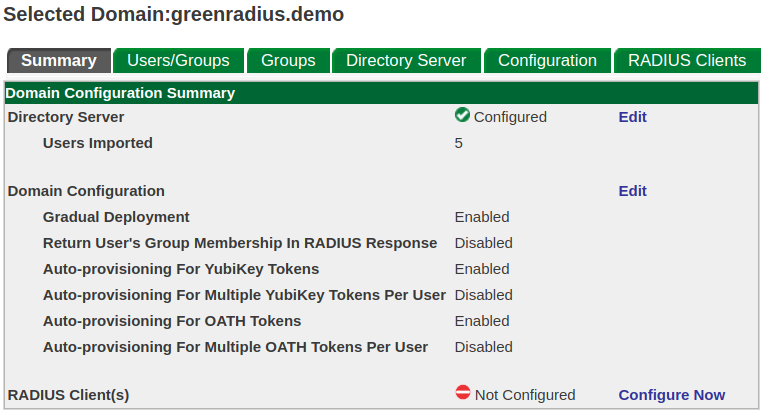
Each domain has a configuration specific to it, accessed through the Configuration tab in the main menu page. There is also a set of configuration options which apply to all domains. This is found under the Global Configuration tab.
The Default Domain
If multiple domains exist, there must be a way to disambiguate which domain a
request is intended for. When there are multiple domains and no default domain
is selected, all authentication requests to GreenRADIUS must specify the user
in 'canonical' format: user@domain, for example jdoe@greenradius.demo.
If a domain has been set as the default domain, requests which do not explicitly specify a domain (that is, a login with a username only) will assume the default domain.
© 2026 Green Rocket Security Inc. All rights reserved.
Users
Importing users
GreenRADIUS imports users from different LDAP servers:
- Active Directory
- OpenLDAP (there is also an onboard OpenLDAP which can be used as the user store)
- 389 DS
- FreeIPA
The LDAP server must remain reachable for GreenRADIUS to work, as authentication requests to GreenRADIUS involve a subsidiary request to the LDAP server.
LDAP configuration is found under the Directory Server tab.
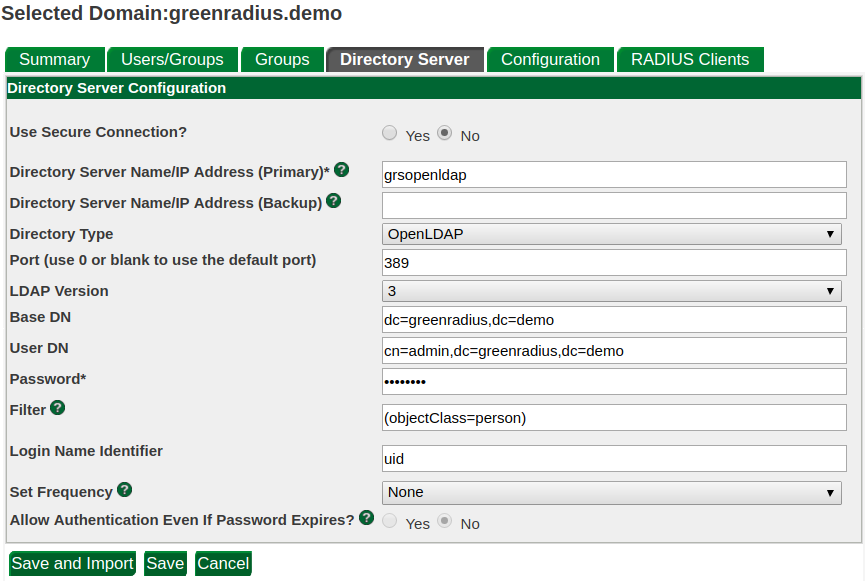
Set the IP address/hostname/FQDN to point to a running LDAP server. The credentials must have the correct permission(s) to allow GreenRADIUS to log into the LDAP server and fetch (read) the user list.
Complete the additional fields to import users from your Active Directory or OpenLDAP. Note the following:
- For the "Login Name Identifier"
- For Active Directory,
sAMAccountNameis common, but other identifiers can also be used - For OpenLDAP, use
uid
- For Active Directory,
- For the "Filter" field, consider importing users from a specific security group. An example filter string would be:
(&(objectClass=person)(memberOf=CN=test_group,OU=Technology,DC=domain,DC=local))Otherwise, to import all users, the filter string should be:(&(objectCategory=person)(objectClass=user)) - The "Set Frequency" drop-down menu sets the scheduled frequency that GreenRADIUS will import/update users from your directory server
Next, click "Save and Import" to import the users into the selected domain.
The Users Tab
When a domain has been selected, the Users/Groups tab displays a list of users:
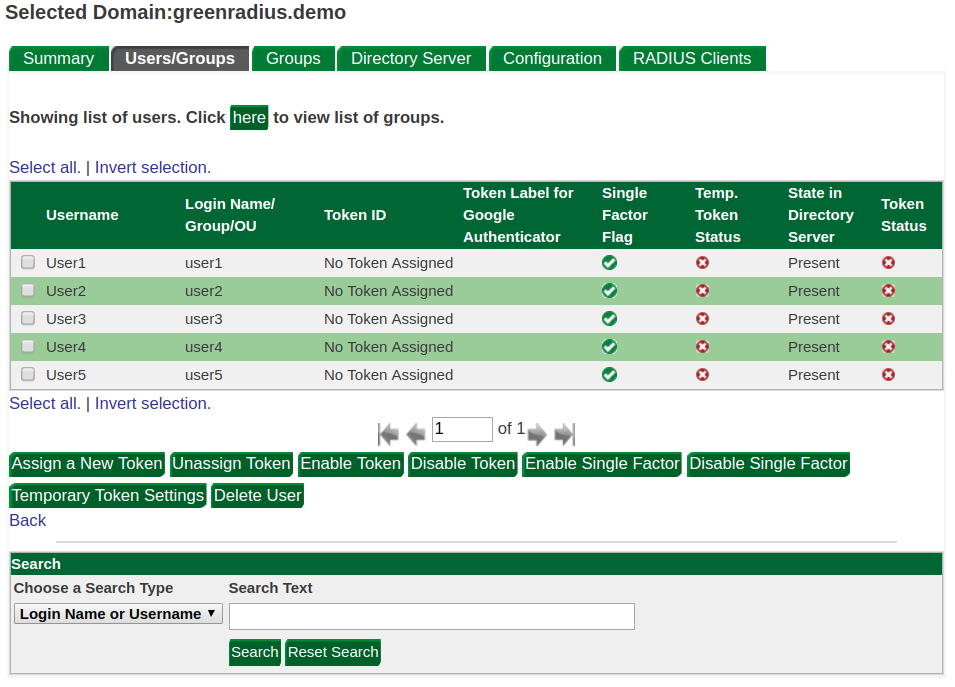
From here you can perform administrative actions at the user level. These are covered in more detail in subsequent sections.
Groups
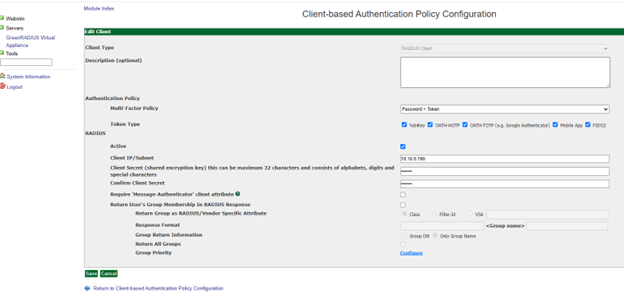
Group membership can be configured to be returned in the RADIUS response for each login attempt.
- Navigate to the Global Configuration tab > Client-based Authentication Policies screen of the RADIUS client you want to configure
- Check the checkbox for "Return User's Group Membership in RADIUS Response"
- Select "Class," "Filter-ID," or the specific VSA the RADIUS client requires
- Click the "Configure" link, and prioritize which group(s) should be returned in the RADIUS response
- The group(s) with the highest priority to which the user belongs will be returned in the RADIUS response. This can be tested in the RADIUS test of the Troubleshoot tab
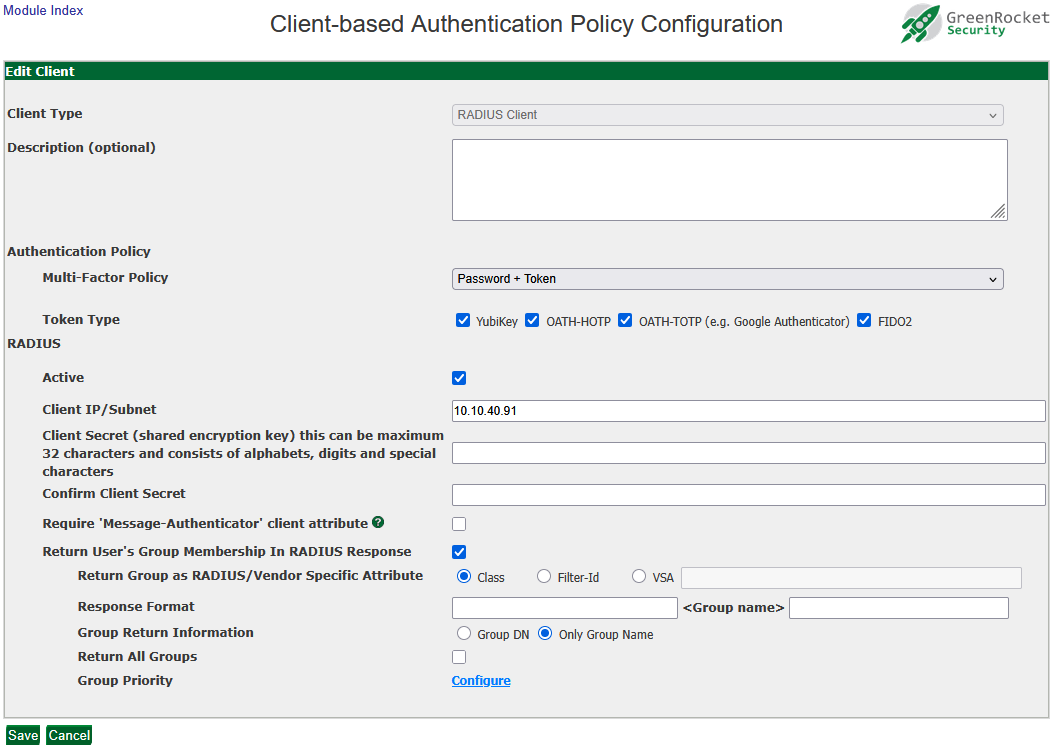
- A group setting of "0" means the group is not prioritized
- A group setting of "1" is the highest priority
- A group setting of "2" is the next highest priority, and so on

© 2026 Green Rocket Security Inc. All rights reserved.
Onboard OpenLDAP
GreenRADIUS comes equipped with an onboard OpenLDAP server, in case an external LDAP is not desired. A third-party LDAP admin tool can be used to manage the onboard OpenLDAP, such as LDAP Admin.
The onboard OpenLDAP, by default, is configured with a sample domain (greenradius.demo) with five test users (user1 through user5). Each of the users has a default password of GreenRocket!23
To overwrite the default OpenLDAP domain with a new OpenLDAP domain, follow these steps:
Pre-requisites
A resolvable hostname/FQDN and a corresponding certificate must be configured in GreenRADIUS.
- Global Configuration tab > General
- Set the value of the Server Hostname/FQDN field
- Click the Save button to save the configuration
- Global Configuration tab > Certificate
- Under the
Generate a CSR/Upload the Certificatesection, clickUpload a certificateand provide the server certificate, private key, and CA chain. Then click theInstall Certificatebutton.
- To install a self-signed certificate, in the
Create Certificatesection, enter a common name matching the hostname/FQDN configured earlier. Click theCreate and Installbutton.
Changing the Onboard OpenLDAP Domain
- Global Configuration tab > On-board LDAP Server
- Provide the following inputs:
- DNS Domain Name
- Organization Name
- Current Admin Password (default password is
GreenRocket!23) - Enable Secure Connection for Replication
- Server ID
- Click the Update button to save the new configuration
Changing the OpenLDAP Admin Password
To change the onboard OpenLDAP password of the admin user, follow these steps:
- Global Configuration tab > On-board LDAP Server
- Provide the following inputs:
- Current Admin Password (default password is
GreenRocket!23) - New Admin Password
- Confirm Admin Password
- Click the Update button to change the admin password
Users Changing Their Own Onboard OpenLDAP Password
Users can change their own onboard OpenLDAP password.
Pre-requisites
- A RedHat, CentOS, or Ubuntu machine that has OpenLDAP utilities installed:
- In RedHat/CentOS,
openldap-clientsshould be installed - In Ubuntu,
ldap-utilsshould be installed - The above Linux machine must be able to reach GreenRADIUS
Steps
- On the command line of the Linux machine, run the following command:
ldappasswd -h <ip address of GreenRADIUS> -p 389 -x -D "uid=<username>,ou=<user's OU>,dc=<domain component 1>,dc=<domain component 2>,dc=<domain component etc>" -W -A -S - The user enters his current password twice
- Then the user enters his new password twice
- Then the user enters his current/old password once again
- A successful password change is silent. If there is an error, an error message will appear.

Setting Up OpenLDAP Password Policies
The onboard OpenLDAP comes with an optional module which can enforce certain password policies, such as password expiration and minimum password lengths.
All commands must be performed in the terminal of GreenRADIUS, either directly or via SSH.
For simplicity, the domain shown in the steps below is always greenradius.demo, represented as dc=greenradius,dc=demo. If your own domain varies, you will need to make the appropriate substitutions.
Several of the commands below will prompt for multiple lines of text. Simply enter the text into your terminal. When everything has been input, press Ctrl-D on a blank line to finish the entry and execute the command.
First, you must load the appropriate module:
sudo docker exec -it GRS-OPENLDAP ldapmodify -Q -Y EXTERNAL -H ldapi:///
This will prompt for LDAP data to insert. Use the following:
dn: cn=module{0},cn=config
changetype: modify
add: olcModuleLoad
olcModuleLoad: ppolicy.la
As mentioned above, press Ctrl-D on a blank line when done. The command should report success with a message:
modifying entry "cn=module{0},cn=config"
Next, load the ppolicy schema. To do this, you will need to download the schema from here and upload it to GreenRADIUS. Copy it into the /var/lib/docker/volumes/grs-docker-compose_gras-config/_data directory. (This will require root permissions.)
To load the schema into LDAP, execute this command:
sudo docker exec -it GRS-OPENLDAP ldapadd -Q -Y EXTERNAL -H ldapi:/// -f /opt/grs/greenradius/ppolicy.ldif
This will load the stored ppolicy schema. You should receive a message upon success.
Now the ppolicy module must be enabled:
sudo docker exec -it GRS-OPENLDAP ldapadd -Q -Y EXTERNAL -H ldapi:///
Input the following data to the command, pressing Ctrl-D when done as said above:
dn: olcOverlay=ppolicy,olcDatabase={1}mdb,cn=config
objectClass: olcOverlayConfig
objectClass: olcPPolicyConfig
olcOverlay: ppolicy
olcPPolicyDefault: cn=default,ou=policies,dc=greenradius,dc=demo
As mentioned, replace dc=greenradius,dc=demo with the LDAP-formatted specification for your own domain, and press Ctrl-D on a blank line when finished.
Now add the object which will hold your password policies:
sudo docker exec -it GRS-OPENLDAP ldapadd -c -x -D "cn=admin,dc=greenradius,dc=demo" -W
You will be prompted for your administrative password. Once this is entered, the command takes the following data:
dn: ou=policies,dc=greenradius,dc=demo
objectClass: organizationalUnit
ou: policies
Press Ctrl-D on a blank line when finished, as before, to add the policy container. The final step is to create the password policy. Shown below is a simple, example policy that requires the following:
- passwords must have a minimum of eight (8) characters
- passwords expire after 60 days (or 5,184,000 in seconds)
Complete documentation on the available password settings can be here.
Run this command:
sudo docker exec -it GRS-OPENLDAP ldapadd -c -x -D "cn=admin,dc=greenradius,dc=demo" -W
As before, you will be prompted for your password, and once this is entered you will need to input the following:
dn: cn=default,ou=policies,dc=greenradius,dc=demo
objectClass: pwdPolicy
objectClass: organizationalRole
cn: default
pwdAttribute: userPassword
pwdCheckQuality: 2
pwdMinLength: 8
pwdMaxAge: 5184000
Replace pwdMinLength: 8 and pwdMaxAge: 5184000 with your own custom configurations as desired. Press Ctrl-D to save the changes as before. You should see a success message and find that your password policies are now enforced.
© 2026 Green Rocket Security Inc. All rights reserved.
Token Types
GreenRADIUS supports several different types of second factor, called tokens:
YubiKey OTP
The YubiKey OTP protocol emits a 44-character One-Time Password (OTP). Once one OTP has been used, it cannot be used again. Another must be generated from the YubiKey. Thus to compromise a YubiKey-secured device, a malicious party would have to gain access to the YubiKey device itself. YubiKeys can be assigned to users in three ways:
- By the administrator in the Users/Groups tab of the GreenRADIUS domain
- With auto-provisioning
- By the user in the GreenRADIUS Self-Service Portal
https://<IP address of GreenRADIUS>
YubiKey OTPs come in two variants: pre-programmed and custom. By default, YubiKeys ship with a pre-programmed secret. OTPs generated using this pre-programmed secret can only be validated using Yubico's YubiCloud servers. You can re-program and overwrite this secret, however, and import that secret into GreenRADIUS. Please refer to our Document Library to see our YubiKey programming guide.
The Global Configuration→Validation Server setting allows you to select whether YubiKey OTPs will be validated by the YubiCloud or locally by GreenRADIUS. If using pre-programmed keys, select YubiCloud. If you are using custom secrets, use local validation.
YubiKey OATH-HOTP
The OATH protocol is similar to the OTP protocol. OATH OTPs are shorter than the traditional YubiKey OTP, which may make OATH OTPs desirable for situations where password fields have a character-length limitation. This option is available for customers with a license for our premium OATH Module.
Please refer to our Document Library to see our guide on programming YubiKeys in OATH-HOTP mode.
Google Authenticator (Authy, Microsoft Authenticator, and similar soft tokens)
GreenRADIUS supports Google Authenticator and other similar soft tokens as a second
factor for users for those customers with a license for our premium OATH Module. Users
sign in to the GreenRADIUS Self-Service Portal, select Google Authenticator, and scan
a QR code with the phone app. Once the user clicks Proceed on the Self-Service Portal,
the soft token is registered to his user account in GreenRADIUS, and a six-digit code is
regenerated every 30 seconds, providing a secure second factor.
Mobile Apps - "Green Rocket 2FA" Apps
The "Green Rocket 2FA" app is available for iOS or Android. Once the app is installed, there is a simple, one-time registration process. This feature is available for customers that have a GreenRADIUS license for our mobile app. (The app is free to download for users.)
In addition to a GreenRADIUS license enabling the use of our mobile app, make sure of the following:
- A valid certificate should be installed in GreenRADIUS. See our Certificate guide for more details.
- Ports 443 and 9443 should be open for communication to and from GreenRADIUS.
When an authentication request reaches GreenRADIUS, and a user has our mobile app installed and registered with GreenRADIUS, a push request will be sent to the user's phone, appearing as a notification in which they can either approve or deny the request.
U2F
The U2F function of the YubiKey (or any other FIDO U2F token) is used with our 2FA for Windows Logon solution. When users log in to Windows, the U2F token flashes, prompting the user to touch the token button and complete the login. No pre-registration of the token is required.
Temporary Token
A temporary token is a static per-user text string which is valid for a limited time and a limited number of logins only. Temporary tokens can be created from the Users/Groups tab.
© 2026 Green Rocket Security Inc. All rights reserved.
Authenticator Registration
Prerequisites
- Users must have an Authenticator app installed on their devices that can scan a QR code (such as Google Authenticator, Microsoft Authenticator, or Authy)
- Make sure the GreenRADIUS server time is accurate. Refer to our date and time configuration guide.
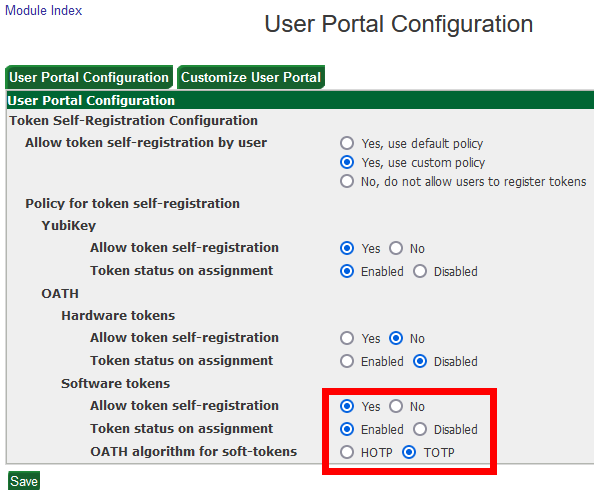
- In GreenRADIUS, in the Global Configuration tab > User Portal screen, make sure the following settings are configured under the "OATH Software tokens" section:
- Allow token self-registration: "Yes"
- Token status on assignment: "Enabled"
- OATH algorithm for soft tokens: "TOTP"
- It is recommended to configure a token label in GreenRADIUS so that users can distinguish their Authenticator app token from other tokens they may have in their app (for personal accounts, etc.). To configure the token label, navigate to the Configuration tab under the GreenRADIUS domain, then enter the token label in the "Token Label Prefix for Google Authenticator" field.
Authenticator App Token Registration Steps
- In a web browser, navigate to the Self Service
Portal at
https://<IP_address_of_GreenRADIUS>/.
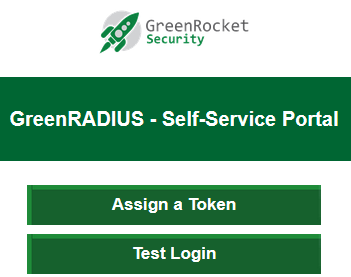
-
Click the "Assign a Token" button. You will then be prompted to log in with your username and password. (If you already have a token assigned, you will be prompted to log in with your assigned token as well.)
-
Once you have logged in, select the "Authenticator app" option at the top of the screen.
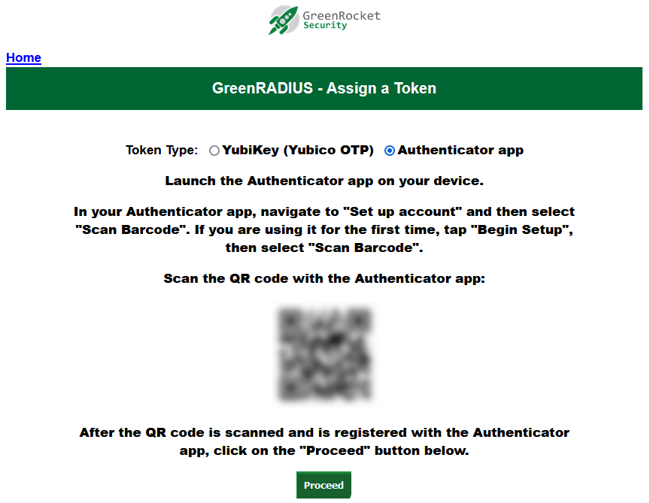
- Using your Authenticator app of choice, scan the QR code. Once you do, it will be displayed as a token in the app:
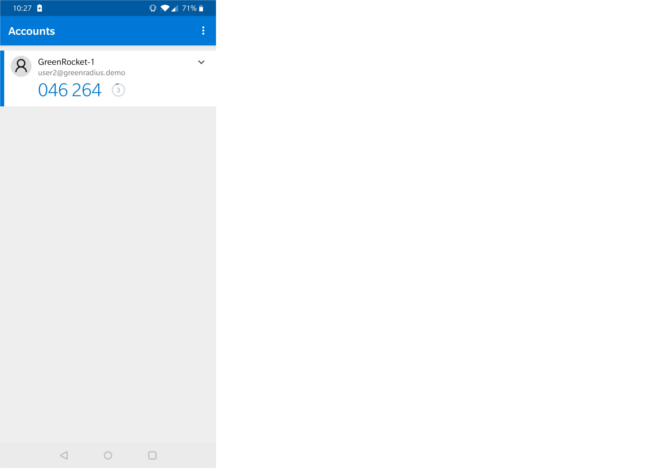
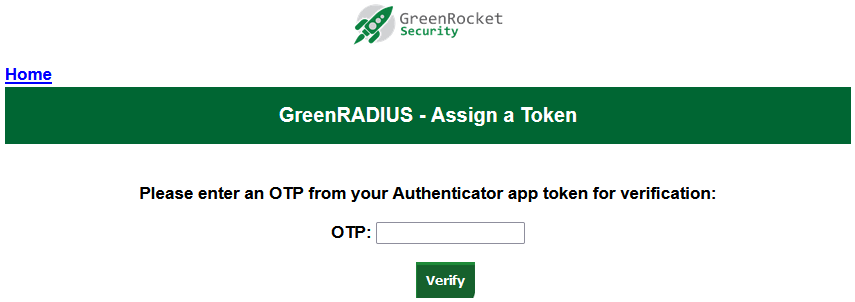
- In the browser, click Proceed. (This is an extremely important step, as clicking Proceed registers the token in GreenRADIUS.) You will be prompted to verify your new Authenticator token by entering the current OTP:
- Once the token is assigned, you will see a success message:
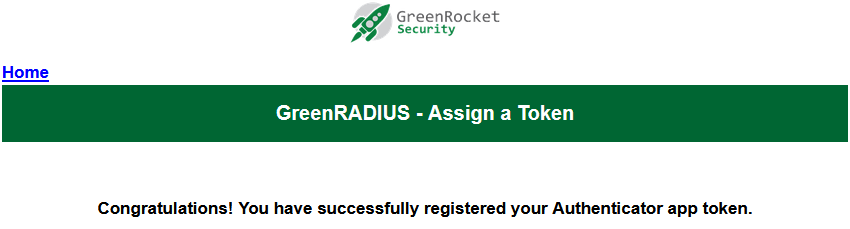
- You can now use your Authenticator token as a second factor.
© 2026 Green Rocket Security Inc. All rights reserved.
"Green Rocket 2FA" Mobile App Registration
NOTE: In order to successfully register our mobile app on iOS devices, you will need to have a valid certificate from a recognized CA installed. This does not apply to Android devices. Also, make sure ports 443 and 9443 are open for communication between GreenRADIUS and the public internet. (Green Rocket Security uses a cloud service for push notifications.)
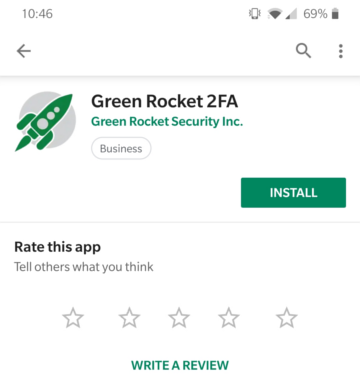
- Download and install the Green Rocket 2FA mobile app from the App Store (on iOS) or the Play Store (on Android):
- Launch the app. A registration screen will be displayed:
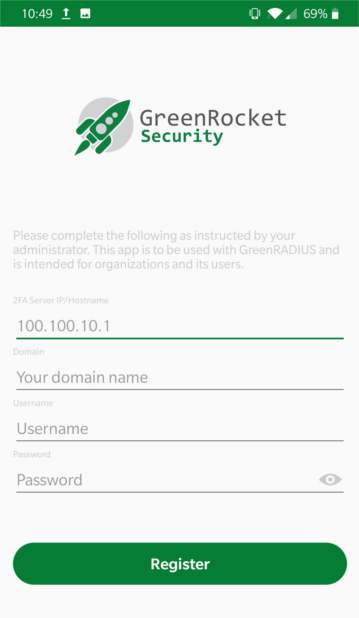
- Enter the IP address or hostname of the GreenRADIUS to connect to, along with the domain the user is in, the username, and password:
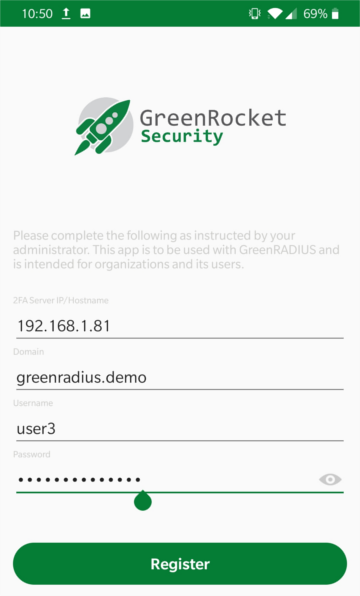
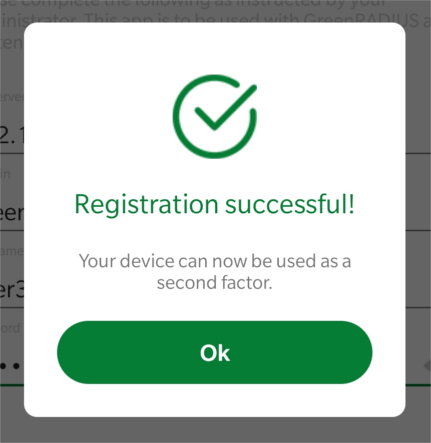
- Tap the Register button. The registration process may take a few seconds, after which you will see a completion message:
-
A PIN will need to be set. This PIN will only be required during login attempts if the phone itself does not already have a lock screen secure setting (PIN, pattern, password, etc.)
-
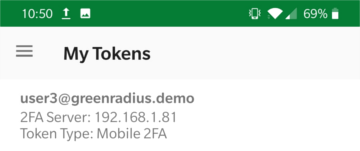
The token will now be displayed in the app.
- You can now use the app as a second factor. When a login request is made and no other token is specified (by appending an OTP to the password or other ways), a push request will be sent to the app:
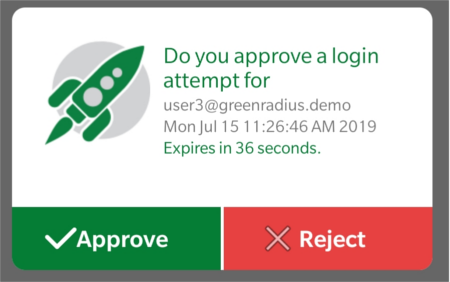
You can tap Approve or Reject on the prompt to verify or deny the authentication attempt.
NOTES:
- For the app on Android, whenever the Android device is rebooted, the Green Rocket 2FA app must be launched once for push notifications to be received.
- Users should make sure devices have notifications enabled for both the device and the Green Rocket 2FA app itself.
- Unlike other tokens supported by GreenRADIUS, the Green Rocket 2FA app token does not sync to other GreenRADIUS instances in a GreenRADIUS High Availability cluster.
© 2026 Green Rocket Security Inc. All rights reserved.
Token Settings
Numerous settings apply to tokens:
Per-user Settings
Single Factor Flag
When set (green checkmark in the Single Factor Flag column), the user can log in without a second factor. This setting is most useful in conjunction with the Auto Provisioning and Gradual Deployment settings described below.
Temporary Token
Selecting a user and clicking "Temporary Token Settings" will bring you to a page where you can add a temporary token to a user. You must specify an expiration date and the maximum number of logins for the temporary token.
Users with valid temporary tokens will have a green checkmark in the Temporary Token column.
Per-domain Settings
Domain configuration can be found under the "Configuration" tab in each GreenRADIUS domain.
Auto Provisioning
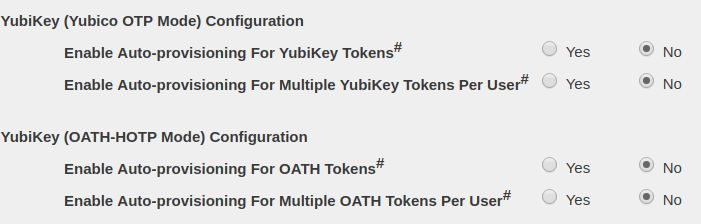
When Auto Provisioning is enabled, the first time a user logs in with a YubiKey OTP, that YubiKey will be automatically assigned to the user. The token assignment will appear on the Users/Groups tab.
The "Enable Auto Provisioning for Multiple Tokens Per User" options allow users to provision multiple tokens to themselves by this method. By default, only users with no tokens already assigned can auto provision.
The per-domain Auto Provisioning setting has no effect if it is not also enabled at a global level in the Global Configuration→General tab. (See below.)
Gradual Deployment

Gradual Deployment allows administrators to roll out the deployment of two-factor authentication gradually, without requiring every user to switch and register a second factor at once. When Gradual Deployment is enabled, the first time a user logs in successfully with a token, his Single Factor Flag is automatically disabled, thus requiring two-factor authentication from that point forward. Gradual Deployment is most useful in conjunction with Auto Provisioning, described above.
Important: Changing this setting from Disable to Enable will set all users to needing only passwords (single factor only) to authenticate, even those users that have tokens assigned or are set to needing tokens to authenticate. You can check each user's requirement under the Single Factor Flag column in the Users/Groups tab. A green check mark means the user only needs a password. A red X means the user needs password and token.
Note: This Gradual Deployment feature is not available for Windows Logon.
Token Label Prefix

The Token Label Prefix is a text string which appears in Google Authenticator and other similar soft token apps to signify which Authenticator token is for GreenRADIUS integrated logins. This text string is configurable, but must not contain spaces.
Global Configuration
Token-related global configuration settings are found under the Global Configuration tab→General heading.
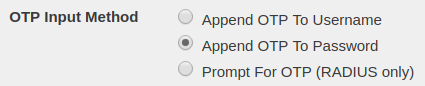
OTP Input Method

This setting controls where users input the OTP during login attempts. It is described in more detail in the Authentication Requests section.
Enable Auto Provisioning
The Global Auto Provisioning settings must be enabled for any of the domain settings to have an effect. If Auto Provisioning is disabled in Global Configuration, no domain will have auto provisioning, irrespective of their domain settings.
© 2026 Green Rocket Security Inc. All rights reserved.
Token Management
You can view which tokens are assigned to each user from the Users/Groups tab of a GreenRADIUS domain or you can view which users are assigned to which tokens on the List Tokens screen.
Importing Secrets
Programmed YubiKeys (whether programmed in traditional Yubico OTP mode or OATH-HOTP mode) have secrets associated with each YubiKey. These secrets files must be imported into GreenRADIUS before the YubiKeys can be used.
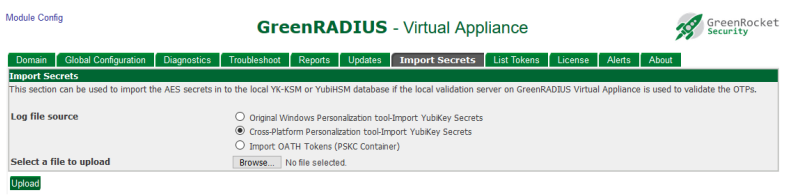
Secrets can be imported under the Import Secrets tab:
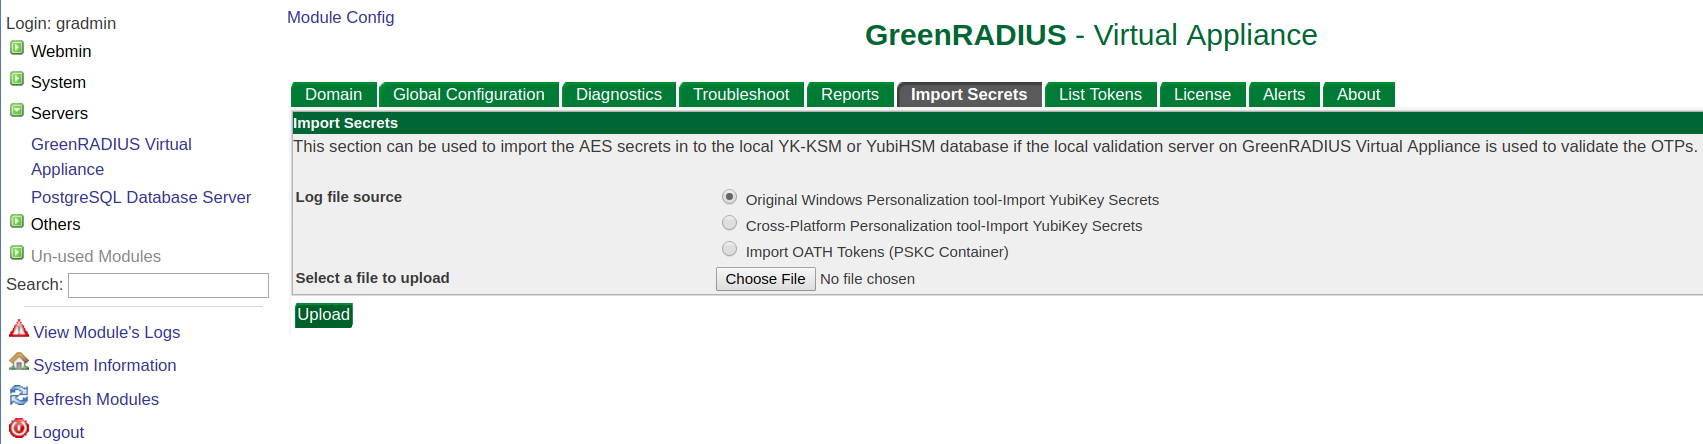
You must select the correct format option depending on which token type you are
importing. If importing YubiKey OTP secrets, select the Cross-Platform option. If importing
OATH token secrets, select Import OATH Tokens.
Once you have chosen a file format, you will be prompted to select the file containing the secrets.
The List Tokens tab
You can view all locally saved tokens in the List Tokens tab. This tab displays every token saved in the GreenRADIUS database (this does not include pre-programmed YubiKeys, as their secrets are stored in the YubiCloud). It also lists the user assigned to each token andthe user's domain.
Token Assignment
There are several ways to assign tokens to users in GreenRADIUS:
Auto Provisioning
Auto Provisioning, described in the previous section, enables users to simply log in with a YubiKey and have it auto-assigned. This is the simplest way to assign YubiKeys (whether OTP or OATH).
Self-Service Portal
The Self-Service Portal allows users to add tokens to themselves manually. It is
accessible at https://<ip address of GRVA>/. From the Self-Service Portal, users
register YubiKeys or Google Authenticator (or similar soft tokens) by scanning a displayed QR
code with their phone.
Administrator Assignment
The GreenRADIUS administrator can manually assign tokens to users from the web admin console in either the List Tokens tab or in the Users/Groups tab of the GreenRADIUS domain.
You will need to enter the user's name in the canonical user@domain format.
Other
Some other methods have their own ways of assigning tokens. U2F tokens are automatically assigned as part of the login process with our 2FA for Windows Logon solution. Our "Green Rocket 2FA" mobile apps have a simple registration process.
© 2026 Green Rocket Security Inc. All rights reserved.
Programming YubiKeys in OTP Mode for GreenRADIUS
1. Introduction
This document will show you how to program YubiKeys in OTP mode so secrets can be "local" in GreenRADIUS instead of using the default YubiKey secrets and using the YubiCloud
2. Prequisites
- Have all YubiKeys that you want programmed with you
- Download and install the Yubico Personalization Tool v3.1.25 (linked here)
3. Programming the YubiKeys
- Open the Yubico Personalization Tool
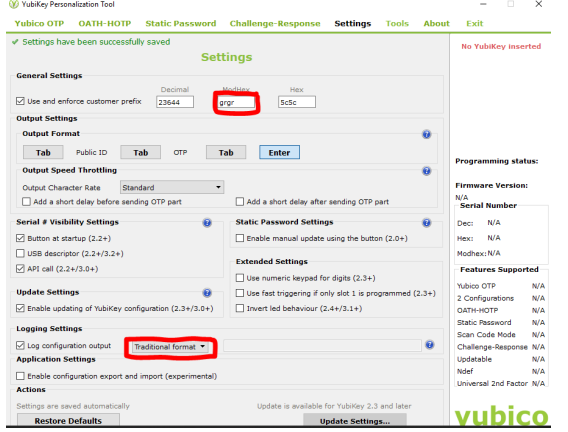
- Select the Settings menu
a. Check the "Use and enforce customer prefix" box, and enter "grgr" in the ModHex field.
b. select Traditional format under Log configuration output
-
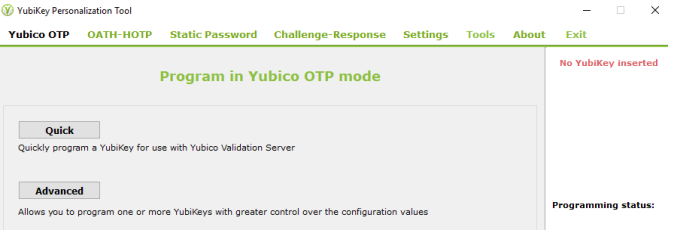
Select the YubiCo OTP menu, and click on Advanced
-
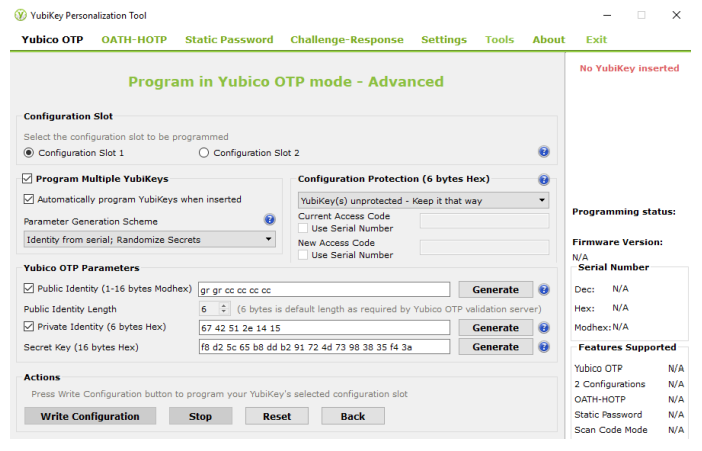
You will see a screen as shown below: a. Select Configuration Slot 1
b. Select Program Multiple YubiKeys
c. Select Automatically program YubiKeys when inserted
d. Under Parameter Generation Scheme, select Identity from serial; Randomize Secrets
-
Insert the first YubiKey and click on Write Configuration. Name the output file to be created and save it somewhere. (Note: Make sure the file name of the output file does not contain spaces.) This file will contain the new secrets of the programmed YubiKeys. Please keep it in a secure place until it is uploaded into GreenRADIUS.
-
The already inserted YubiKey will be programmed, and you will see a success message. Remove the YubiKey.
-
Without exiting the tool, insert the next YubiKey. Wait for the tool to program the inserted YubiKey (you will success message), then remove it. Continue this process this process for the rest of your YubiKeys.
-
After all YubiKeys are programmed, click on Stop, and close the tool.
4. Importing the New Secrets File into GreenRADIUS
-
Open a new browser tab and navigate to the GreenRADIUS web admin console.
-
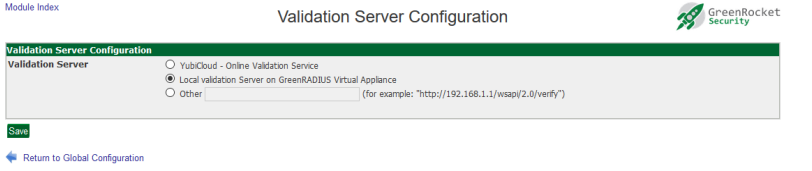
Make sure the validation server is set to "Location Validation Server on GreenRADIUS." You can set this under the Global Configuration tab, Validation Server.
-
Go to the Import Secrets tab.
-
Select "Cross-Platform Personalization tool-import YubiKey Secrets." Then click on "Browse..."
-
Select the new secrets file that was just created.
-
Click on Upload. Do not navigate away from the page. Wait for a success message to appear.
-
After the upload is complete, you can see the newly imported tokens in the List Tokens tab.
© 2026 Green Rocket Security Inc. All rights reserved.
Programming YubiKeys in OATH HOTP Mode for GreenRADIUS
1. Introduction
This document will show you how to program YubiKeys in OATH HOTP mode so OTPs are 18 characters instead of the default 44 characters.
2. Prequisites
- Have all the YubiKeys that you want programmed with you
- Download and install the YubiCo Personalization Tool v3.1.25 (linked here)
3. Programming the YubiKeys
-
Open the YubiCo Personalization Tool
-
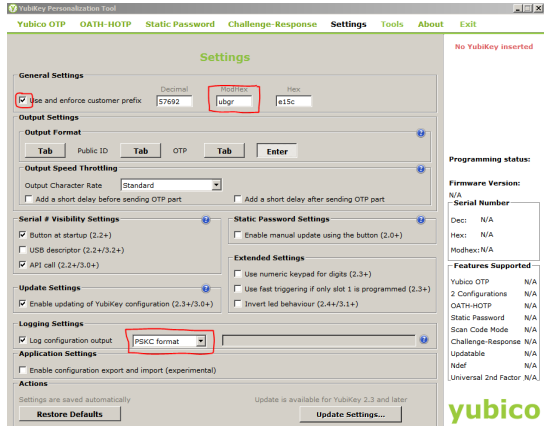
Select the Settings menu
a. Check the "Use and enforce customer prefix," and enter "ubgr" in the ModHex field.
b. Select **PSKC format** under **Log configuration output**
-
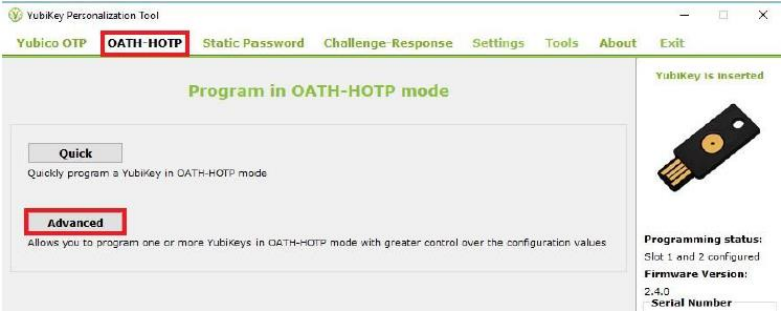
Select the OATH-HOTP menu, and click on Advanced
-
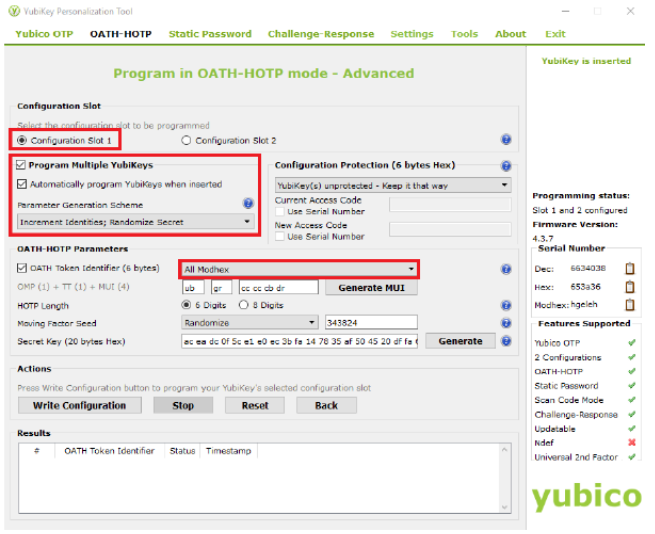
You will see a screen as shown below:
a. Select Configuration Slot 1
b. Select Program Multiple YubiKeys
c. Select Automatically Program YubiKeys when inserted
d. Under Parameter Generation Scheme, select Increment Identities; Randomize Secret
e. Under OATH-HOTP Parameters select All ModHex
-
Set HOTP Length as 6 digits, Moving Factor Seed as "Randomize," and click on Generate to create a random Secret Key.
-
Insert the first YubiiKey and click on Write Configuration. Name the output file to be created and save it somewhere. This file will contain the new secrets of the programmed YubiKeys. Please keep it in a secure place until it is uploaded to GreenRADIUS.
-
The already inserted YubiKey will be programmed, and you will see a success message. Remove the YubiKey.
-
Without exiting the tool, insert the next YubiKey. Wait for the tool to program the inserted YubiKey (you will see a success message), then remove it. Continue to insert, have YubiKey programmed, then remove for the rest of your YubiKeys.
-
After all YubiKeys are programmed, click on Stop, and close the tool.
4. Importing the New Secrets File into GreenRADIUS
- Open a new browser tab and navigate to GreenRADIUS web admin console.
- Make sure the validation server is set to "Local Validation Server on GreenRADIUS." You can set this under the Global Configuration tab, Validation Server.
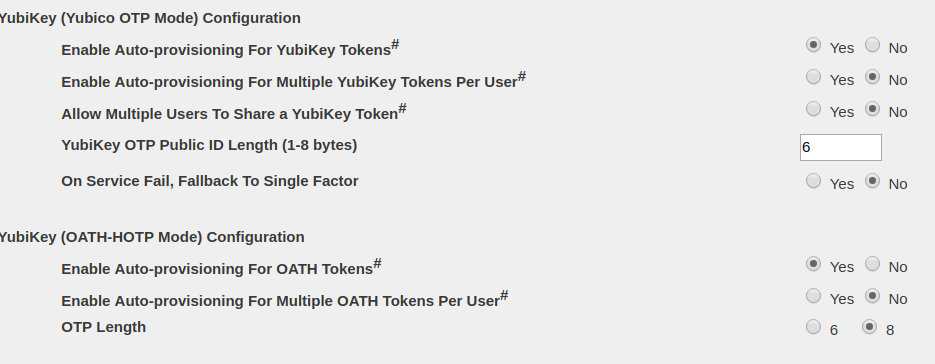
- Also in the Global Configuration tab, in the General settings, set the "YubiKey (OATH-HOTP Mode) Configuration - OTP Length" to 6, then click the Save button.
- Go to Import Secrets tab.
- Select "Import OATH Tokens (PSKC Container)." Then click on "Browse..."
- Select the new secrets file.
- Click on Upload. Do not navigate away from the page. Wait for a success message to appear.
- After the upload is complete, you can see the newly imported tokens in the List Tokens tab.
© 2026 Green Rocket Security Inc. All rights reserved.
Authentication Requests
Request Methods
There are a number of ways GreenRADIUS can integrate with your applications or services including the following:
RADIUS
The RADIUS protocol is a standardized and widely-used authentication request protocol in the security industry. It uses UDP on port 1812.
RADIUS uses a configured shared secret between the client and the server. You can add RADIUS clients and shared secrets in the Global Configuration tab > Client-based Authentication Policies screen:
Note: The following RADIUS protocols are supported by GreenRADIUS:
- PAP
- PEAP
- EAP-TTLS-GTC
CHAP, MS-CHAP, and MS-CHAPv2 are not supported.
Web API
GreenRADIUS provides a modern, REST-style Web API for use in applications that are constrained (e.g. browser applications which don't have direct access to the TCP/UDP stack.)
The Web API is accessed using a simple HTTP POST request with the following
parameters:
https://<ip address of GRVA>/wsapi/ropverify.php?user=<username>&password=<password+OTP>
Windows Login
Green Rocket Security provides a Windows agent which allows Windows logins to enforce two-factor authentication. Any supported token can be used as the second factor (YubiKey, Google Authenticator, "Green Rocket 2FA" mobile apps, etc.) Contact us today for more details.
OTPs
Some token types require an OTP to be submitted (i.e. OTP, OATH, and Authenticator tokens.) By default, the OTP is to be appended to the password.
However, this configuration can be changed in the Global Configuration tab. The OTP Input Method setting allows you to change whether the OTP should be appended to the username, appended to the password, or have a separate field to prompt for the OTP. (The Prompt For OTP option is only available for RADIUS clients that support this feature.)
© 2026 Green Rocket Security Inc. All rights reserved.
2FA for Windows Logon
GreenRADIUS can enforce two-factor authentication for Windows Logon. Our Windows Logon solution works with:
- Windows PCs (Windows 10 and 11)
- Windows Servers (2016, 2019, 2022, and 2025)
- domain-joined
- non-domain-joined
- desktop/physical logon
- RDP logon
- online logons
- offline logons
During configuration, make sure GreenRADIUS is reachable from your Windows machines over ports 443 and 9443. Also, make sure GreenRADIUS has an active license that enables our U2F Module. (You can check this in the GreenRADIUS web admin interface on the License tab.)
Also, if you are adding 2FA to domain-joined Windows machines, make sure GreenRADIUS has a domain whose name matches exactly with the name of the domain that the Windows machines are joined to.
On each Windows machine, a small Green Rocket Security Windows agent will need to be installed when logged in as an administrator. (Contact us for our latest Windows agents.)
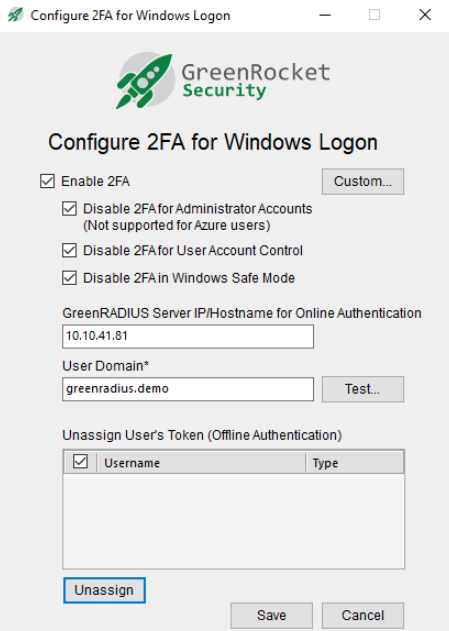
- Enable 2FA: This should be checked to enforce 2FA with GreenRADIUS. If unchecked, 2FA will not be enforced.
- Disable 2FA for Administrator Accounts: If checked, all administrator accounts will bypass 2FA and will only need passwords to log in.
- NOTE: If an offline login is attempted for a domain account, the login will always require 2FA, even if this checkbox is checked and the user is a domain administrator.
- Disable 2FA for User Account Control: If checked, User Account Control (UAC) logins will bypass 2FA and will only need passwords to log in.
- Disable 2FA in Windows Safe Mode: If checked, when Windows is booted in Safe Mode, 2FA will be disabled. (NOTE: In Safe Mode, the agent cannot be uninstalled, but the "Enable 2FA" checkbox can be unchecked.)
- GreenRADIUS Server IP/Hostname for Online Authentication: Enter the IP address or hostname of GreenRADIUS. (The "https://" and ":9443/" will automatically be inserted.)
- User Domain: Enter the GreenRADIUS domain where LDAP users have been imported. (Only one GreenRADIUS domain can be configured.)
After the above has been configured, click the Test button. You should see a successful message appear. If not, double check the GreenRADIUS IP address/hostname and the GreenRADIUS domain, and then try the Test button again.
The Custom... button will allow for more granular 2FA policies on the Windows machine. These policies will override policies in GreenRADIUS. (For example, if user1 has 2FA enforced in GreenRADIUS, but in the Custom... button, user1 is configured to bypass 2FA, user1 will only need a password to log in.)
After configuration, save the settings. You may be asked to restart in order for changes to take effect.
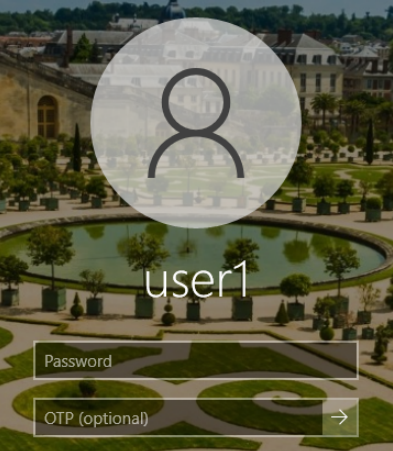
Online Authentication Attempts (GreenRADIUS is reachable)
After entering the username and password, users may use the following tokens for online authentication attempts:
- YubiKey OTP: Insert the YubiKey in a USB port, and with the cursor in the OTP field, touch the YubiKey button.
- YubiKey OATH-HOTP: Insert the YubiKey in a USB port, and with the cursor in the OTP field, touch the YubiKey button.
- FIDO U2F tokens: Insert the FIDO U2F token in a USB port, leave the OTP field blank, and after entering the password, press the Enter key on your keyboard or click the login arrow on the screen. Then touch the FIDO U2F button after it starts to flash. The FIDO U2F token used the first time successfully to log in by the user will automatically be assigned to the user in GreenRADIUS. This auto-provisioning of FIDO U2F tokens is the only way these tokens can be assigned to users.
- Authenticator app: Enter the current OTP from the Authenticator app into the OTP field. Then press Enter.
- Green Rocket 2FA Mobile App: With no token inserted in a USB port, and after entering the password, press Enter. A push notification will be sent to the user's phone to approve or reject the logon attempt. Tap
Approveon the app to log in.
Important Note: For local Windows user accounts, corresponding user accounts with the same usernames as the local user accounts must be present in the LDAP being used with GreenRADIUS. Then, those user accounts will need to be imported into GreenRADIUS. Also important, if tokens using OTPs are going to be used, the LDAP password for these users must be set to Pa$$word@123. This password is not necessary for users using FIDO U2F tokens and the Green Rocket 2FA Mobile App. Local users would still use their local Windows passwords to log in to Windows. (This fixed password will never be used for a Windows login.)
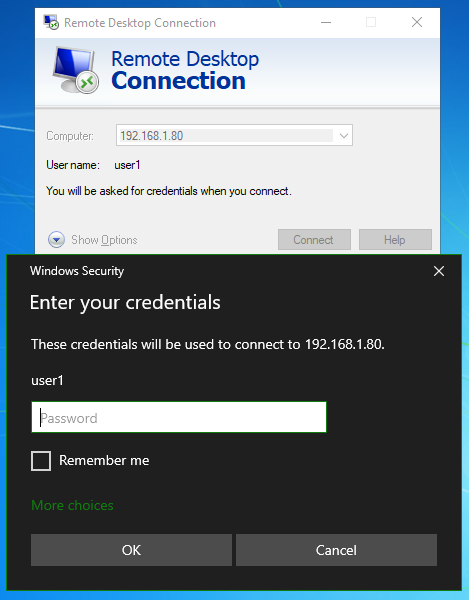
RDP Logon
To log in via RDP, launch the mstsc.exe application. After selecting the IP address or hostname, on the RDP logon screen, enter username and password only.
Once that is successful, users will see the Windows Logon screen. The following tokens can be used:
- YubiKey OTP: Insert the YubiKey in a USB port, and with the cursor in the OTP field, touch the YubiKey button.
- YubiKey OATH-HOTP: Insert the YubiKey in a USB port, and with the cursor in the OTP field, touch the YubiKey button.
- Authenticator app: Enter the current OTP from the Authenticator app into the OTP field. Then press Enter.
- Green Rocket 2FA Mobile App: With no token inserted in a USB port, and after entering the password, press Enter. A push notification will be sent to the user's phone to approve or reject the logon attempt. Tap
Approveon the app to log in.
Note: FIDO U2F tokens cannot be used for RDP logon attempts.
Offline Authentication Attempts (GreenRADIUS is not reachable)
Only FIDO U2F tokens can be used when the Windows machine cannot reach GreenRADIUS. The logon experience will be the same when using FIDO U2F tokens, whether the Windows machine is online or offline. Users will insert the FIDO U2F token in a USB port, leave the OTP field blank, and after entering the password, press the Enter key on the keyboard or click the login arrow on the screen. Then touch the FIDO U2F button after it starts to flash.
The FIDO U2F token used to successfully log in the first time in offline mode will automatically be assigned to the user. Offline FIDO U2F tokens are managed on the Windows agent on the PC or Server, not in GreenRADIUS. To unassign an offline FIDO U2F token, open the agent as an administrator, select the user, and click the "Unassign" button.
Token Type By Login
| Token Type | Online Login | Offline Login | RDP |
|---|---|---|---|
| YubiKey OTP | Yes | No | Yes |
| YubiKey OATH | Yes | No | Yes |
| YubiKey FIDO U2F | Yes | Yes | No |
| Authenticator App | Yes | No | Yes |
| Green Rocket 2FA Mobile App | Yes | No | Yes |
Note: ARM64-based Windows devices are not yet supported by our Windows agent
© 2026 Green Rocket Security Inc. All rights reserved.
GreenRADIUS Windows 2FA - GPO Deployment Guide
Prerequisites
You must have the following for the GreenRADIUS two-factor authentication solution for Windows to be deployed properly via GPO.
- GreenRADIUS v4.3.3.3 or later
- Active Directory users imported into GreenRADIUS
- Shared folder on your machine or network containing MSI setups
- Windows 2FA GPO bundle
Pre-deployment configuration file
- Extract the Windows 2FA GPO bundle into a shared folder on your Domain Server:
GreenRADIUS 2FA for Windows Logon.msigrs_settings.reggrs_cleaner.reg
- Right click on
grs_settings.reg. Choose Open With → Notepad and you will see multiple key-value pairs to set in the Windows registry.
Some of the values for the given keys need to be changed depending on your desired configuration. Please see the following list of parameters (keys), what they mean, and when you should modify (or not) the values corresponding to these keys.
Legend
grsAddress
This points to your GreenRADIUS server, and it can be an IP address or hostname.grsDomain
This points to your target domain in GreenRADIUS.grsErrorLevel
This is used to set the verbosity level of logging, and the default value is dword:00000004. It is advised to leave it as is.enabled
This is the flag that decides whether Windows two-factor authentication (Win2FA) must be enabled or not on your machine. Set it to dword:00000001 to enable Windows two-factor authentication on your machine.byPassAdministrators
This is the flag that decides if Windows 2FA should be enabled for users that fall under the Administrator role. If enabled, administrative accounts won’t be prompted for two-factor authentication. It is set by default and we recommend to leave it as is.safemodeEnabled
This is the flag that decides if two-factor authentication should happen when a user boots into safe mode on a Windows machine. By default it is set to (0) and we recommend to leave it as is.safemodeBypassAdmin
This is the flag that decides if an Administrative account will be prompted for a two-factor authentication on a Windows machine. By default it is set and we recommend to leave it as is.
Group Policy Objects
GreenRADIUS 2FA settings and custom preferences
If custom settings will be configured (such as custom policies for particular AD groups or users), a GPO can be used for these custom settings.
Create a GPO for grs_settings.reg:
-
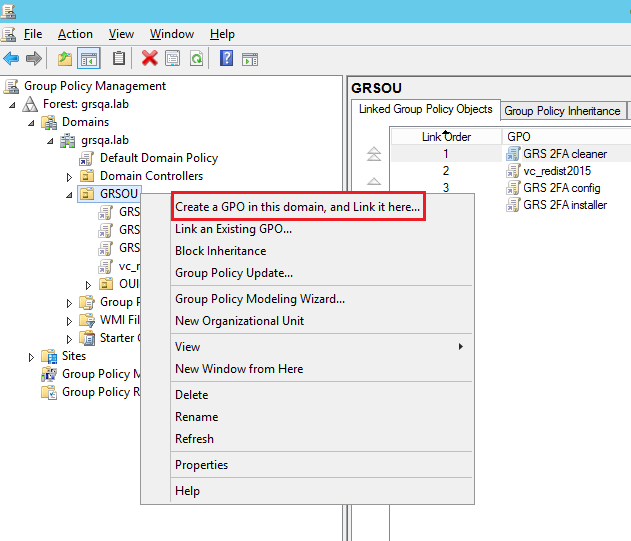
In your Domain Server, open Server Manager, click Tools, and open Group Policy Management.
-
Right click the target Domain/OU/Group and click “Create a GPO in this domain, and link it here...”
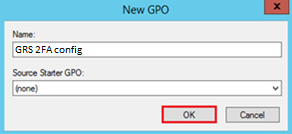
- In the New GPO window, type any name for this new policy e.g. “GRS 2FA config” and then click OK.
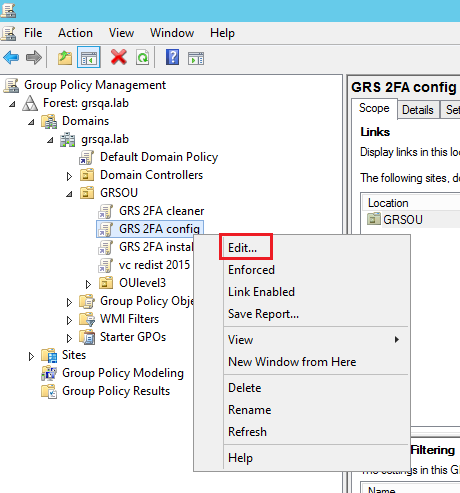
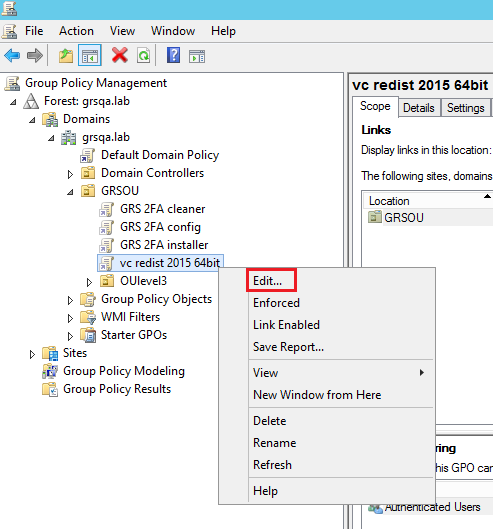
- On the Group Policy Management console, right click the new “GRS 2FA config” GPO and click Edit.
-
In the Group Policy Management Editor, under Computer Configuration, expand Policies, and then expand Windows Settings.
-
Choose Scripts (Startup/Shutdown) and click Startup.
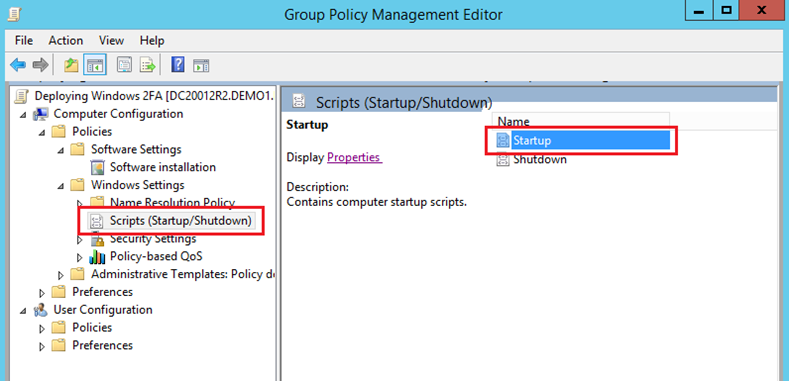
- Click on Show Files and copy/paste “grs_settings.reg” from your shared folder.
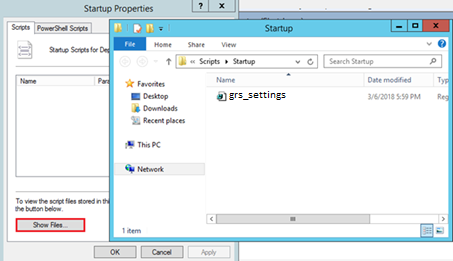
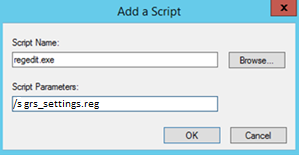
- In the Startup Properties window, click on Add and apply the following:
- Script Name:
regedit.exe - Script Parameters:
/s grs_settings.reg
- Script Name:
-
Click OK.
-
In the Startup Properties window, click OK and close this Group Policy Management Editor.
GreenRADIUS 2FA installer
Create a GPO for software installation:
-
In your Domain Server, open Server Manager, click Tools, and open Group Policy Management.
-
Right click the target Domain/OU/Group and click “Create a GPO in this domain, and link it here…”

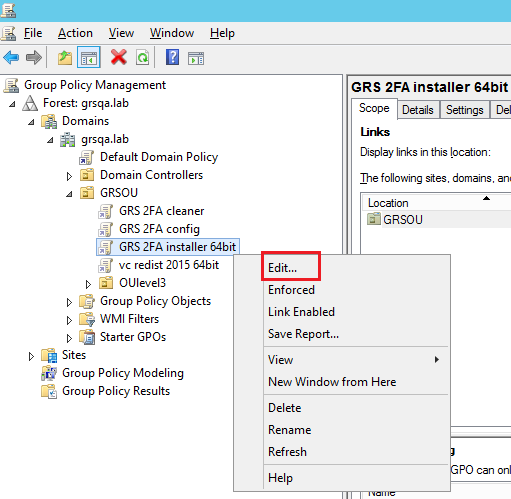
- In the New GPO window, type any name for this new policy e.g. “GRS 2FA installer 64bit” and then click OK.
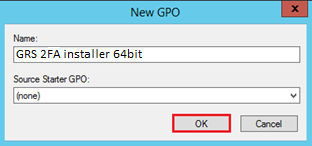
- On the Group Policy Management console, right click the new “GRS 2FA installer 64bit” GPO and click Edit.
-
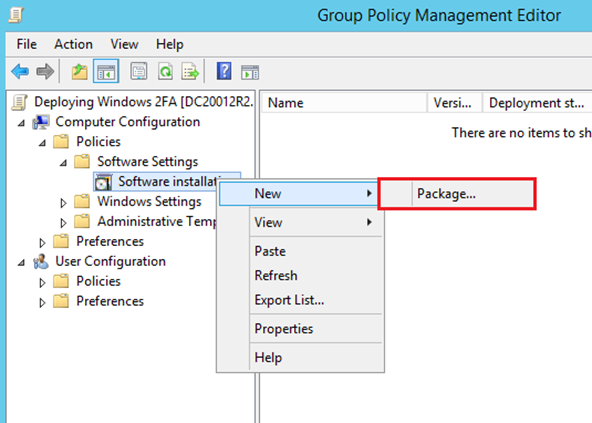
In the Group Policy Management Editor, under Computer Configuration, expand Policies, and then expand Software Settings.
-
Right click Software installation. From the context menu, click New, and then click Package.
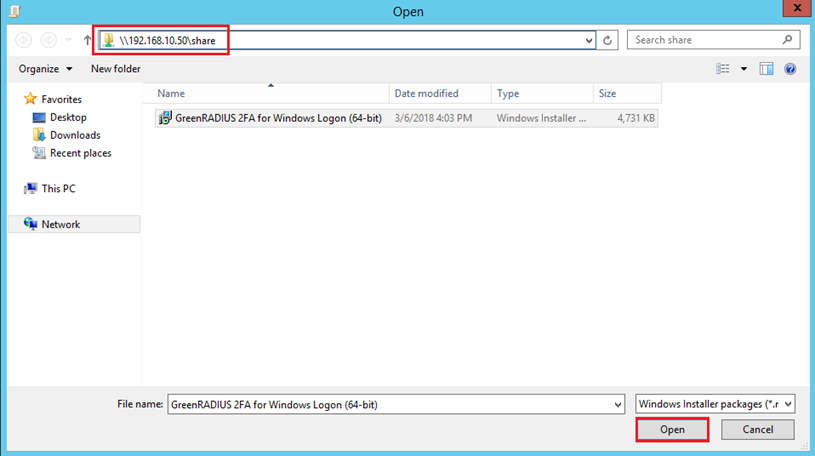
- In the Open dialog box, browse to
\your_server_ip\shared_folder, click on “GreenRADIUS 2FA for Windows Logon.msi”, and then click Open.
-
On Select deployment method, select Assigned.
-
Click OK to complete the setup.
-
Wait for a few seconds and verify that GreenRADIUS 2FA for Windows Logon is listed in the Group Policy Management Editor.
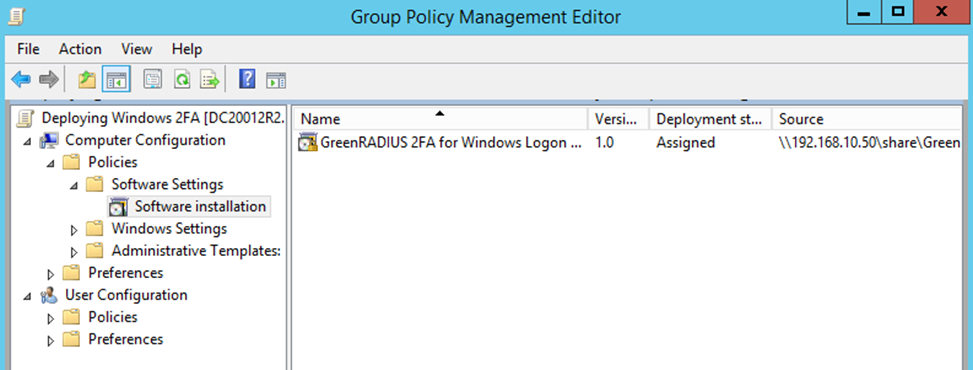
- Close this Group Policy Management Editor
Group Policy Link Order
Click on your target Domain/OU/Group, the GPOs should reflect the following link order:
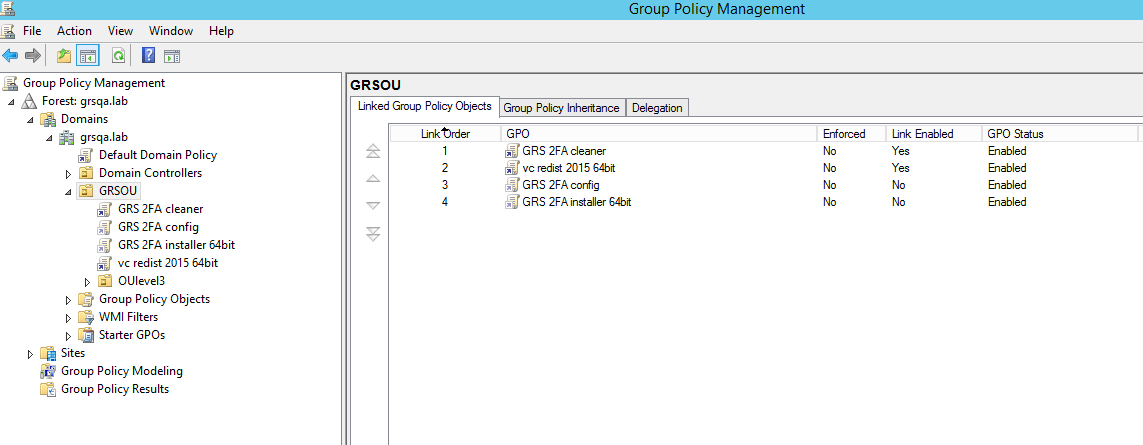
- GRS 2FA cleaner (optional – needed when updating from 1.0.8 or below)
- GRS Offline token unassignment (optional)
- GRS 2FA config
- GRS 2FA installer 64bit
The installer looks for the GRS 2FA config provided, however a system reboot is required to fully enable GreenRADIUS 2FA for Windows.
GRS Offline Token Unassignment
GreenRADIUS offline U2F token assignments can unassigned via GPO. (This can be done per user to multiple machines.) Create a GPO for offline U2F token unassignment.
-
On your Domain Controller, open Server Manager, click Tools, and open Group Policy Management.
-
Right click the target Domain/OU/Group and click “Create a GPO in this domain, and link it here…”

- On the Group Policy Management console, right click the newly created GPO and click Edit.
-
In the Group Policy Management Editor, under Computer Configuration, expand Preferences, and expand Windows Settings then Registry.
-
Add new entry, Action should be Delete then specify key path accordingly.

For Domain Users:
KeyPath: SYSTEM\CurrentControlSet\Software\GRS\OfflineUsers\DomainUsers\username
For Local Users:
KeyPath: SYSTEM\CurrentControlSet\Software\GRS\OfflineUsers\LocalUsers\username
© 2026 Green Rocket Security Inc. All rights reserved.
LDAP Authenticator Module
The GreenRADIUS LDAP Authenticator Module enables a way to implement two-factor authentication for applications and services that support authentication requests over the LDAP protocol. At times, it is advantageous to integrate third-party applications and services over LDAP instead of RADIUS, Web APIs, or other ways.
Prerequisites
- GreenRADIUS v5.3.1.1 or above
- GreenRADIUS license that enables the LDAP Authenticator Module
- If GreenRADIUS has multiple domains configured on the Domain tab, only the users in the default domain will be able to log in
- Certificate installed in GreenRADIUS from a trusted CA
- Third-party application that supports authentication requests over the LDAP protocol
Steps To Configure the LDAP Authenticator Module
-
Click on the Global Configuration tab. Then click the LDAP Authenticator Module icon.
-
Enter the following configuration parameters:
- Multi-Factor Policy Choose which multi-factor policy you want enforced when users log in

- Click the Update button
Steps To Configure Your Third-Party Application (LDAP client)
Typically, the following configuration parameters need to be specified:
- Base DN: The base DN to configure is indicated at the top of the LDAP Authenticator Module screen. It is based on the currently configured default domain in GreenRADIUS.
- Bind DN: The bind DN to configure is indicated at the top of the LDAP Authenticator Module screen. It should be in DN format (not just a username). It can be another user in the same domain if the user is imported into GreenRADIUS. Also, if a different user is used, the user should be single-factor enabled in GreenRADIUS.
- Password: Enter the password of the bind DN user.
© 2026 Green Rocket Security Inc. All rights reserved.
PIN Authentication
GreenRADIUS offers the ability to use a PIN instead of an LDAP password or as an additional authentication factor when this premium feature is enabled. PINs can be set per user, and the policy to use a PIN can be configured for each RADIUS client served by GreenRADIUS.
The first step is to enable PIN authentication for the desired RADIUS client. On the Global Configuration tab > Client-based Authentication Policies screen, when adding a new RADIUS client or when editing an existing one, the "Multi-Factor Policy" can be selected from the dropdown list:
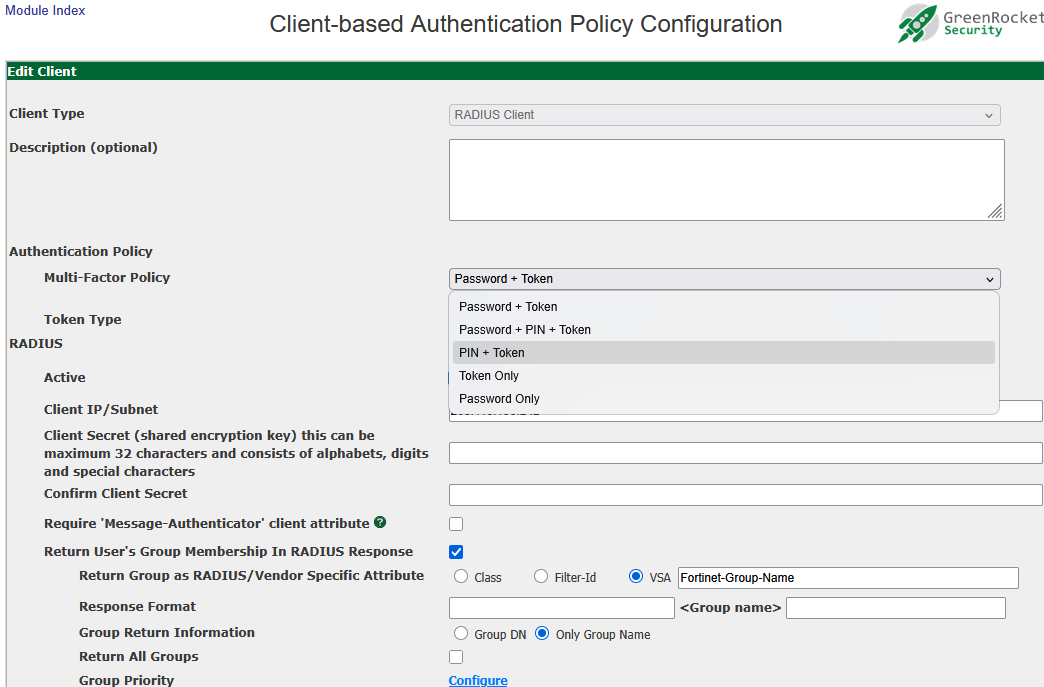
From this list, admins can select to use standard LDAP password authentication (Password+Token), to use the PIN in addition to the LDAP password (Password+PIN+Token), or to exclude the LDAP password entirely and use PIN authentication alone (PIN+Token).
When the PIN feature is enabled, an extra column labelled "PIN Status" will display next to each user in the Users/Domains tab:

From here, admins can select a user and click "Set/Update PIN" to change the PIN for the user:

Users can also set their own PINs from the Self-Service Portal by
clicking the "Assign/Change PIN" button. Once authenticated,
users will be prompted to enter a new PIN:

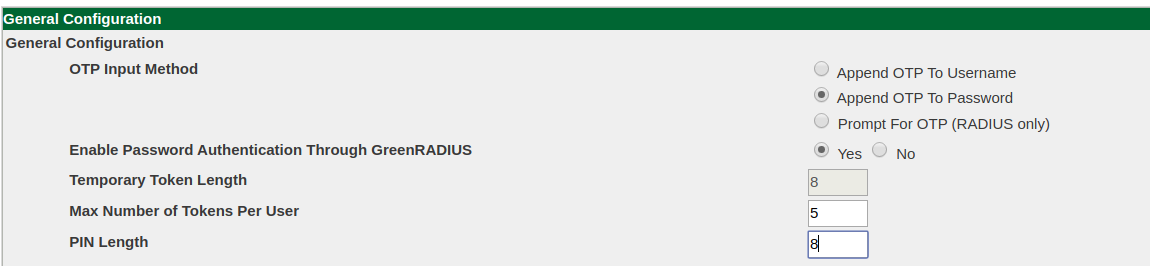
Note that PINs must have a certain length based on a PIN length policy. This is set to 8 digits by default, but can be changed in the Global Configuration tab under the General heading:
Note: This PIN feature is only available for applications and services configured as RADIUS clients in GreenRADIUS.
© 2026 Green Rocket Security Inc. All rights reserved.
Date and Time Configuration
Basic Configuration
By default, GreenRADIUS uses the hardware clock to provide the system time.
The date command allows you to access and edit the system time relative to the current timezone:
~$ date
Mon Jun 10 22:10:31 UTC 2019
The timezone can be changed using the timedatectl command:
sudo timedatectl set-timezone <timezone>
A complete list of timezone specifiers can be obtained by running:
sudo timedatectl list-timezones | less
Once the timezone has been correctly set, use these commands to edit the system date and time.
sudo timedatectl set-time YYYY-MM-DD
and
sudo timedatectl set-time HH:MM:SS
(Time synchronization may be enabled, which may prevent manually updating the date and time. This can be disabled with this command: sudo timedatectl set-ntp 0. To re-enable time synchronization: sudo timedatectl set-ntp 1.)
If the system clock is already set when the timezone is changed, setting the timezone adjusts the system clock to remain temporally consistent. For example, the UTC timezone is 7 hours ahead of PDT. Therefore if the system clock registers ‘08:15 UTC’ and then timezone is changed to PDT, the system will now display ‘01:15 PDT,' which is the equivalent time.
Setting the clock back in time often has disastrous consequences for long-running programs which depend on the clock always moving forward. This should be avoided whenever possible.
Network Time Protocol
NTP (Network Time Protocol) allows you to synchronize the clocks of multiple servers to a single canonical source over the network. NTP is designed to correct for network latency and ensure that all server clocks are synchronized and monotonic (they never move backwards while adjusting to synchronize with each other.) This section explains how to configure the NTP client on your GreenRADIUS instances, providing greater consistency in timestamps and logging data.
Out of the box, GreenRADIUS comes with NTP synchronization available but not
activated. To use NTP, first ensure that NTP is enabled with the
sudo timedatectl set-ntp true command. Next, configure NTP sources by
editing the /etc/systemd/timesyncd.conf file.
You can add NTP servers by adding lines of the form
NTP=<IP address or hostname of server> at the marked location
in the file. Once the file is edited and saved, you'll need to restart the
time server by running sudo systemctl restart systemd-timesyncd.
If NTP servers are configured and NTP is enabled, sudo timedatectl show-timesync --all will
display detailed synchronization info for the configured NTP providers.
© 2026 Green Rocket Security Inc. All rights reserved.
Certificates
The GreenRADIUS web admin interface GreenRADIUS's Web API are served exclusively over HTTPS. GreenRADIUS supports both self-signed certificates and certificates from certificate authorities.
The Global Configuration→Certificates tab will allow you to upload new certificates into your GreenRADIUS instance.
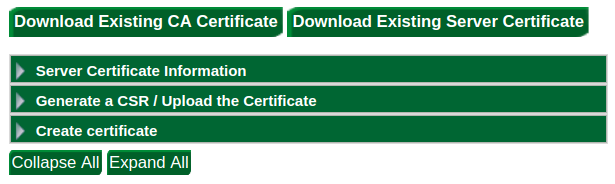
The Server Certificate Information segment displays the credentials of the certificate being served and the Certificate Authority. The Create Certificate segment will allow you to generate and upload your own self-signed certificate (CSR).
To upload a certificate from a trusted provider, open the Upload a certificate
segment and select Upload a certificate created with the CSR generated externally.
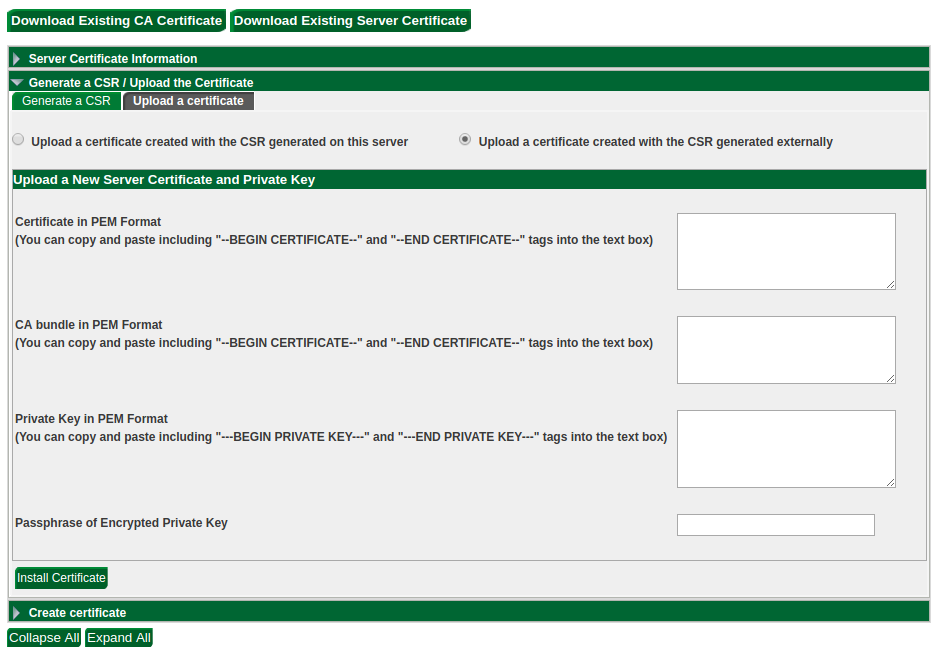
You will need to copy and paste the certificate, the complete trust chain extending back either to a Certificate Authority or to yourself (if the certificate is self- signed), and the private key. If the certificate was created with a passphrase, you'll need to provide that too.
Once uploaded, the GreenRADIUS instance will display a completion message. From this point on the certificate will be served as the SSL security for all web admin interface and Web API accesses.
© 2026 Green Rocket Security Inc. All rights reserved.
Debugging and Reports
The Troubleshooting tab
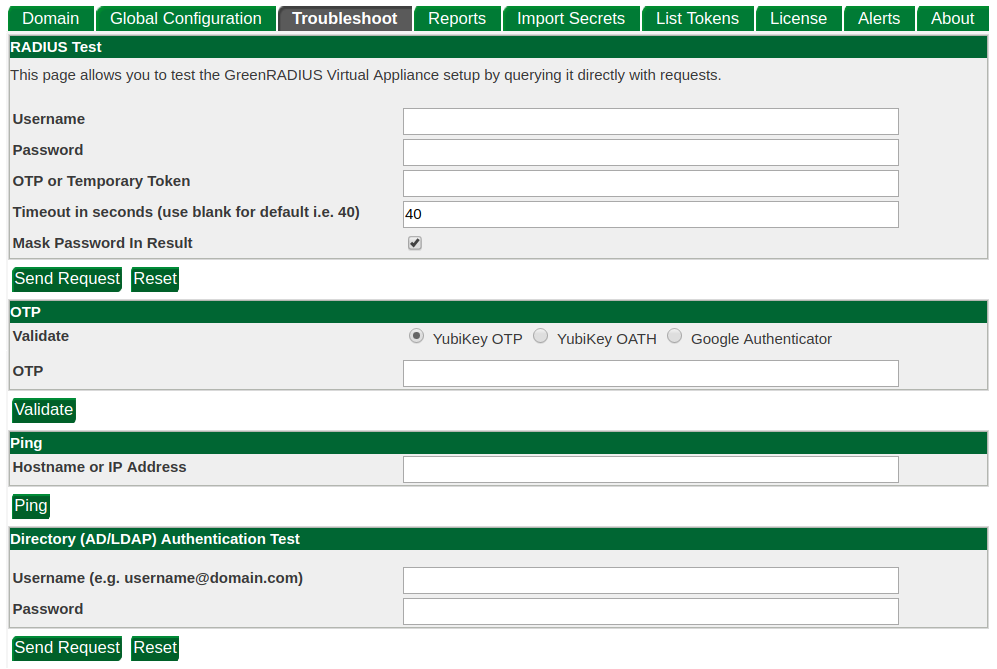
If you need to troubleshoot your GreenRADIUS configuration, the Troubleshooting tab offers several tests you can perform to triage the problem:
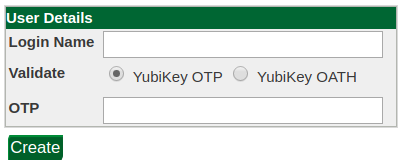
- The RADIUS test allows you to send a RADIUS request, bypassing the RADIUS IP address/secret filter.
- The OTP test allows you to validate an OTP. This will help ensure that the secrets are correctly uploaded, the OTP is synced (if it is an OATH token), and the validation settings are correct.
- The Ping test helps to ensure that an IP address or hostname is accessible by GreenRADIUS and that there is something on the other end.
- The LDAP test performs an authentication using LDAP only without a second factor.
The Reports tab

Three types of report can be generated by GreenRADIUS. These reports list all events of a certain type. They can be filtered by date, time, and other filters to produce more informative results.
Authentication Requests
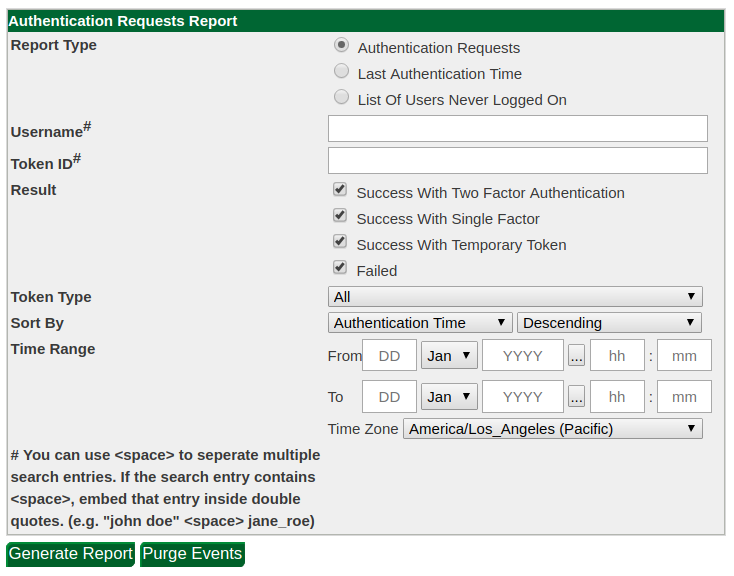
An authentication request report lists all authentication attempts that have reached GreenRADIUS, whether they were successful or rejected. The report can be filtered by date, user, token type, and other filters.
Token Assignment
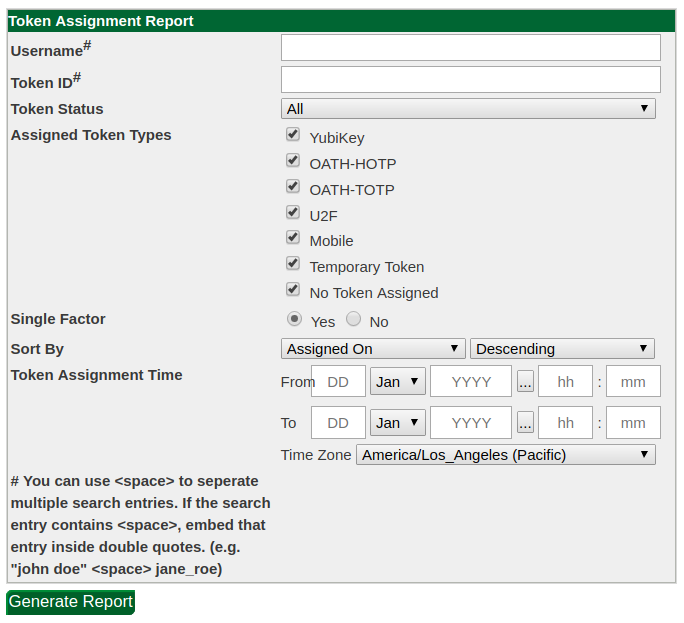
The token assignment report lists the time at which each token was assigned to a user. Like the authentication request report, it supports filtering by token type and token status.
Support Package
If you have a problem and contact GreenRADIUS support, you may be asked to generate a support package. This is an archive containing a copy of GreenRADIUS internal state and log files which provide more insight into any configurations and login attempts.
Generating a support package is done in the Global Configuration→Logging tab:
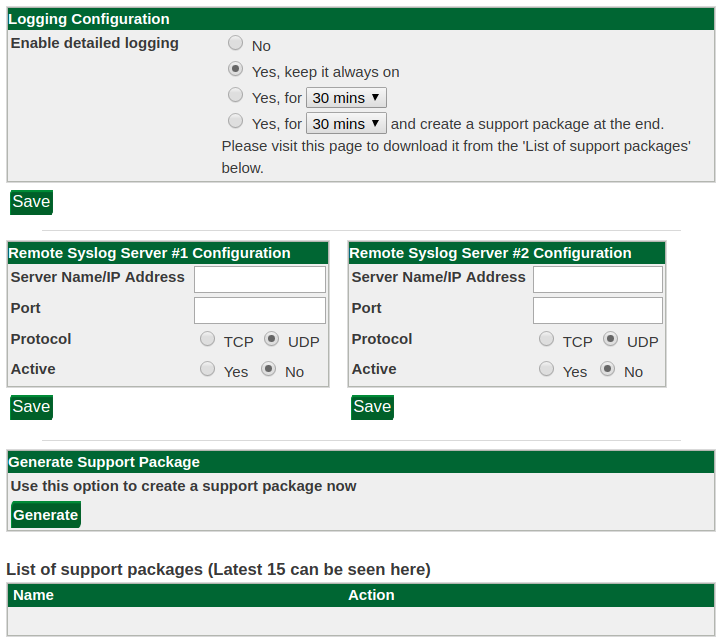
Click the Generate button to create a new support package. This may take time. When the package is ready, it will be displayed along with the 15 most recent packages for download:

You can then download the package and send it to Green Rocket Security to enable the Support team to better assist you.
Please note - If the issue is related to login attempts, it will be very helpful if detailed logging is enabled during the login attempts. These will then be captured in the support package and give the Support team more details to review.
© 2026 Green Rocket Security Inc. All rights reserved.
Maintenance
License Files
GreenRADIUS licenses grant you a certain number of user-token assignments for a certain period of time. When the current license file expires, it is necessary to install a new one. Licenses can be obtained by emailing sales@greenrocketsecurity.com.
License installation is done from the License tab.
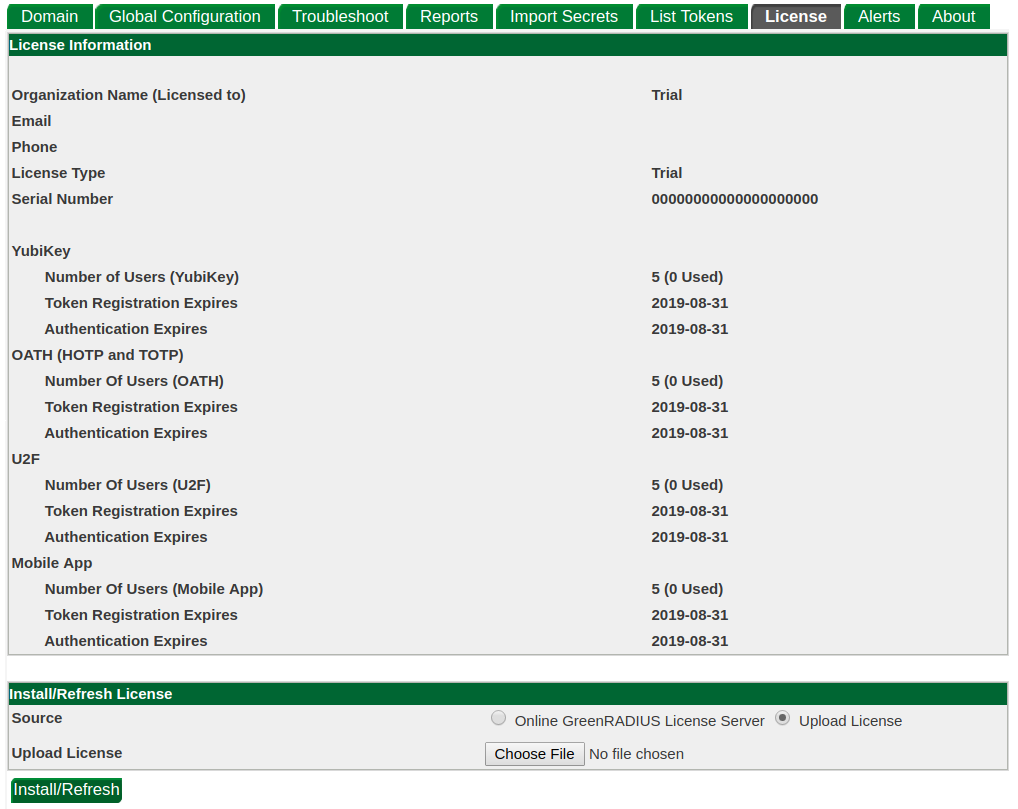
The license tab displays the licensee, the expiration date of the currently installed license, and the number of user-token assignments of each type used out of the maximum allowed. To install a new license, click the Choose File button and select a license file to upload.
Once the new license is installed, you will see a completion message, and the license information will be updated.
Updates
GreenRADIUS updates are generally released monthly. Updates and release notes (including steps to apply the updates) are distributed to customers via email.
Updates include enhancements and security patches for the entire GreenRADIUS VM, from the operating system to the containers. There is no need to update any GreenRADIUS component manually or individually, outside of the updates provided by Green Rocket Security.
© 2026 Green Rocket Security Inc. All rights reserved.
Appendix
© 2026 Green Rocket Security Inc. All rights reserved.
Configuring Our GRS PAM Module for 2FA for RedHat, CentOS, or Ubuntu
Introduction
GreenRADIUS can be used to enforce two-factor authentication for access to RedHat, CentOS or Ubuntu machines. One way to do this is with our custom GRS PAM Module. Our GRS PAM Module uses HTTPS communication instead of RADIUS, avoiding the need to manage each machine as a RADIUS client.
The following login methods can be protected with the GRS PAM Module:
- SSH
- console
sudo- GNOME
Contact us today to evaluate GreenRADIUS with our custom GRS PAM Module.
Prerequisites
- GreenRADIUS with users imported and reachable from the client machine running RedHat 7, 8, or 9 or Ubuntu 20, 22, or 24
- Users imported into GreenRADIUS from your LDAP must have matching usernames with local user accounts on the Linux machine
- GRS PAM Module from Green Rocket Security (at least v2.7.1).
- If SELinux is installed on the client machine (it is usually installed by default on RedHat), then you will need to do one of the following:
- Set SELinux to disabled or permissive mode. You can change this setting in the
/etc/selinux/configfile. After editing the file, reboot your system for the changes to take effect. - After you have unpacked the files from the module archive (step 2 below), run
sudo chcon system_u:object_r:lib_t:s0 grs_pam.soin your terminal to set the appropriate security context on the module.
- Set SELinux to disabled or permissive mode. You can change this setting in the
- You will need a version of Python and the corresponding Requests module.
- RedHat:
sudo yum install python3andsudo pip3 install requests - Ubuntu:
sudo apt install python3 python3-requests
- RedHat:
Steps
-
Run
sudo su -to enter super user mode -
Unpack the provided module archive. You should have three files:
make_request.py,config, andgrs_pam.so. -
Run
chmod +x make_request.py -
Run
chmod +x grs_pam.so -
Run
mkdir /etc/grs-pam -
Run
mv make_request.py /etc/grs-pam -
Run
mv config /etc/grs-pam -
Move the
grs_pam.soto the appropriate location depending on your OS:- RedHat:
/lib64/security - Ubuntu:
/lib/x86_64-linux-gnu/security
- RedHat:
-
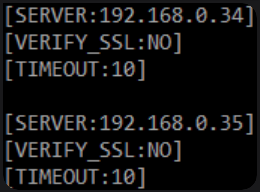
Edit the /etc/grs-pam/config file to update the following:
- SERVER: the IP address/hostname of the GreenRADIUS instances or a list of IP addresses/hostnames
- e.g.
[SERVER:greenradius]
- e.g.
- VERIFY_SSL: flag to enable/disable peer certificate verification
[VERIFY_SSL:YES]- for enforcing certificate verification[VERIFY_SSL:NO]- for disabling certificate verification
- CERT: the absolute path to a CA_BUNDLE file or directory of trusted CA certs to be used to verify the GreenRADIUS certificate
- e.g.
[CERT:/etc/ssl/certs/ca-bundle.crt] - NOTE: If a directory is specified with CERT, it must have been processed using the c_rehash utility supplied with OpenSSL.
- e.g.
- TIMEOUT: the number of seconds the PAM module will wait for GreenRADIUS to respond
- e.g.
[TIMEOUT:10]
- e.g.
- SERVER: the IP address/hostname of the GreenRADIUS instances or a list of IP addresses/hostnames
-
Edit the
sshdconfiguration to setChallengeResponseAuthenticationandKbdInteractiveAuthenticationtoyeswherever they occur. The default configuration file is found in/etc/ssh/sshd_config, but there may beIncludecommands in this file which link it to other files, so those will need to be searched as well. Note thatChallengeResponseAuthenticationorKbdInteractiveAuthenticationmay occur multiple times across those files, or even in the same file; be sure to set all occurrences toyes. -
Run
service sshd restart.
It is possible to configure multiple GreenRADIUS servers by using a set of SERVER directives. Timeout and certificate settings must be configured separately for each server with the appropriate TIMEOUT, VERIFY_SSL, and CERT directives. In this configuration, the PAM module will attempt to contact each server in turn. If one server fails to respond, the next is tried. This is useful for high availability configurations.
- Edit one of the following files depending on which login method(s) you want to protect:
- SSH:
/etc/pam.d/sshd - console:
/etc/pam.d/login sudo:/etc/pam.d/sudo- GNOME:
/etc/pam.d/gdm-password - GNOME Screen Lock:
/etc/pam.d/gnome-screensaver
- SSH:
- Add this line at the top of the file:
auth required grs_pam.so. - If you would like password and OTP to be prompted for separately, add the word
separate_otp_promptto the end of the previous line:auth required grs_pam.so separate_otp_prompt. Note that this will not work for all authentication methods, as not all permit custom prompts. - Add a
#in front of the following line to comment it out:- RedHat:
auth substack password-auth - Ubuntu:
@include common-auth
- RedHat:
- Try a test login attempt with a user. In the password field, enter Password+OTP (append OTP to the end of the password), then hit Enter.
If you have any questions during your evaluation or configuration, please do not hesitate to contact us!
Note for advanced users
For advanced users designing more complex PAM authentication flows, note that
the GRS PAM HTTPS Module only returns PAM_SUCCESS or PAM_FAIL, never any other code.
This behavior will not change in future updates unless gated behind a command-line option.
© 2026 Green Rocket Security Inc. All rights reserved.
Integration Guide for FortiGate VPN
Before starting, make sure GreenRADIUS is configured with users imported from your LDAP and can communicate with your FortiGate
Configuring GreenRADIUS for FortiGate VPN
In the GreenRADIUS web admin interface, add the FortiGate VPN as a RADIUS client.
- Click the Global Configuration tab
- Click the Client-based Authentication Policies icon
- Enter the IP address of the FortiGate. Then enter the same RADIUS secret twice. Then click the Add button.
Configuring the FortiGate VPN
Add GreenRADIUS as a RADIUS Server
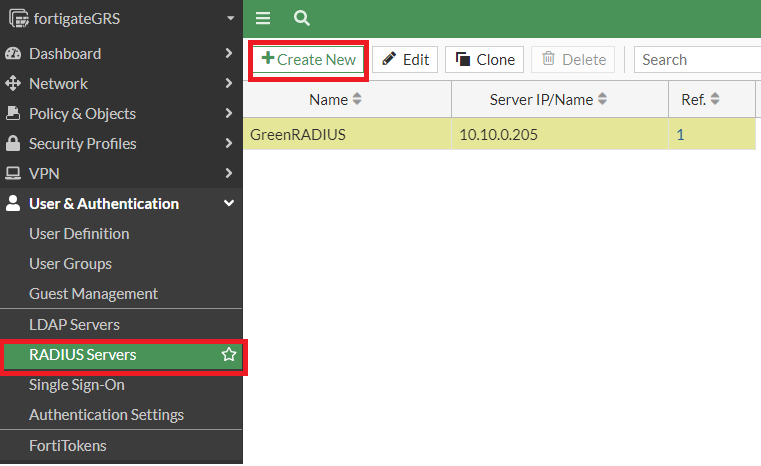
- Log in to FortiGate
- Open the User & Authentication menu, select RADIUS Servers, and click the "+ Create New" button
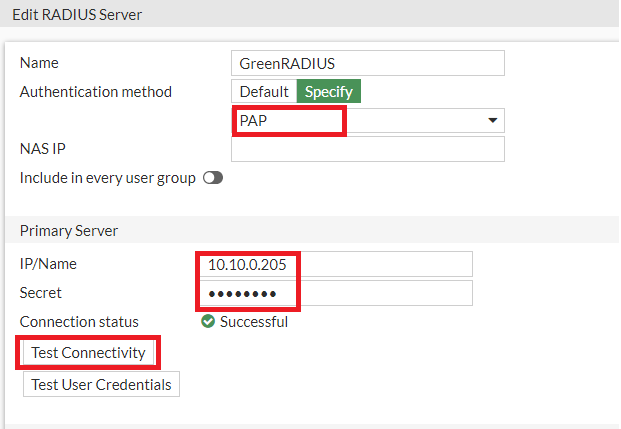
-
Configure the following fields
- Name: GreenRADIUS
- Authentication method: Specify PAP
- Primary Server IP/Name: [the IP address of GreenRADIUS]
- Primary Server Secret: [the same RADIUS secret configured in GreenRADIUS for the FortiGate RADIUS client]
-
Use the Test Connectivity and Test User Credentials buttons to verify the above settings
-
Click OK
Create a user group
- From the User & Authentication menu, select User Groups, and click the "+ Create New" button
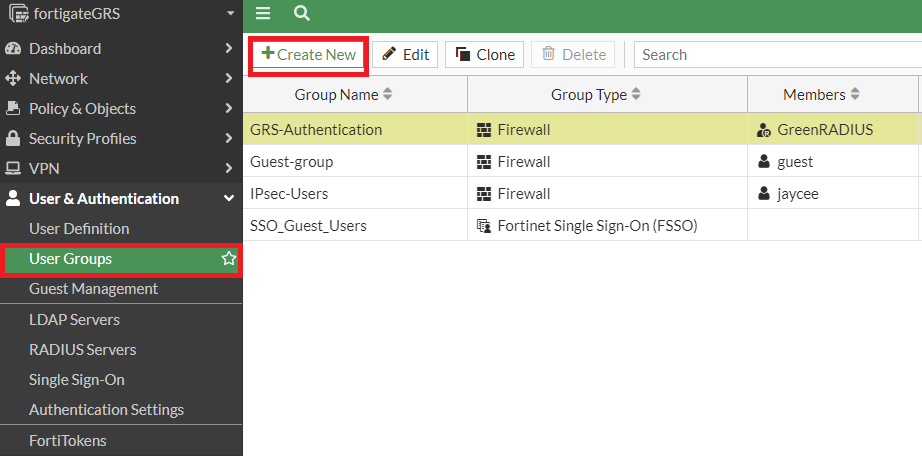
- Configure the following fields:
- Name: [as desired, for example, "GRS Authentication"]
- Type: Firewall
- Members: [leave this field empty]
- Remote Groups: Click the "+ Add" button, set Remote Server as "GreenRADIUS" and Groups as "Any"

- Click OK
- The new user group should now be listed

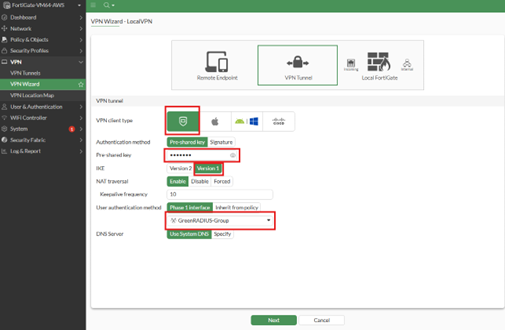
IPsec VPN Configuration
- From the VPN menu, select VPN Wizard Set "Tunnel name" and select template "Remote Access" and then click Begin

- Configure the following fields:
- VPN Client Type: FortiClient
- Pre-shared key: [This is a credential for the VPN and should differ from any user password]
- IKE: Version 1
- User authentication method group: [select the one created above]
- Click Next
- Configure the following fields:
- Addresses to assign to connected endpoints: [as desired]
- Subnet for connected endpoints: [as per your network settings]
- Click Next
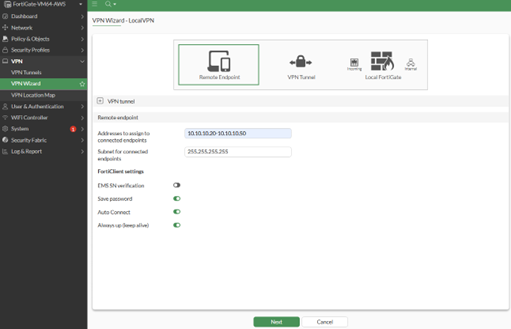
- In the FortiClient settings, set as desired, however, we recommend not saving passwords, especially if OTPs will be used as the second factor.
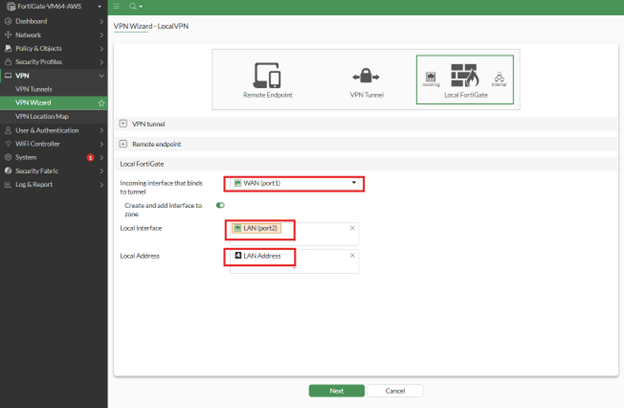
- Configure the following fields:
- Incoming interface that binds to tunnel: [Firewall WAN]
- Local Interface: [LAN interface of your network]
- Local Address: [the local network address]
- Click Next
- Review the configuration, then Submit

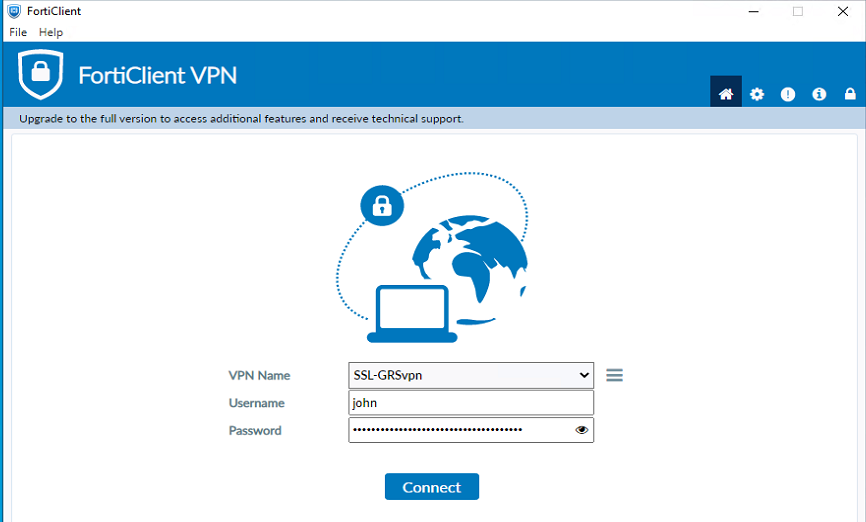
- The IPsec integration with GreenRADIUS is now complete. In the FortiClient, the required settings are:
- VPN: IPsec VPN
- Remote Gateway: IP address or hostname of your FortiGate
- Authentication Method: Pre-shared key, and enter the key configured above
- VPN Settings: [Please make sure that it matches the information in the Firewall configuration]
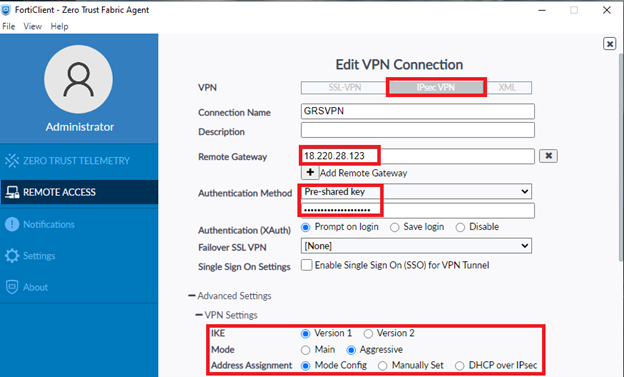
(Above) FortiClient end settings
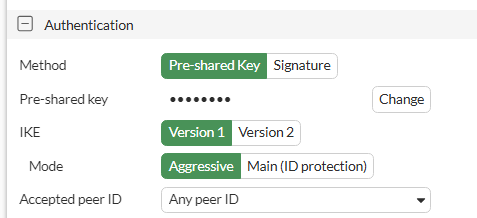
(Above) Firewall end settings
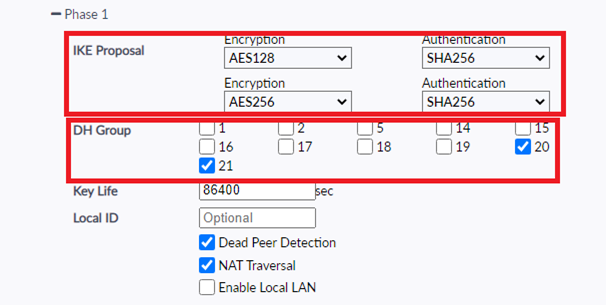
(Above) Phase 1 proposal FortiClient end settings
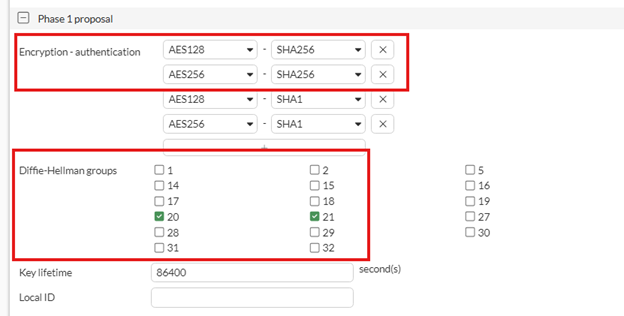
(Above) Phase 1 proposal Firewall end settings
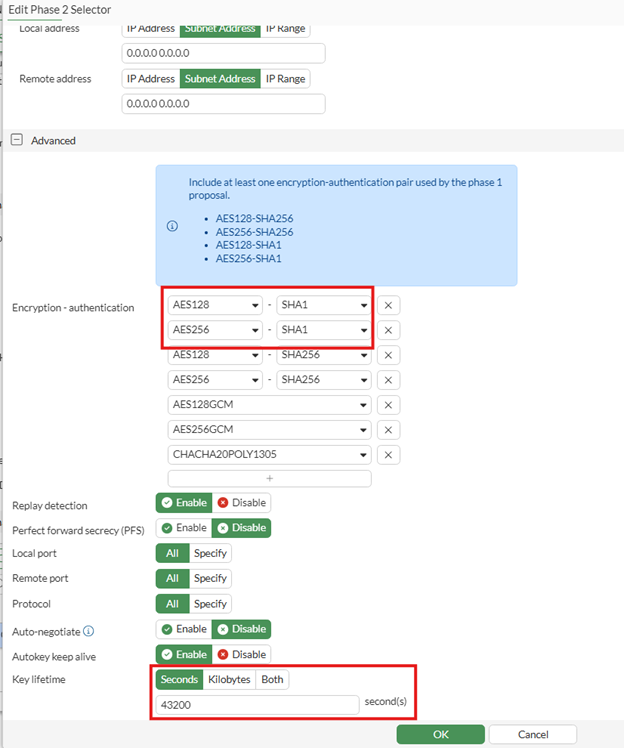
(Above) Phase 2 selector Firewall end settings
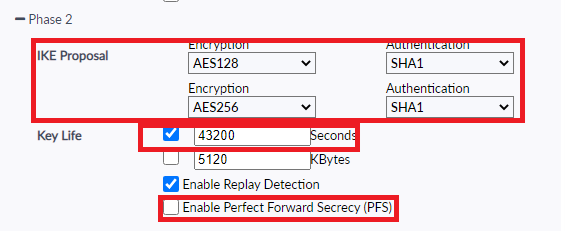
(Above) Phase 2 FortiClient end settings
- Try a login on the FortiClient
SSL VPN Configuration
Note: The same group configured above can be used
- From the VPN menu, select SSL-VPN Settings
- Configure the following fields:
- Enable SSL VPN: Yes (green)
- Listen on Interface(s): [as desired, for example, WAN]
- Listen on Port: [as desired, for example, 10443]
- Server Certificate: [If you have a server certificate, set it to the authentication certificate]
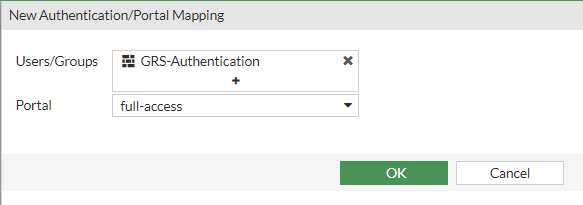
- Under Authentication/Portal Mapping:
- Edit "All Other Users/Groups" and set the Portal to "full-access"
- Click "+ Create New" and create a mapping for the desired user group, setting the Portal to "full-access"
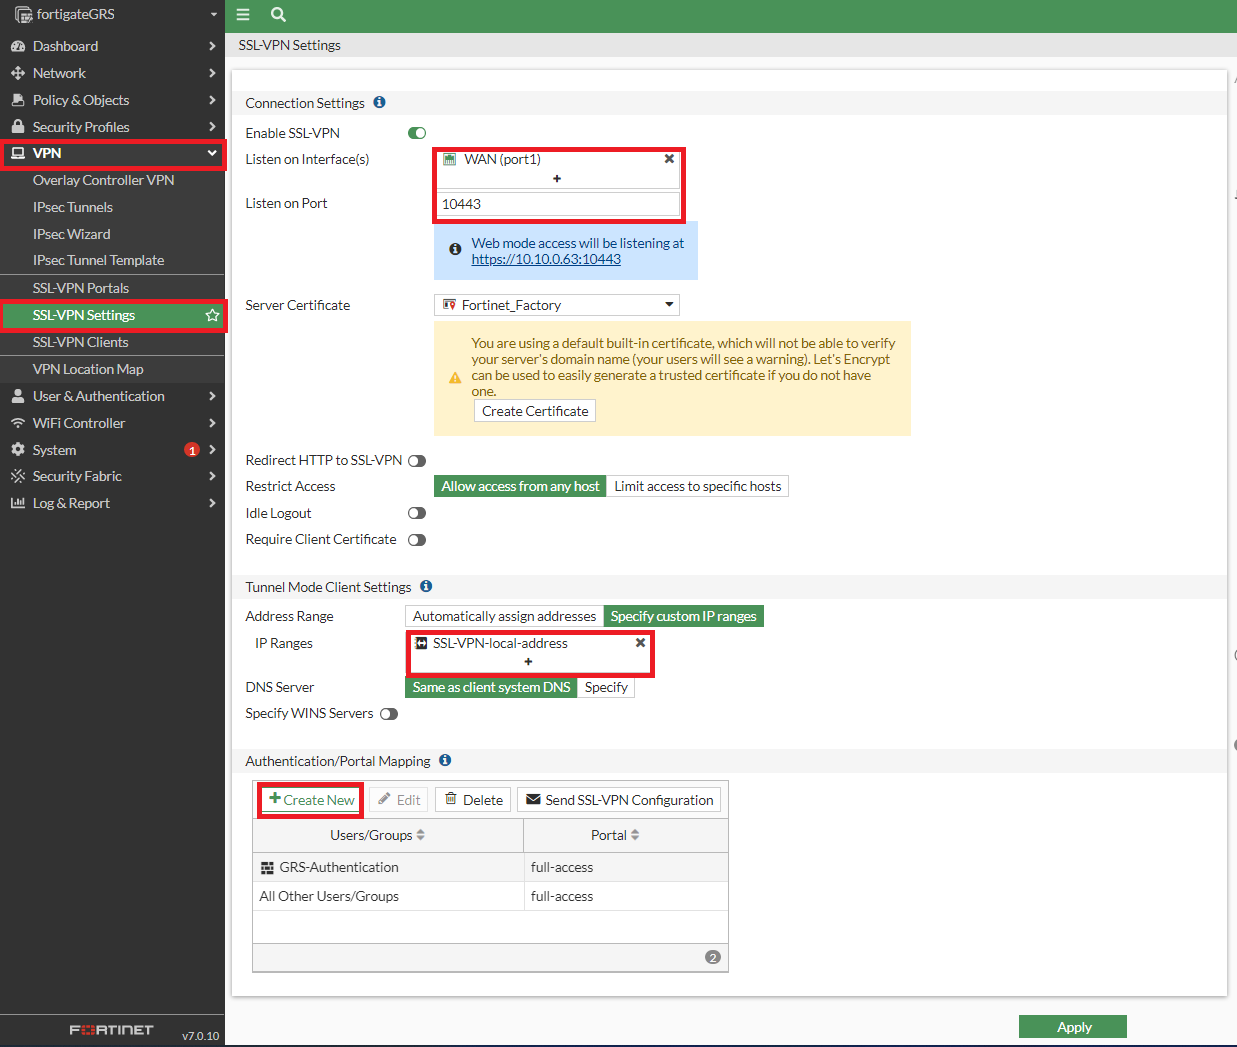
- Click Apply
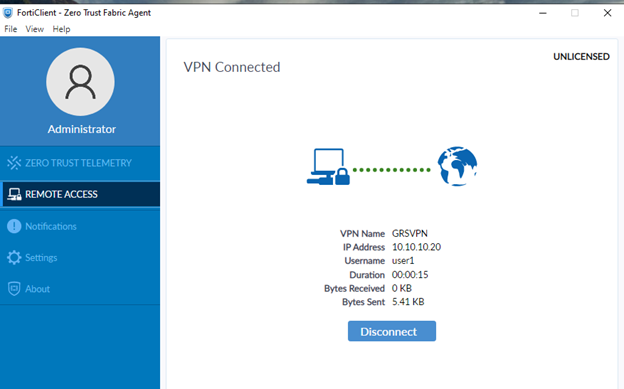
- On the FortiClient, configure the required details below:
- VPN: SSL VPN
- Remote Gateway: [IP address or hostname of your FortiGate]
- Customize port: [the port configured above]
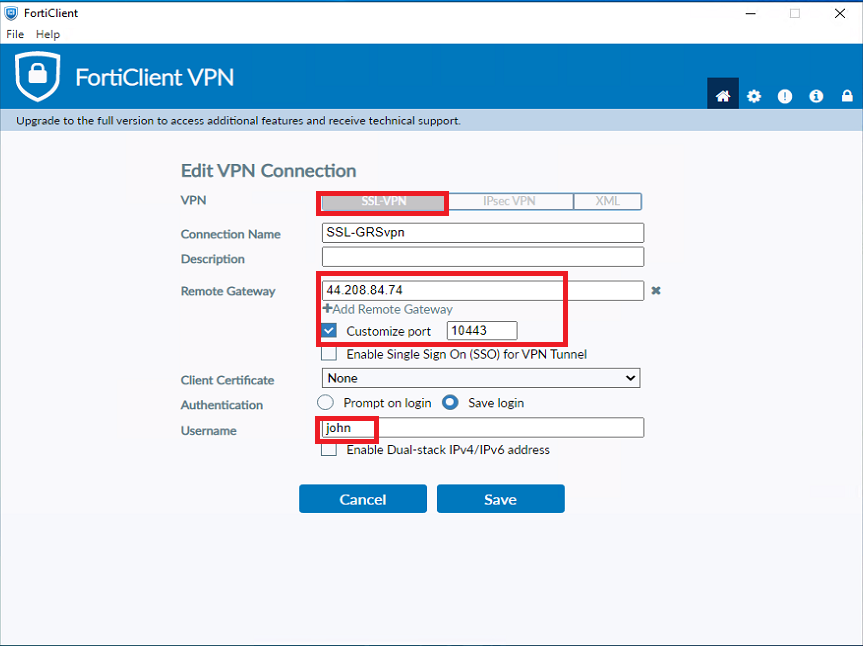
- Try a login on the FortiClient
© 2026 Green Rocket Security Inc. All rights reserved.
Integration Guide for NetMotion Mobility
Before starting, make sure GreenRADIUS is configured with users imported from your LDAP and can communicate with your NetMotion Mobility Server
Configuring GreenRADIUS for NetMotion Mobility
In the GreenRADIUS web admin interface, add the NetMotion Mobility Server as a RADIUS client.
- Click the Global Configuration tab
- Click the Client-based Authentication Policies icon
- Enter the IP address of the NetMotion Mobility Server. Then enter the same RADIUS secret twice. Then click the Add button.
Configuring the NetMotion Mobility Server
Add GreenRADIUS as a RADIUS Server
- Log in to the NetMotion Mobility Server console
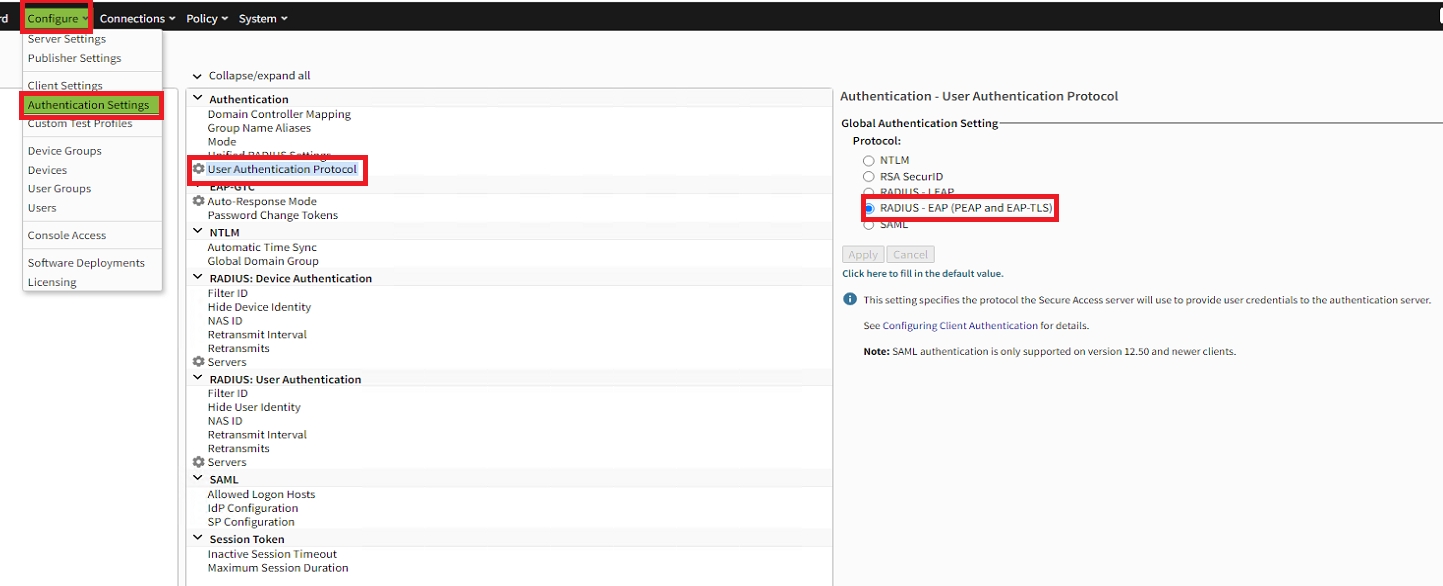
- In the main menu, click on the Configure tab > "Authentication Settings"
- Under the "Authentication" section, click "User Authentication Protocol"
- In the "Global Authentication Setting" section, select "RADIUS - EAP (PEAP and EAP-TLS)." Then click "Apply."
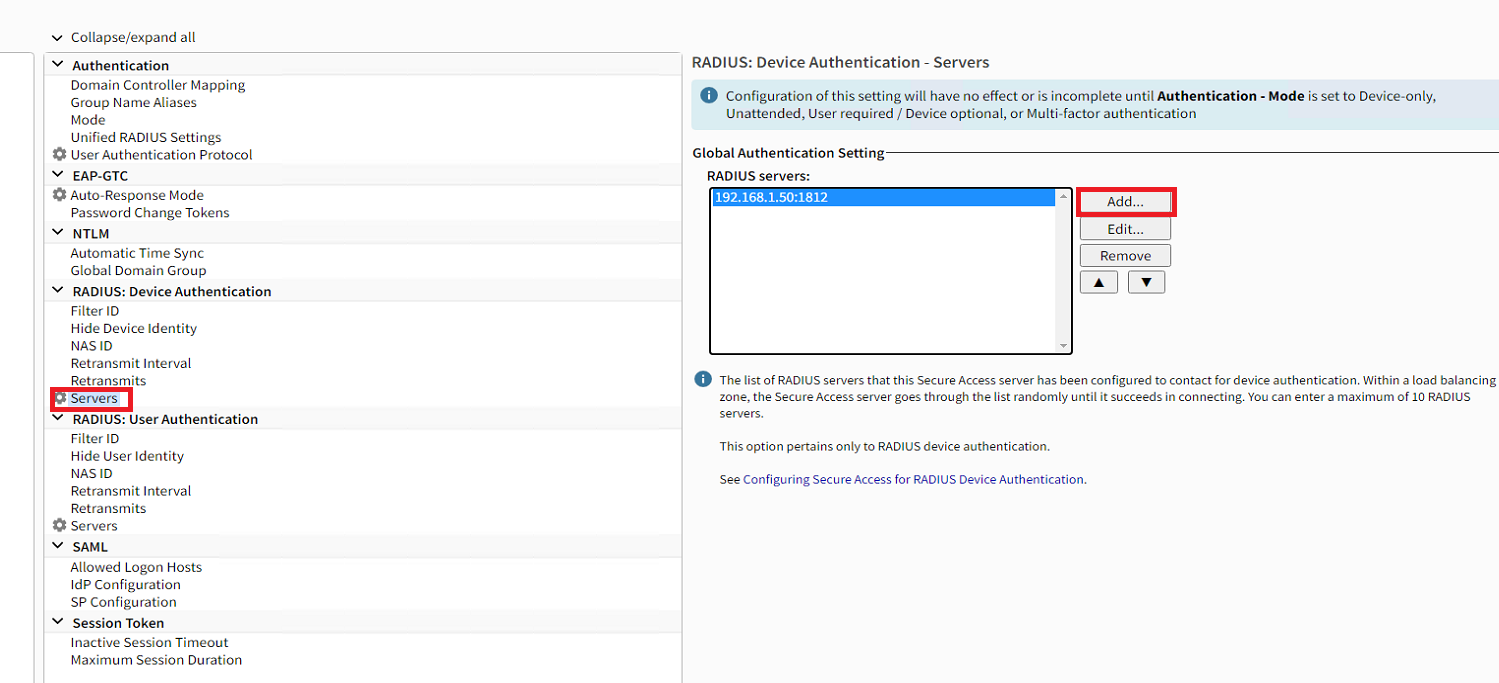
- Under the "RADIUS: Device Authentication" section, click "Servers"
- In the "RADIUS Servers" section, click the "Add..." button
- Enter the following:
- Host Address:
[IP address or hostname of GreenRADIUS] - Port:
1812 - Shared secret:
[enter the same RADIUS secret as configured in GreenRADIUS] - Confirm shared secret:
[enter the same RADIUS secret as configured in GreenRADIUS] - Load balancing zone:
0
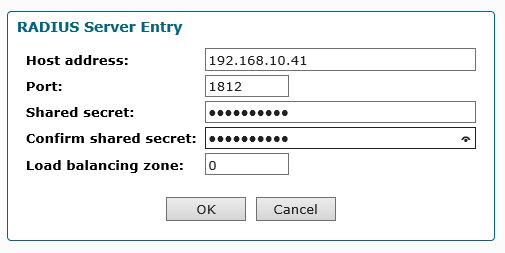
- Click OK
- The GreenRADIUS entry should now be listed
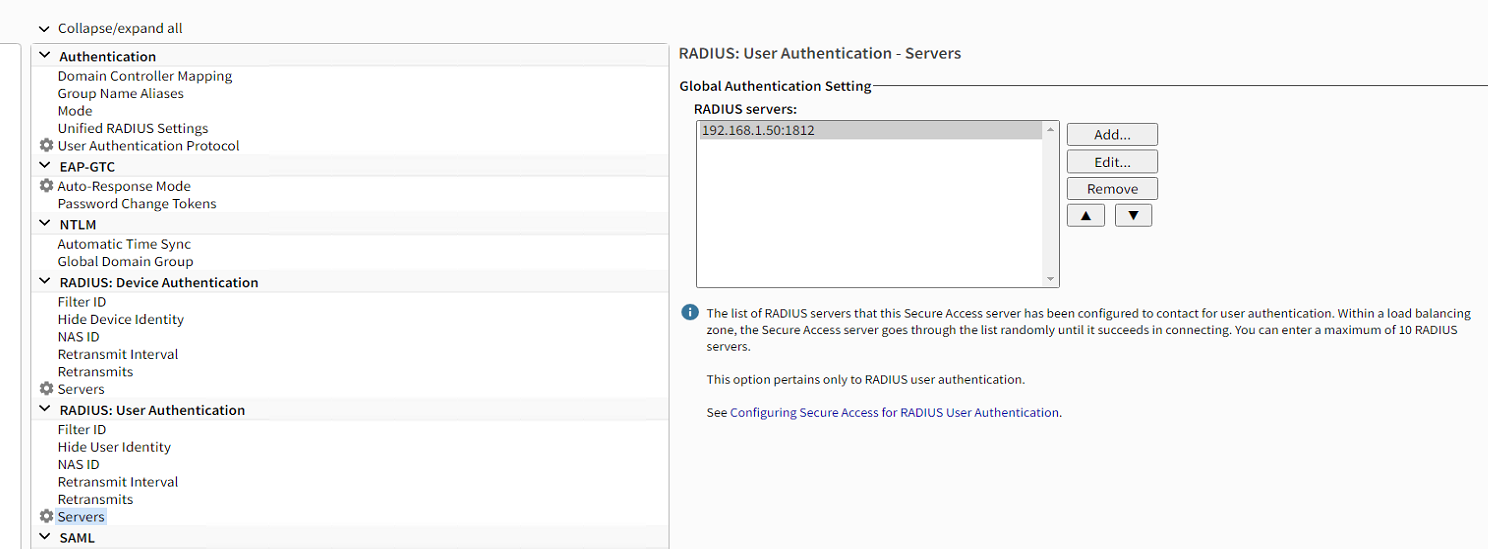
- Under the "RADIUS: User Authentication" section, click "Servers"
- Repeat Steps 6 - 8 above
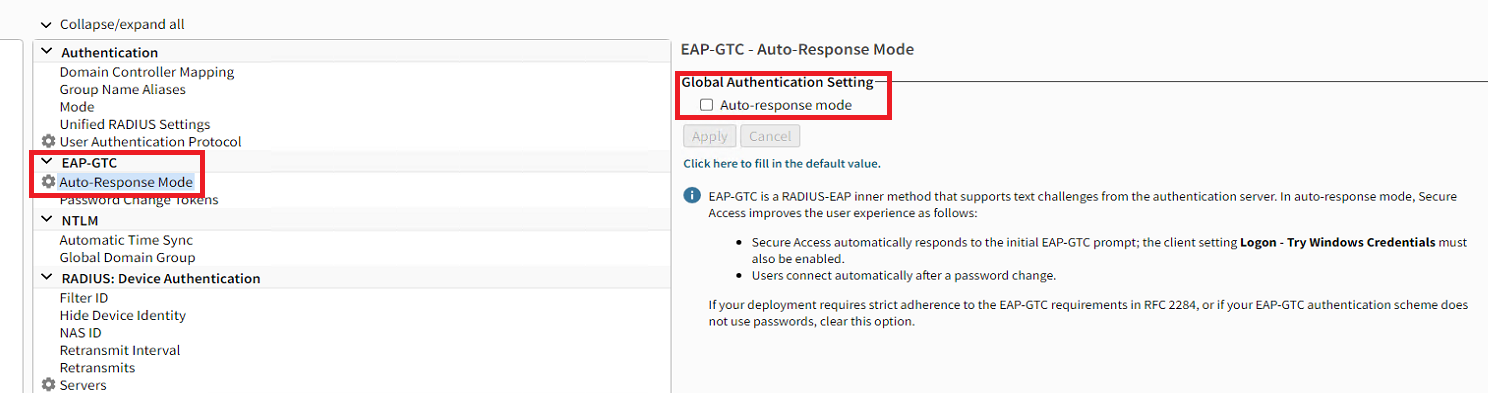
- Under the "EAP-GTC" section, click "Auto-Response Mode"
- Uncheck the checkbox for "Auto-response mode" and click Apply
- In the main menu, click on the Configure tab > "Server Settings"
- Under the "Virtual Address" section, click "Allocation Method IPv4"
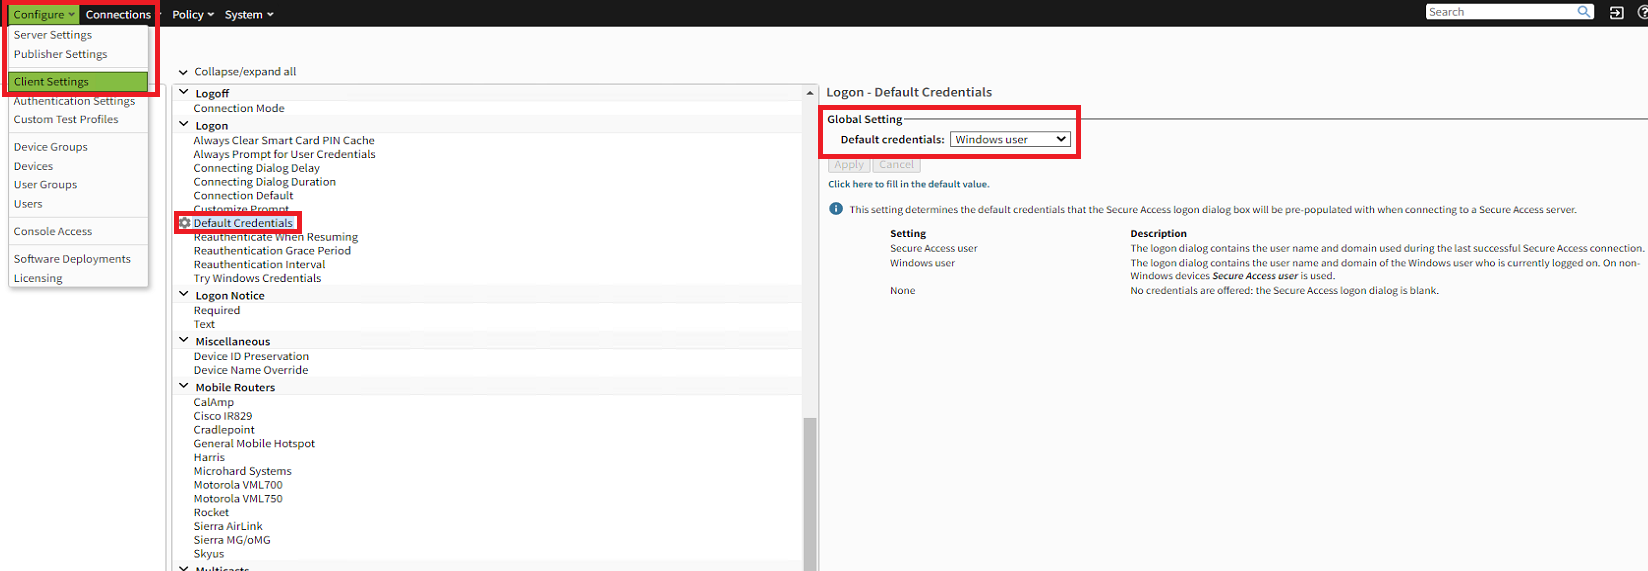
- In the main menu, click on the Configure tab > "Client Settings"
- Under the "Logon" section, click "Default Credentials"
- In the "Global Setting" section, set as "Windows user"
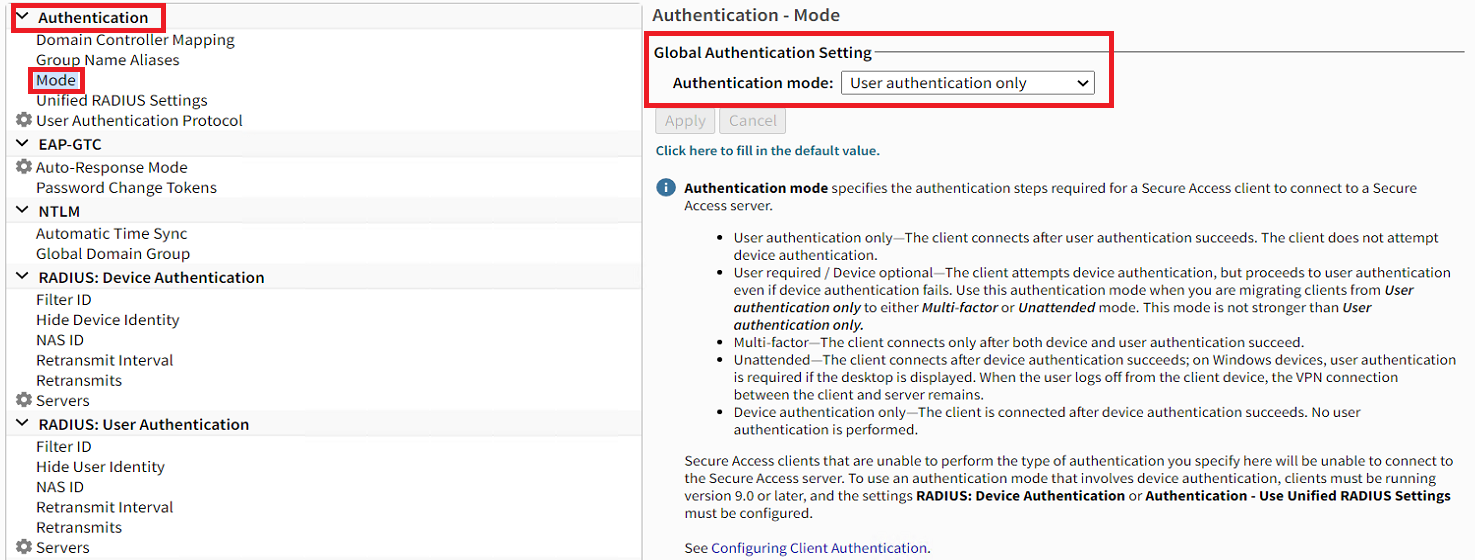
- In the main menu, click on the Configure tab > "Authentication Settings"
- Under the "Authentication" section, click "Mode"
- In the "Global Authentication Setting" section, set as "User authentication only." Then click "Apply."
NetMotion Mobility Client Configuration
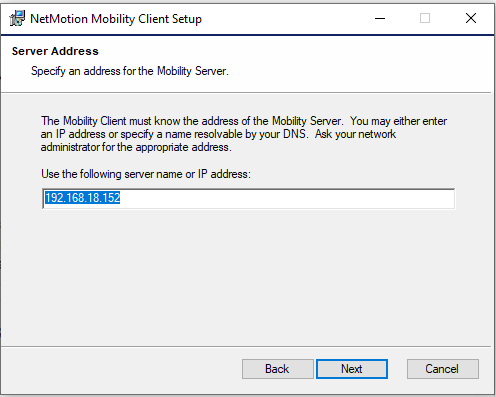
- When installing the NetMotion Mobility client on a Windows machine, be sure to enter the IP address of the NetMotion Mobility server.
- After installation, restart the Windows machine.
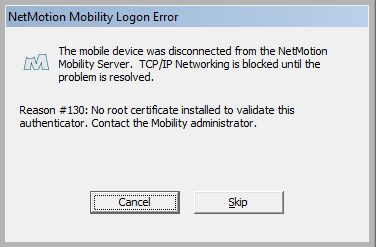
- After restarting, the following screen may appear, because the NetMotion Mobility client is not yet configured. Click "Skip."
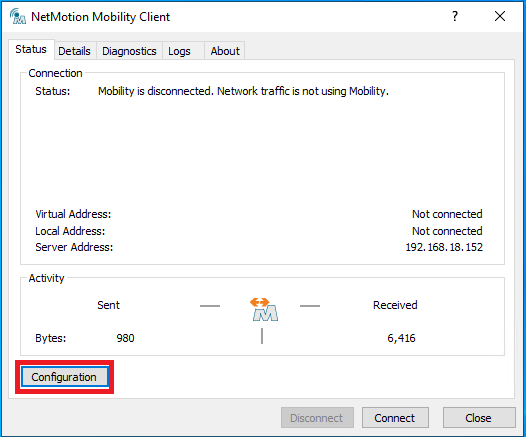
- Open the NetMotion Mobility client, and click on the "Configuration" button
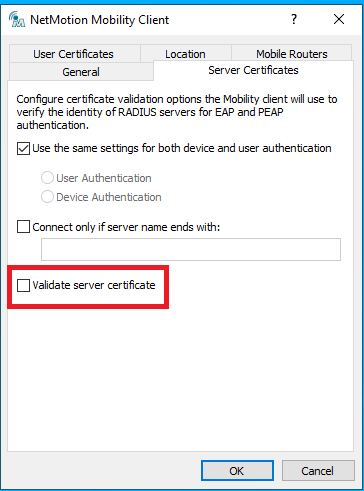
- Click the "Server Certificates" tab. Then uncheck the checkbox for "Validate server certificate," and click OK.
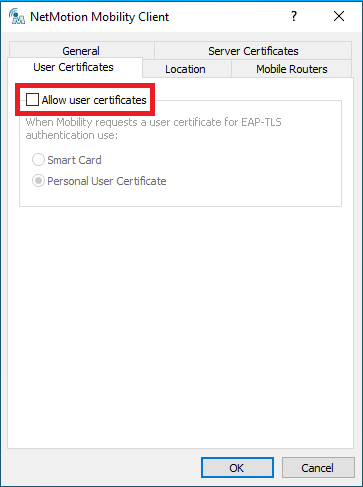
- Click the "User Certificates" tab. Then uncheck the checkbox for "Allow user certificates," and click OK.
- Restart the Windows machine
- After restarting, log in with a user that already has a token assigned (or will have a YubiKey auto-provisioned upon the first successful login).
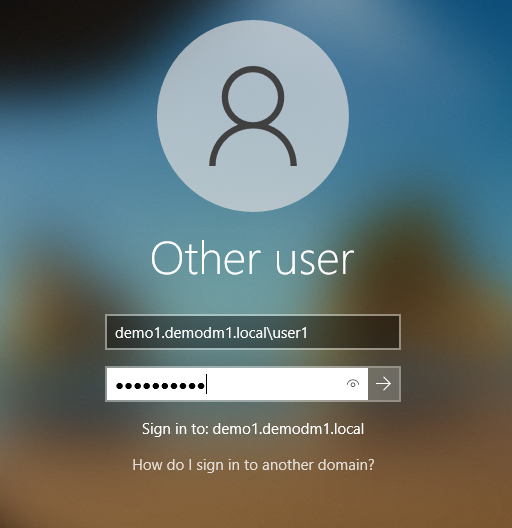
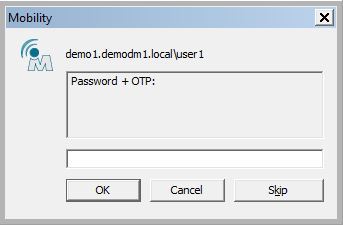
- After logging into Windows, the Mobility client login screen will appear. The user should enter his password followed by an OTP (either from a YubiKey or an Authenticator app).
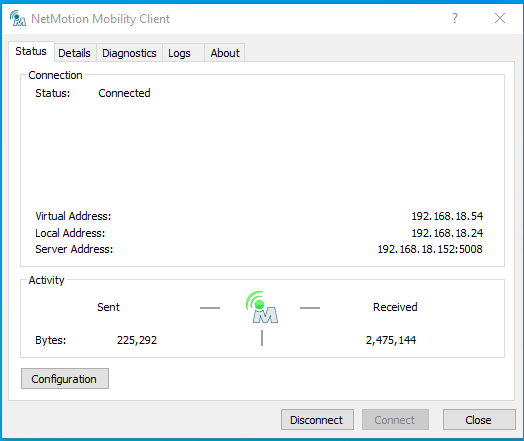
- If the username, password, and OTP are authenticated successfully by GreenRADIUS, the user will be connected to the NetMotion server, and the network will become active and show a status of "Connected."
Avoiding Entering Passwords Twice (Optional)
If you would like users to avoid entering passwords twice (once at the Windows logon screen and again on the NetMotion Mobility client), GreenRADIUS can be configured to skip password validation and only validate token OTPs.
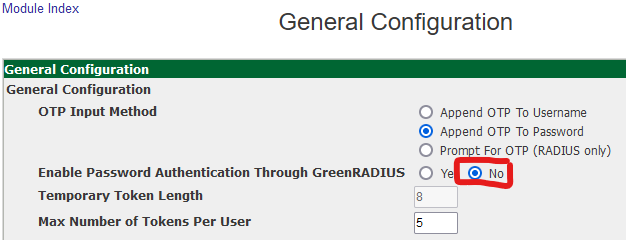
- In the GreenRADIUS web admin interface, under the "Global Configuration" tab, click the "General" icon.
- Set "Enable Password Authentication Through GreenRADIUS" to "No." Then click the "Save" button.
IMPORTANT: This is a global setting, so this would only be recommended if NetMotion is the only 2FA integration with GreenRADIUS.
- When users see the NetMotion Mobility client login screen, users will only need to enter an OTP from their token to log in.
© 2026 Green Rocket Security Inc. All rights reserved.
Integration Guide for Cisco Remote Access with GreenRADIUS 2FA
Before starting, make sure GreenRADIUS is configured with users imported from your LDAP and can communicate with your Cisco ASA
Configuring GreenRADIUS for Cisco ASA
In the GreenRADIUS web admin interface, add the Cisco ASA as a RADIUS client.
- Click the Global Configuration tab
- Click the Client-based Authentication Policies icon
- Enter the IP address of the Cisco ASA. Then enter the same RADIUS secret twice. Then click the Add button.
Configuring the Cisco ASA
Add GreenRADIUS as a RADIUS Server
Before starting, ensure that network interfaces and client profiles are configured correctly.
- Log in to the Cisco ASDM for ASA.
- Open the "Configuration" tab and select "Remote Access VPN."
- Locate "AAA/Local Users" and select "AAA Server Groups." Click the top right Add button to create a new "GreenRADIUS" RADIUS server group:
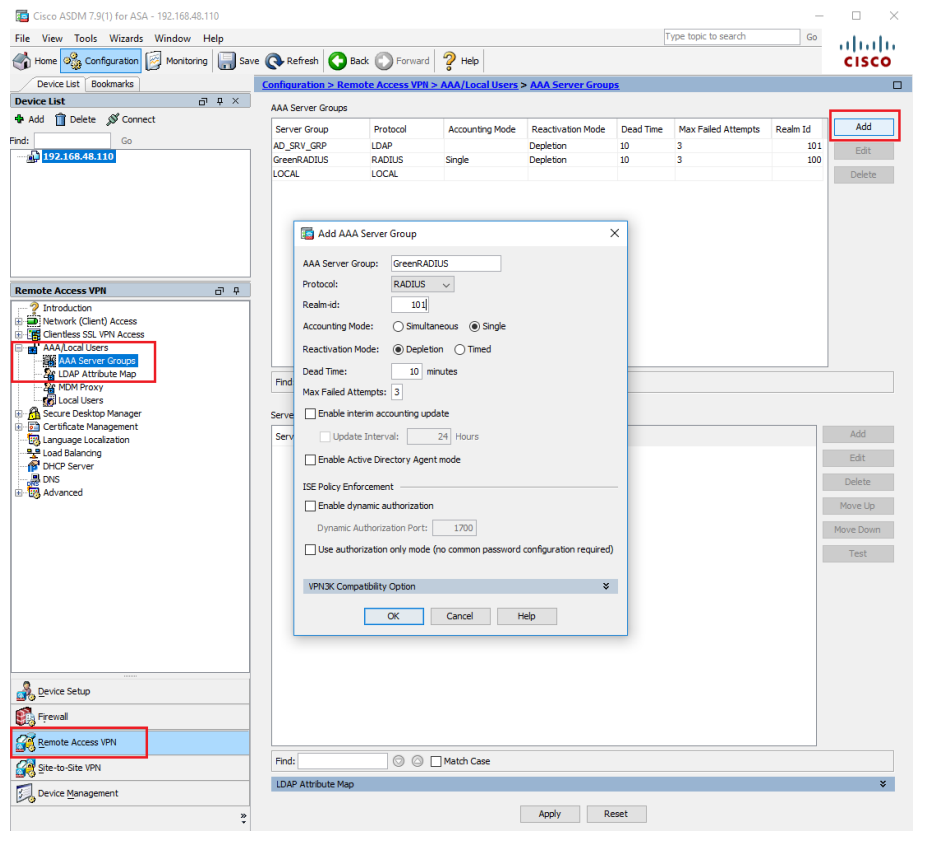
- Select the new "GreenRADIUS" AAA Server Group and click the bottom right Add button. This will open the AAA Server window:
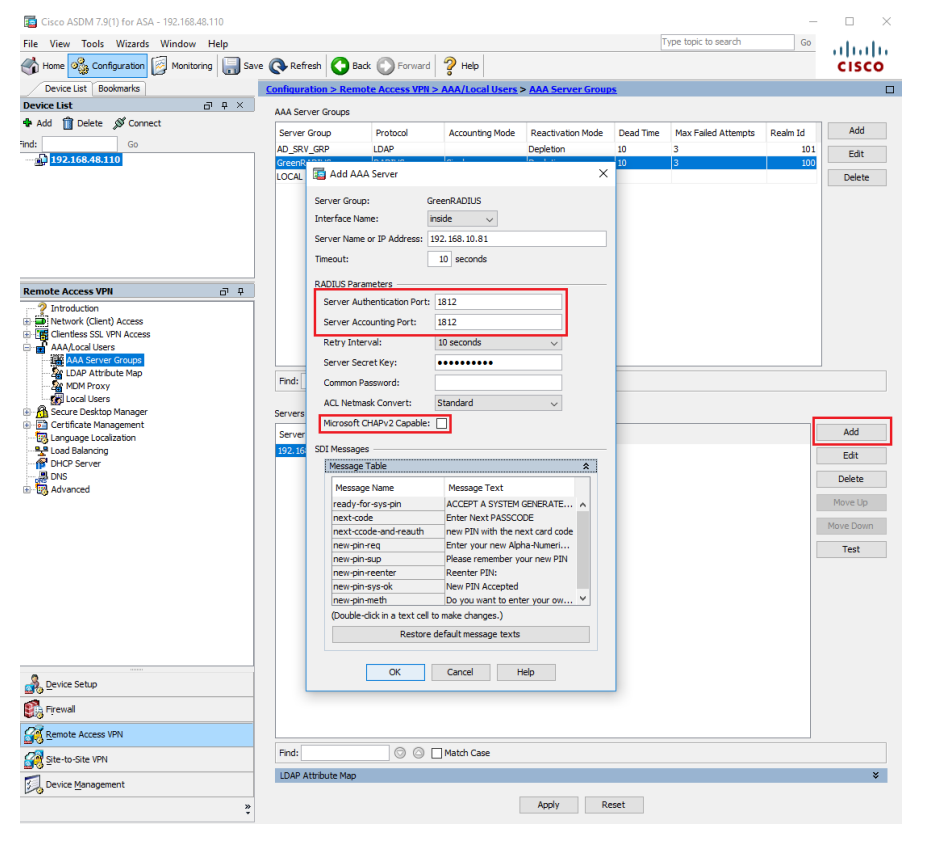
- Server Name or IP Address: greenradius_ip_or_fqdn
- Server Authentication Port: 1812
- Server Accounting Port: 1812
- Server Secret Key: Client Secret provided in the RADIUS Clients tab on the GreenRADIUS web admin interface.
- Microsoft CHAPv2 Capable: Unchecked
- Click OK. Choose "Test" to verify the above configuration:
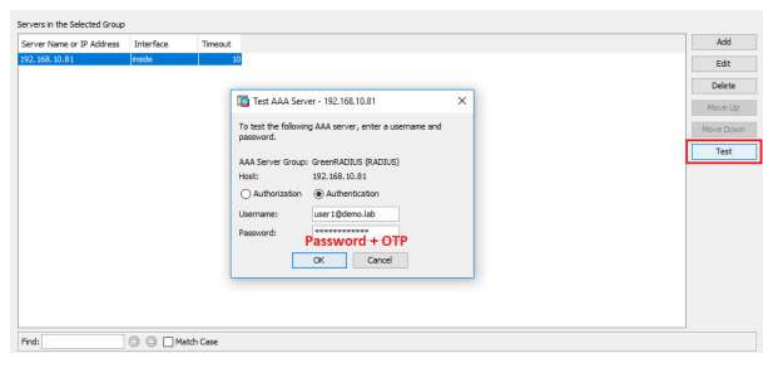
- Select "Authentication." Enter the test user's username and password and append the token's OTP to the password in the Password field, then press "OK."
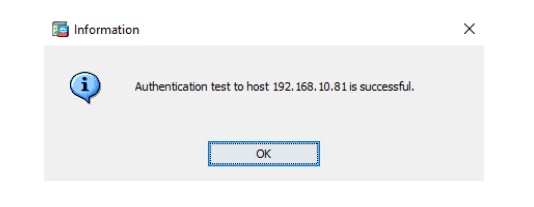
Cisco Network Client Access Configuration
- Locate "Network (Client) Access" on Remote Access VPN and select your "Connection Profile."
- Under Authentication, choose Method: AAA and AAA Server Group: GreenRADIUS, then "OK."

- We have successfully configured your Cisco ASA Remote Access VPN with GreenRADIUS. Now, just connect from a client machine by appending the token's OTP to the password.
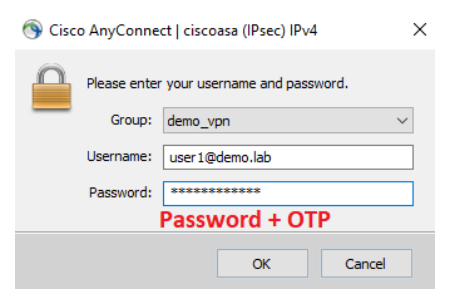
© 2026 Green Rocket Security Inc. All rights reserved.
Integration Guide for Palo Alto Networks GlobalProtect VPN
Before starting, make sure GreenRADIUS is configured with users imported from your LDAP and can communicate with your Palo Alto GlobalProtect device.
Configuring GreenRADIUS for Palo Alto GlobalProtect
In the GreenRADIUS web admin interface, add the Palo Alto GlobalProtect as a RADIUS client.
- Click the Global Configuration tab
- Click the Client-based Authentication Policies icon
- Enter the IP address of the Palo Alto GlobalProtect. Then enter the same RADIUS secret twice. Then click the Add button.
Configuring Palo Alto GlobalProtect
Add GreenRADIUS as a RADIUS Server
- Log in to the Palo Alto GlobalProtect admin interface
- On the Device tab, navigate to Server Profiles, then RADIUS. Click Add.
- In the Name field, enter "GreenRADIUS"
- Set the timeout value to 10 seconds (or 45 seconds if using our Green Rocket 2FA Mobile App)
- Configure the "Authentication Protocol" drop-down to "PAP." Note: PAN-OS 7.X users must set the protocol via command line using this command:
set authentication radius-auth-type pap - In the Servers section, click Add. Then enter the following:
- Server:
GreenRADIUS - RADIUS Server:
[IP address or hostname of GreenRADIUS] - Secret:
[enter the same RADIUS secret as configured in GreenRADIUS for the Palo Alto GlobalProtect] - Port:
1812
- Click OK
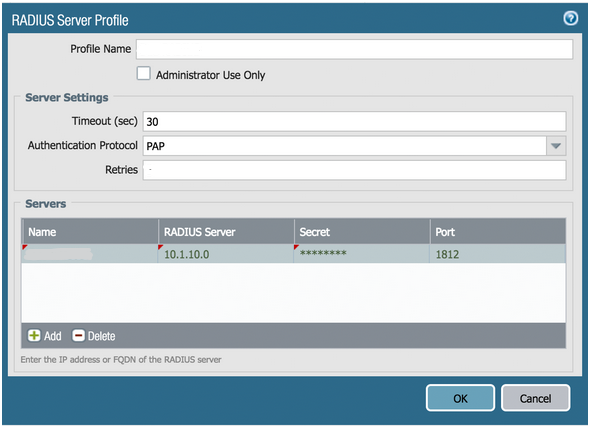
Add an Authentication Profile
- On the Device tab, navigate to Authentication Profile
- Click the
New...button. Then enter the following:
- Name:
GreenRADIUS - Type:
RADIUS - Server Profile:
GreenRADIUS - User Domain: Optional, leave blank if you only have one domain configured in GreenRADIUS
- Username Modified: Optional, leave blank if you only have one domain configured in GreenRADIUS
- Click the Advanced tab. In the "Allow List" section, select the "all" group.
- Click OK
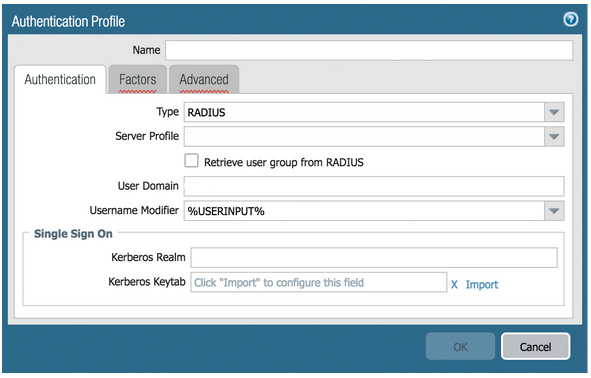
Configure Palo Alto GlobalProtect
- On the Network tab, navigate to GlobalProtect, then Gateways
- Click on the GlobalProtect Gateway to display the properties window
- On the Authentication tab, select the GreenRADIUS authentication profile
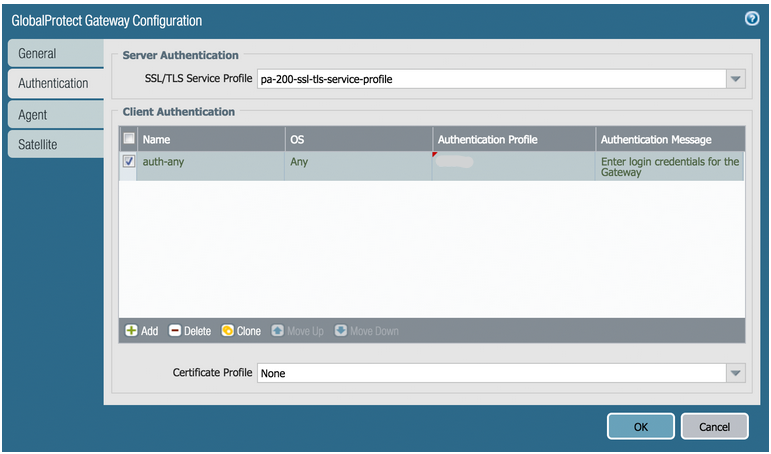
- Click the Agent tab, then click the Client Settings tab. Click the name of your configuration.
- On the Authentication Override tab, check the checkboxes for both
Generate cookie for authentication overrideandAccept cookie for authentication override. Set the Cookie Lifetime as desired. Select a certificate to use with the cookie.
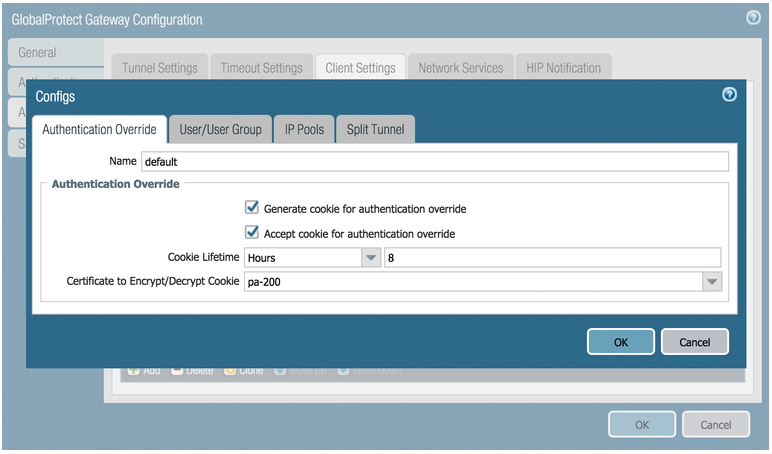
- Click OK twice
Configure the GlobalProtect Portal
- On the Network tab, navigate to GlobalProtect, then Portal
- Click on your GlobalProtect Portal to display the properties window
- On the Authentication tab, select the GreenRADIUS authentication profile
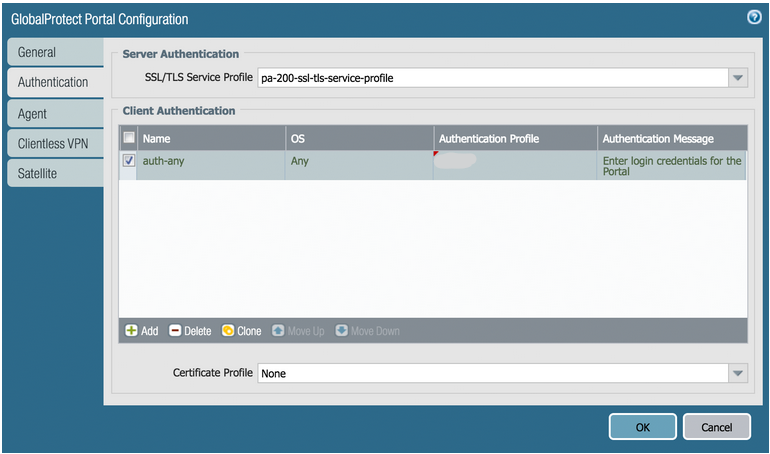
- Click the Agent tab, then click the name of your configuration.
- On the Authentication tab, check the checkboxes for both
Generate cookie for authentication overrideandAccept cookie for authentication override. Set the Cookie Lifetime as desired. Select a certificate to use with the cookie.

- Click OK twice
Commit and Save the Settings
- Click the Commit button to make the changes take effect
You may now start testing Palo Alto GlobalProtect logins. Check the Authentication Requests report in GreenRADIUS (under the Reports tab) to make sure Palo Alto GlobalProtect logins are being validated by GreenRADIUS.
© 2026 Green Rocket Security Inc. All rights reserved.
Integration Guide for Pulse Secure with GreenRADIUS 2FA
Before starting, ensure GreenRADIUS is configured correctly to communicate with the local Active Directory or LDAP domain, as well as with the validation service (either local validation or the YubiCloud).
Configuring GreenRADIUS for Pulse Secure
In the GreenRADIUS web admin interface, add Pulse Secure as a RADIUS client.
- Click the Global Configuration tab
- Click the Client-based Authentication Policies icon
- Enter the IP address of Pulse Secure. Then enter the same RADIUS secret twice. Then click the Add button.
Pulse Secure Configuration
Add GreenRADIUS as a RADIUS Server
Befotre starting, ensure that network, interfaces, and client profiles are configured correctly.
- Log into the Pulse Secure Administrator Sign-In Page.
- Open the "Authentication" tab and select "Auth. Servers."
- Locate "RADIUS Server" and choose "New Server..."
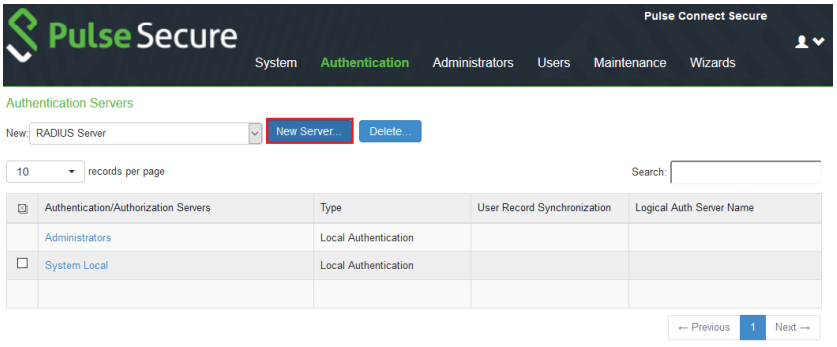
- Configure the following fields
- Name: GreenRADIUS
- RADIUS Server: your_greenradius_ip
- Authentication Port: 1812
- Shared Secret: The same Client Secret configured under RADIUS Clients in GreenRADIUS
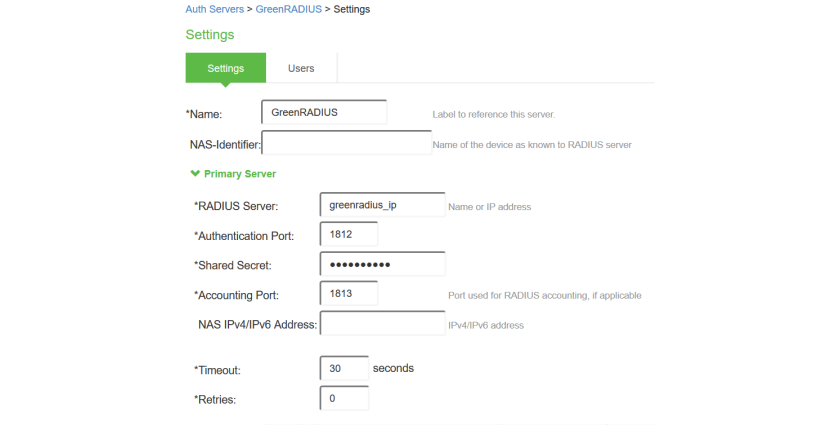
- Click "Save Changes" at the bottom
- Navigate to Users> User Realms
- Select your Authentication Realm (default "Users").
- Change the authentication server to GreenRADIUS or add an Additional Authentication Server.
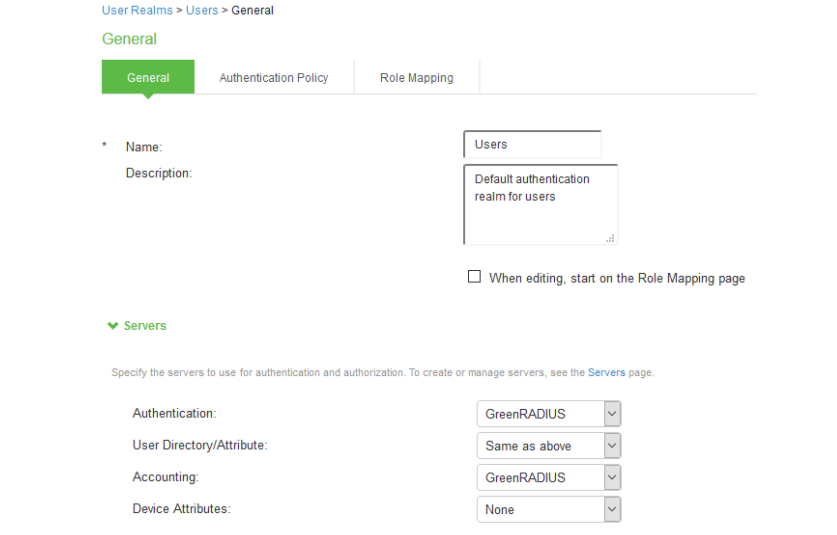
- Choose "Save Changes."
Pulse Secure Prompt for Token (Optional)
By default, users submit their token OTPs (one-time passcodes) by appending them to their passwords in the password field. If desired, a separate OTP field can be used to submit OTPs instead of appending them to passwords. To configure this, follow the steps below.
- Enable "Prompt For OTP (RADIUS only)" in GreenRADIUS in the Global Configuration tab > General
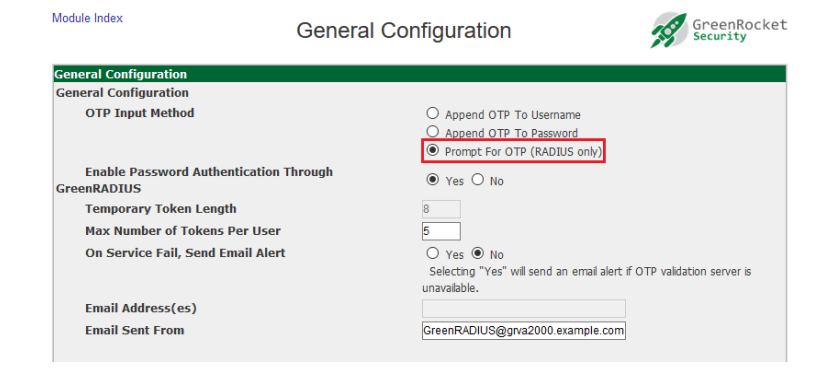
- Choose "Save."
- In Pulse Secure, navigate to Authentication > Auth. Servers
- Open GreenRADIUS server settings
- Create a new custom RADIUS rule
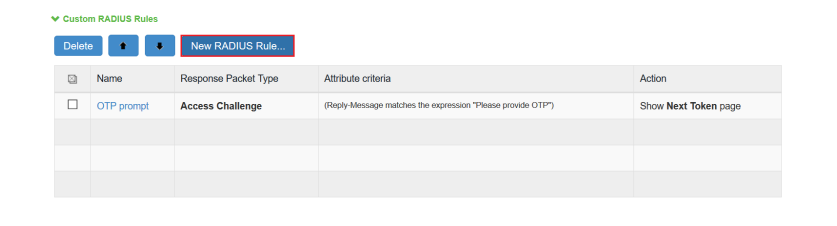
- Configure the following fields: Name: OTP prompt Reply-Message(18) > matches the expression > Please provide OTP > choose Add Then take action > show Next Token page
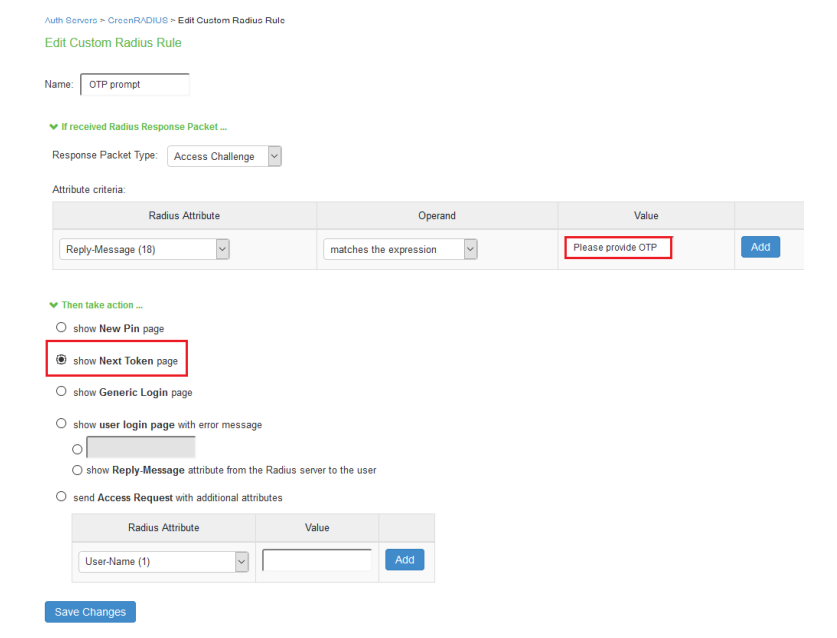
- Click "Save Changes"
A dedicated token page will appear after the usual user login:
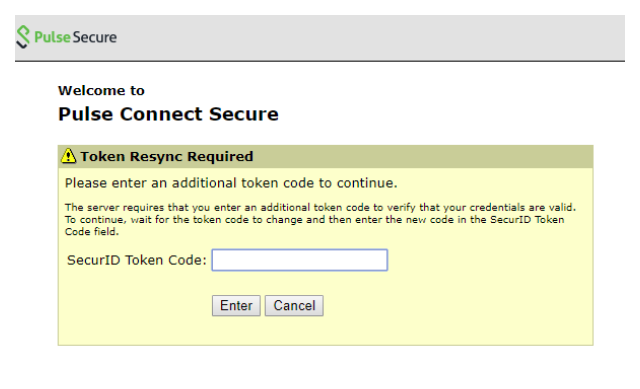
© 2026 Green Rocket Security Inc. All rights reserved.
Integration Guide for WatchGuard with GreenRADIUS 2FA
Before starting, ensure GreenRADIUS is configured correctly to communicate with the local Active Directory or LDAP domain, as well as with the validation service (either local validation or the YubiCloud).
WatchGuard with GreenRADIUS 2FA- Integration Guide
In the GreenRADIUS web admin interface, add WatchGuard as a RADIUS client.
- Click the Global Configuration tab
- Click the Client-based Authentication Policies icon
- Enter the IP address of WatchGuard. Then enter the same RADIUS secret twice. Then click the Add button.
WatchGuard Configuration
Before starting, ensure that network, interfaces, and client profiles are configured correctly.
- Log into the WatchGuard Fireware Web UI.
- Navigate to AUTHENTICATION>Servers
- Click on RADIUS.
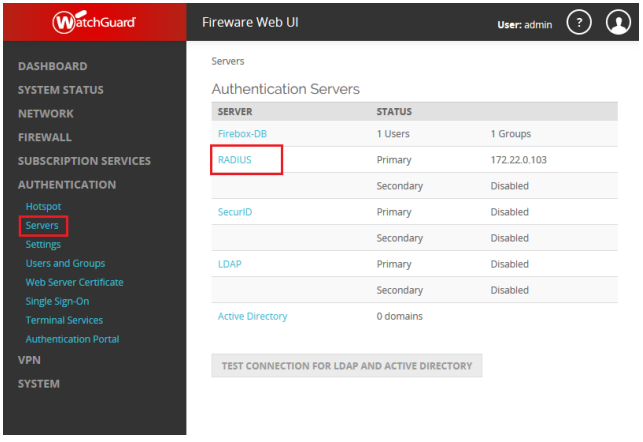
-
Select Enable RADIUS Server.
-
Configure the following fields:
- IP Address:your_greenradius_ip
- Port: 1812
- Passphrase: the Client Secret provided under RADIUS Clients in GreenRADIUS
- Confirm the Client Secret once again
- Timeout: 30 seconds
- Retries: 3
- Group Attribute: 11
- Dead Time: 10 Minutes
-
Click on SAVE.
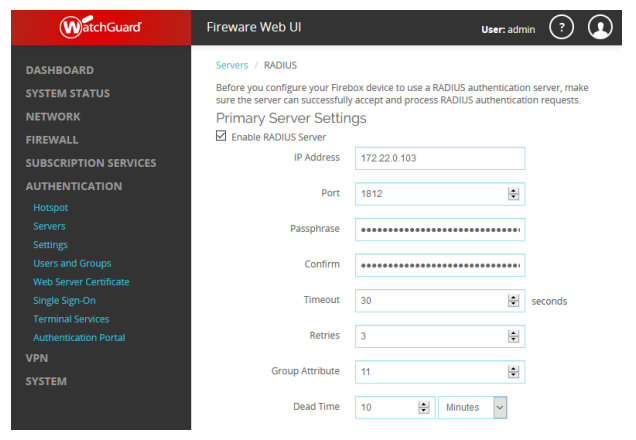
- Navigate to VPN>Mobile VPN with SSL>Authentication.
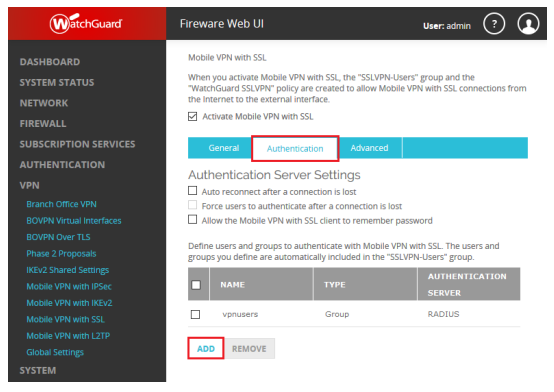
- Add your "vpnusers" group name.
- Select RADIUS as Authentication Server.
- Click OK.
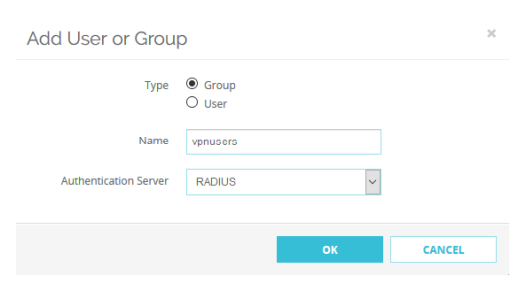
- The Firebox/XTM RADIUS integration is now done.
Authentication Test
At this point, you can try a single-factor (password-only) login attempt and then verify that the authentication successfully went through GreenRADIUS.
- Make sure the test user you are using is single-factor in GreenRADIUS. a. Click on the domain the user is in, then click on the Users/Groups tab. b. Find the user you will test with. (You can use the search function if you have many pages of users.) c. In the Single Factor Flag Column, if the user has a red "X," click the checkbox next to the user, then click on "Enable Single Factor." The user should have a green checkmark in the Single Factor Flag for this password-only test.
- Log in to the WatchGuard VPN client with the user's username and password.
- In GreenRADIUS, you can check that the authentication went through by going to GreenRADIUS Virtual Appliance>Reports tab>Authentication Requests a. Click on Run Report b. The authentication attempt should then be listed there.
© 2026 Green Rocket Security Inc. All rights reserved.
Integration Guide for Check Point VPN
Before starting, make sure GreenRADIUS is configured with users imported from your LDAP and can communicate with your Check Point VPN
Configuring GreenRADIUS for Check Point VPN
In the GreenRADIUS web admin interface, add the Check Point VPN as a RADIUS client.
- Click the Global Configuration tab
- Click the Client-based Authentication Policies icon
- Enter the IP address of the Check Point VPN. Then enter the same RADIUS secret twice. Then click the Add button.
Configuring the Check Point VPN
Add GreenRADIUS as a RADIUS Server
- Log in to the Check Point VPN SmartConsole
- Go to Objects > New Host to add GreenRADIUS details
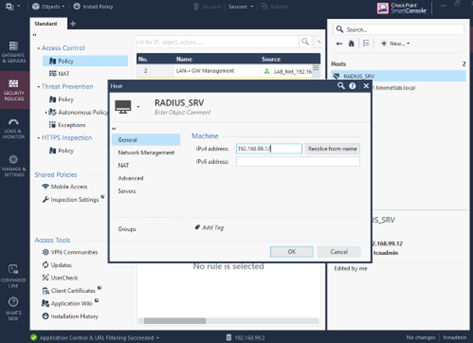
- Go to Objects > More object types > Server > RADIUS. Select the newly created GreenRADIUS host and enter GreenRADIUS details. (Note: Select "PAP" as the protocol.)
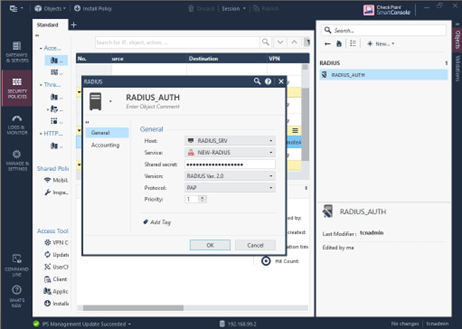
Create Local Users in the Check Point VPN
If you would like to create local user accounts and have them authenticated by GreenRADIUS, follow the steps below. (If you would like to use user accounts from Active Directory, please follow the steps in the next section below.)
- Go to Objects > More object types > User/Identity > New User
- Create new users making sure that their usernames match exactly with their usernames in your LDAP and in GreenRADIUS (assuming they have already been imported into GreenRADIUS)
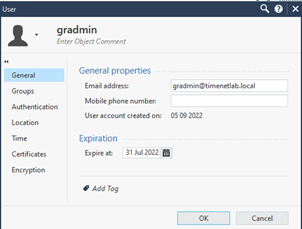
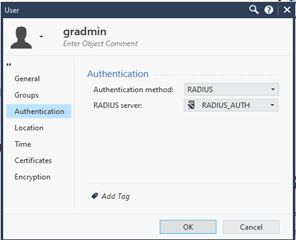
Import Users from Active Directory into the Check Point VPN
- Go to Objects > More object types > User/Identity > LDAP Account Unit
- Specify all of the required details for the Active Directory connection. On the General tab, provide a name for the LDAP.
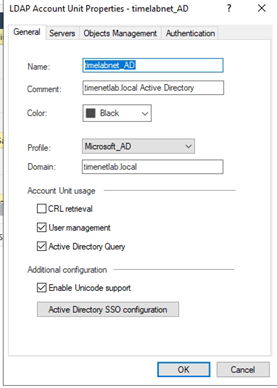
- On the Servers tab, enter the Active Directory details
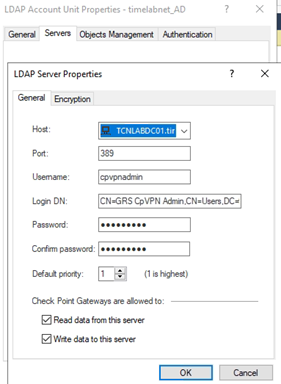
- On the Objects Management tab, click "Fetch branches" to confirm it can access the domains in the Active Directory

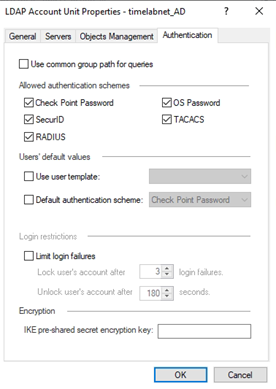
Create Group in the Check Point VPN
For local user accounts, go to Objects > More object types > User/Identity > New Group, and assign users to this group
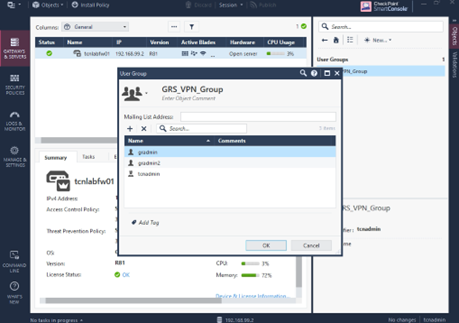
For Active Directory user accounts, go to Objects > More object types > User/Identity > LDAP Group. Specify the AD security group whose members should be allowed access.
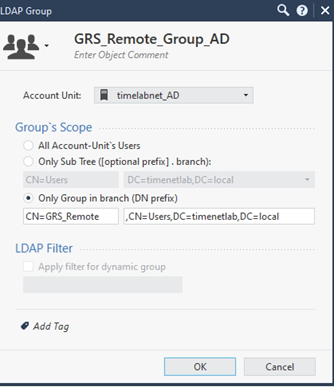
Configure Gateway
- Navigate to Gateways & Servers and double click on your gateway
- Go to VPN Client > Authentication > Authentication Method and click the Settings button
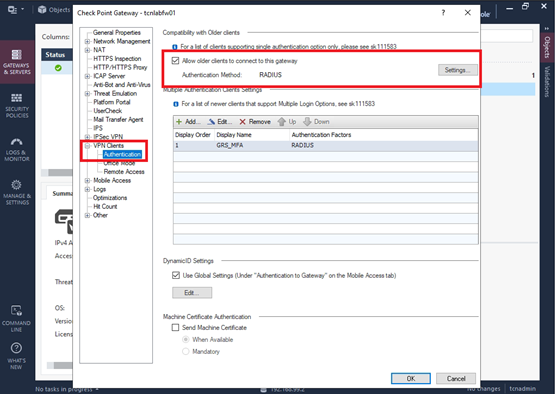
- In the Single Authentication Client Settings, set Authentication Method as RADIUS and specify the configured RADIUS server
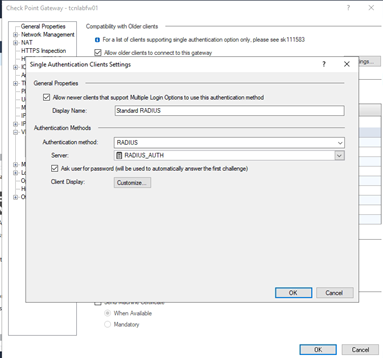
Configure Security Policies
- Go to Security Policies > Access Control > Policy
- Click "+" to add a policy
- For local user accounts, right click the Source field and select Add Legacy User Access. Select the group in the User Group dropdown menu.
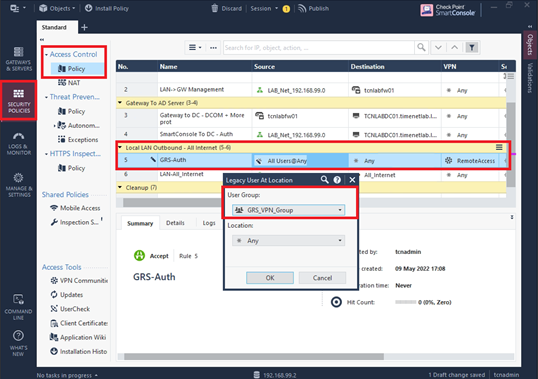
- For user accounts from Active Directory, in the Source field, click the "+" (add) icon and select the AD group created earlier
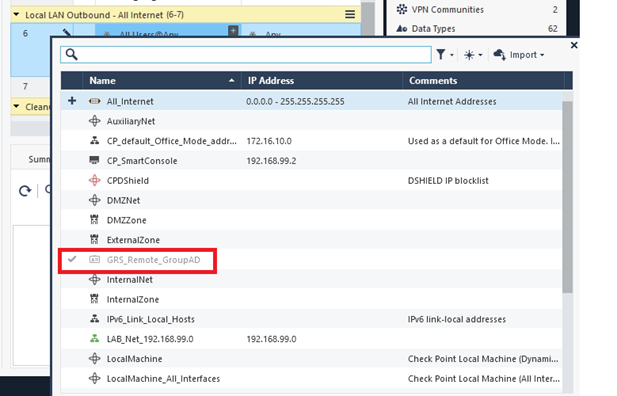
Once all of this has been configured, publish to save the settings
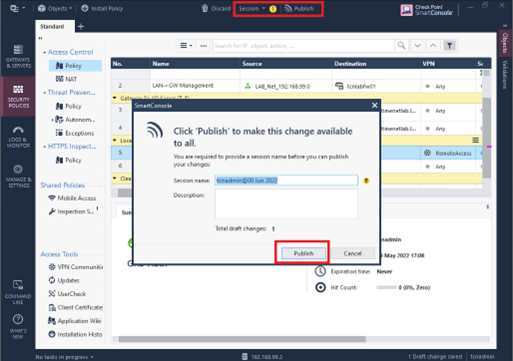
Test Login
- To test a VPN login, launch your Check Point Endpoint Security VPN client
- Select the appropriate site
- Log in with your username and password+OTP. (If you are testing with a YubiKey or Authenticator app OTP, and the OTP Input Method is "Append OTP to password" in GreenRADIUS, then append the OTP to the end of your password in the password field.)
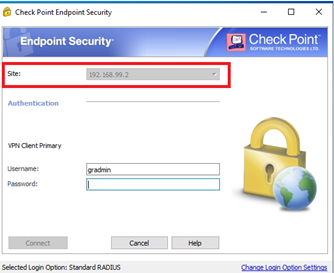
- If the login is successful, it will show that it is connected
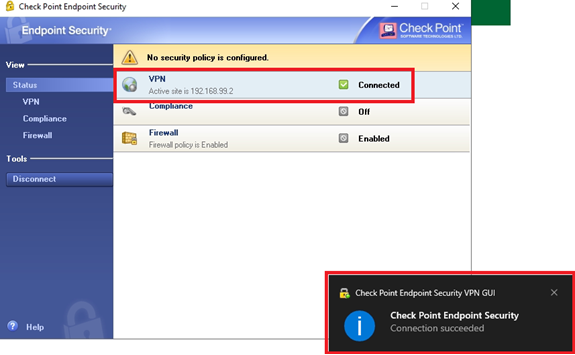
- You can verify that the login was authenticated by GreenRADIUS by going to the GreenRADIUS web admin interface > Reports tab > Authentication Requests report
© 2026 Green Rocket Security Inc. All rights reserved.
Integration Guide for OpenVPN
Configuring GreenRADIUS for OpenVPN
In the GreenRADIUS web admin interface, add OpenVPN as a RADIUS client.
- Click the Global Configuration tab
- Click the Client-based Authentication Policies icon
- Enter the IP address of OpenVPN. Then enter the same RADIUS secret twice. Then click the Add button.
Configuring OpenVPN
- Connect to OpenVPN Server and go to Authentication>RADIUS
Specify the Hostname, Shared Secret, and RADIUS Authentication Method as PAP then save settings.
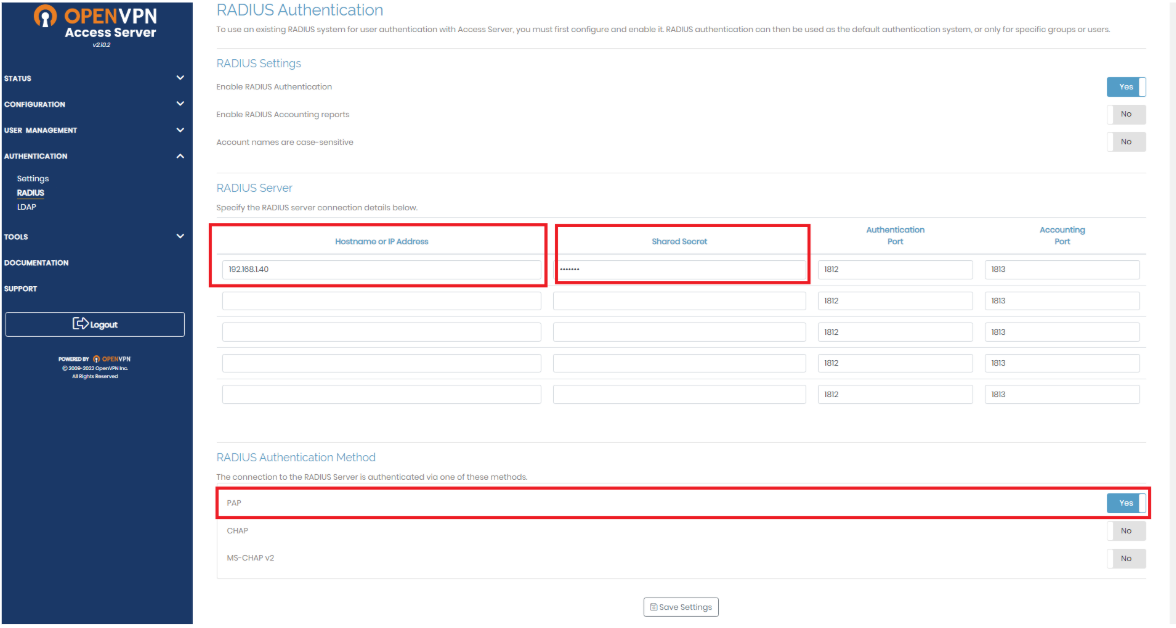
- Create user profile in OpenVPN. Go to User Management > User Permission.
Add user profile that matches in GreenRADIUS.
Specify the Authentication Method to RADIUS then save settings.
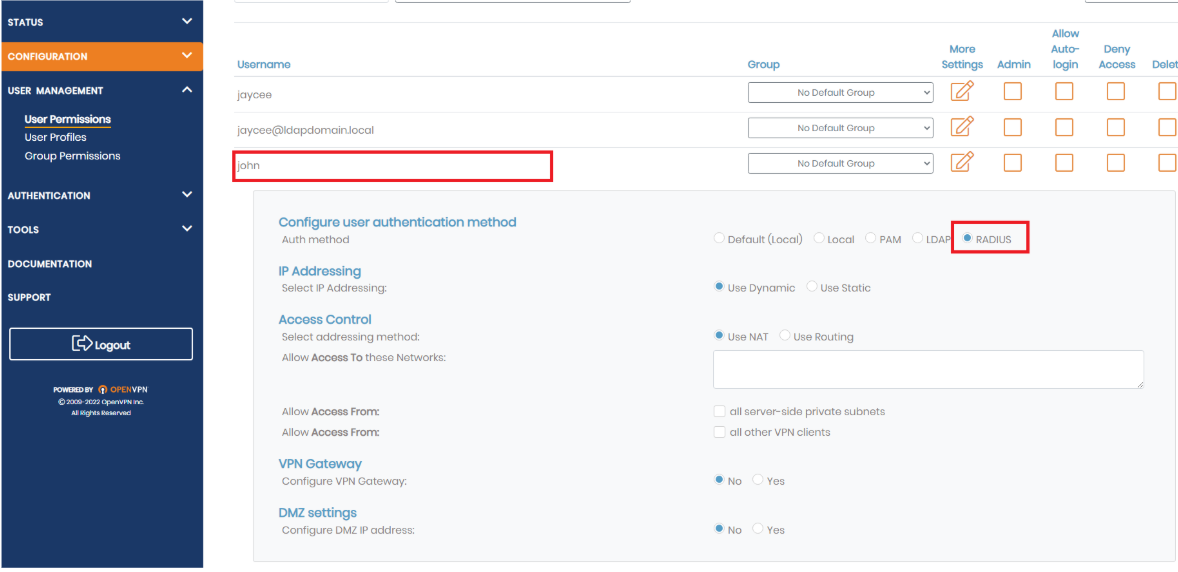
Connecting to OpenVPN Client via RADIUS Authentication
- Open the OpenVPN Client and add profile. Specify the server IP/hostname.
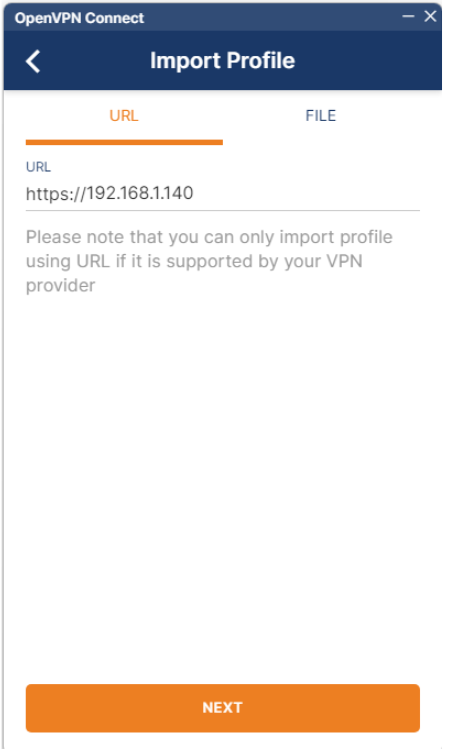
Insert the login details and it will prompt for OTP. Insert the OTP.
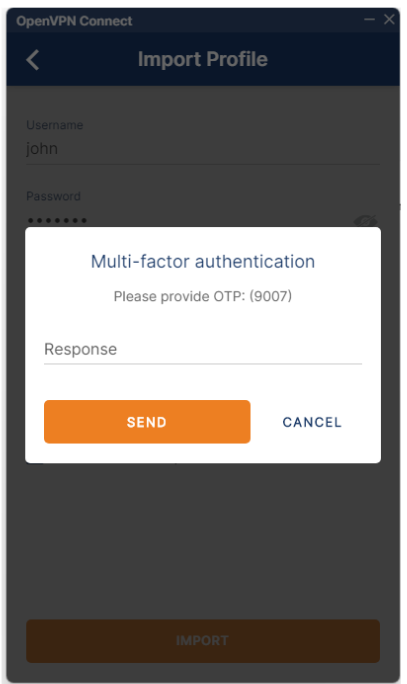
Profile will be configured and you can connect.
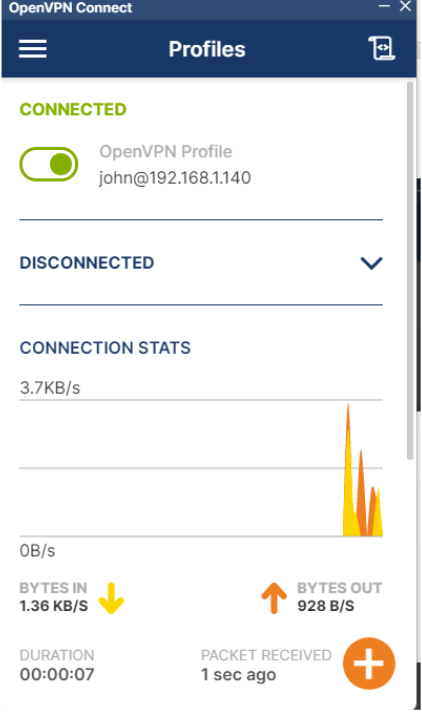
© 2026 Green Rocket Security Inc. All rights reserved.
ADFS Integration
GreenRADIUS 2FA can be integrated with Active Directory Federation Services (ADFS).
This deployment and configuration guide assumes the following:
- GreenRADIUS (v4.1.11.11 or later) has been deployed and configured
- A GreenRADIUS license has been installed that enables the ADFS MFA module
- The ADFS Server role has been installed and configured in either Windows Server 2016 or 2019
- Applications and services are already set up in ADFS as relying parties
GreenRADIUS Configuration
- In the GreenRADIUS web admin interface, click on the Global Configuration tab.
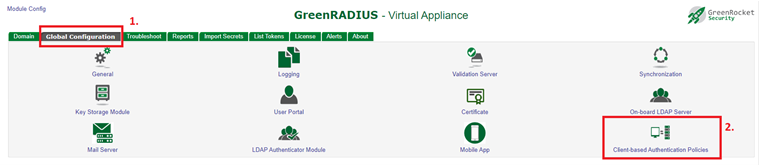
- Click the Client-based Authentication Policies icon.
- In the Add Client page, configure the following settings:
- Client ID: This is an admin-defined value and should be the same Client ID as configured in the ADFS adapter.
- Description: This is an optional field.
- Shared Secret: This is an admin-defined character string and must match with the Shared Secret configured in the ADFS adapter.
- Type: Set to
ADFS - Multi-Factor Policy: The configured setting will be enforced for user logins:
Password + OTP: Password and OTP (or mobile push app)PIN + OTP: PIN and OTP (or mobile push app)Password + PIN + OTPPassword, PIN, and OTP (or mobile push app)
- Enable First Factor Validation (Password/PIN) Through GreenRADIUS: Set to
No - Enable Auto-provisioning: If set to
Yes, YubiKeys (when OTPs are used) will be automatically assigned to users upon the first successful login with the YubiKey if the user does not already have a YubiKey assigned.- Note: To enable auto-provisioning of YubiKeys for use with ADFS, not only must this be set to "Yes," but also at the global and domain level.

- Click the
Addbutton.
Install and Configure the GreenRADIUS ADFS MFA Adapter
- Download the GreenRADIUS ADFS MFA Adapter. (You can obtain the latest version by contacting us.)
- Logged in as an admin on the Windows Server with the ADFS server role, double-click the GreenRADIUS ADFS 2FA Adapter installer. After a few progress bars, a welcome screen appears. Click Next.
- Accept the license agreement and click Next.
- Click Install.
- After the installation is complete, click Finish.
- Open the GreenRADIUS ADFS MFA Adapter Configuration application
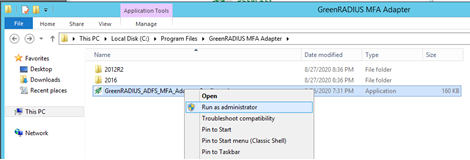
- Click the Global Configuration tab.
- Configure the following settings:
Request Processing SchemeOrdered List: The first GreenRADIUS instance listed will be contacted first for user authentication, then the next, and so on.Round Robin: The next GreenRADIUS instance will be contacted first for user authentication, rotating through the list of GreenRADIUS instances with each new login attempt.
Server Connection Timeout: The time (in seconds) for which the ADFS client waits for each GreenRADIUS instance to respond.Dead Server Detection Threshold: Indicates the maximum number of consecutive login attempts to be made to a configured GreenRADIUS instance before marking the instance as "dead"Server Dead Time Interval: The time (in seconds) for which a server marked as dead will not be contacted.Client ID: Should be the same Client ID as configured in all GreenRADIUS instances.- Note: The client ID must be unique and not already used by another ADFS client.
Shared Secret: This must match the shared secret configured in each GreenRADIUS for this ADFS client.
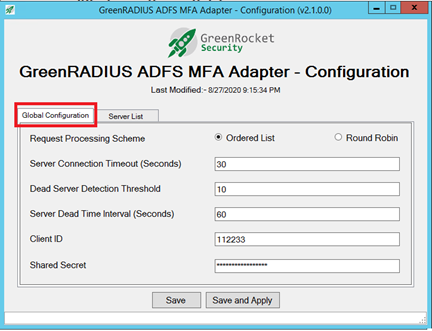
- Click the Server List tab.
- Add GreenRADIUS instances and enable them.
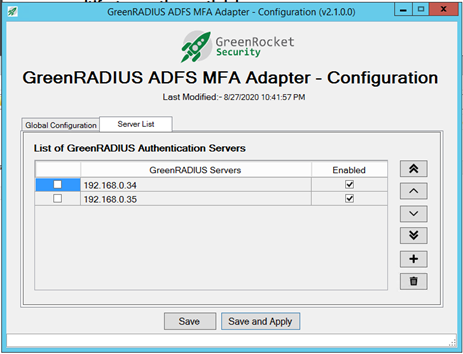
- Click the
Save and Applybutton. - Launch the ADFS management application. Right-click on
Authentication Methodsand selectEdit Multi-factor Authentication Methods.
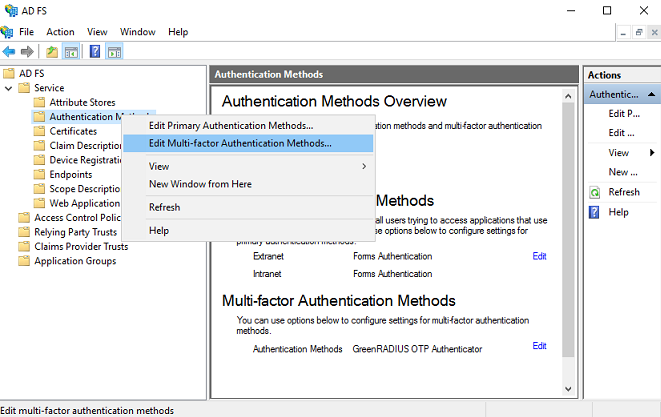
- A list of authentication providers will be shown. Select/Enable
Green Rocket Security MFA for AD FS, and then click Apply.
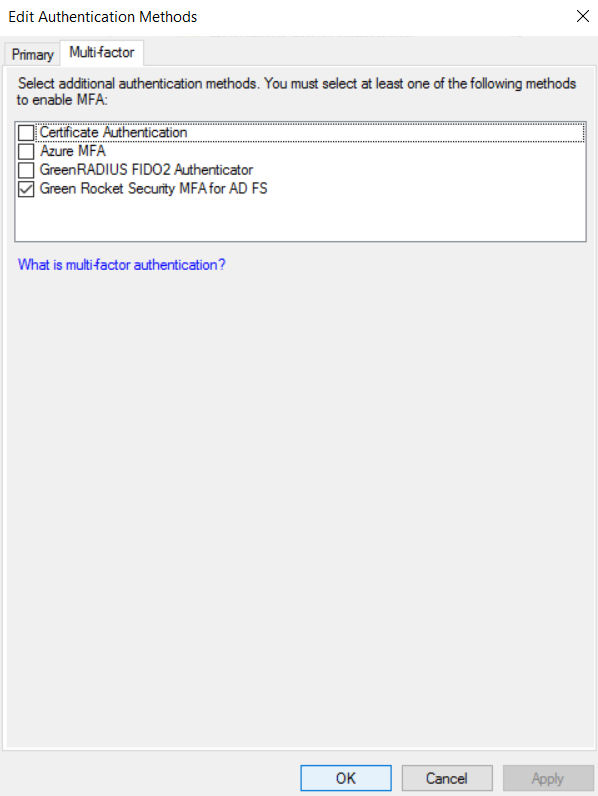
- Restart the ADFS service.
Configuring the GreenRADIUS ADFS MFA Adapter/Plugin
- Launch the ADFS management application. Right-click on
Access Control Policiesand selectAdd Access Control Policy....
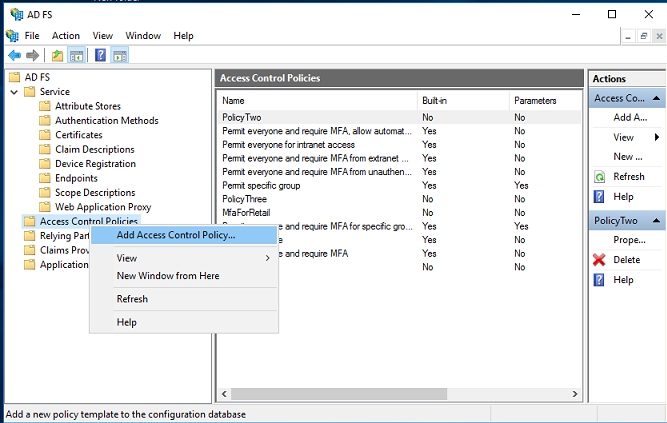
- An "Add Access Control Policy" screen will appear. In the Name field, enter a name for this new access control policy.
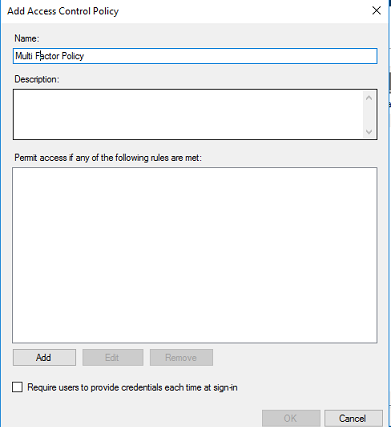
- In the "Rule Editor" screen, under the "Permit" section, select
usersand check the checkbox forand require multi-factor authentication. Then click OK.
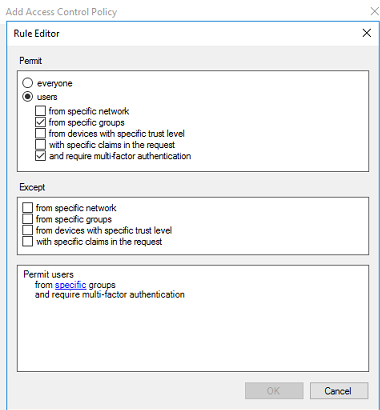
- Click on Apply, then OK to save changes.
Associate Access Control Policies to Relying Parties in ADFS
- In the ADFS management application, right-click on
Relying Party Trusts, and select a relying party trust to configure. - From the list of available access control policies, select the policy that was just configured above that requires multi-factor authentication.
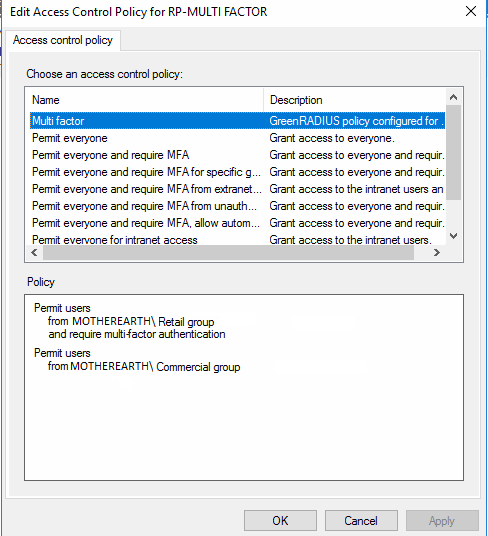
- Restart the ADFS service.
User Logins with GreenRADIUS MFA for ADFS Relying Parties
At this point, the ADFS service is ready to authenticate users and their second factor with GreenRADIUS. If the relying party is configured with an access control policy requiring multi-factor authentication with GreenRADIUS, users will see the following screen (or similar) after logging in with their username and password.
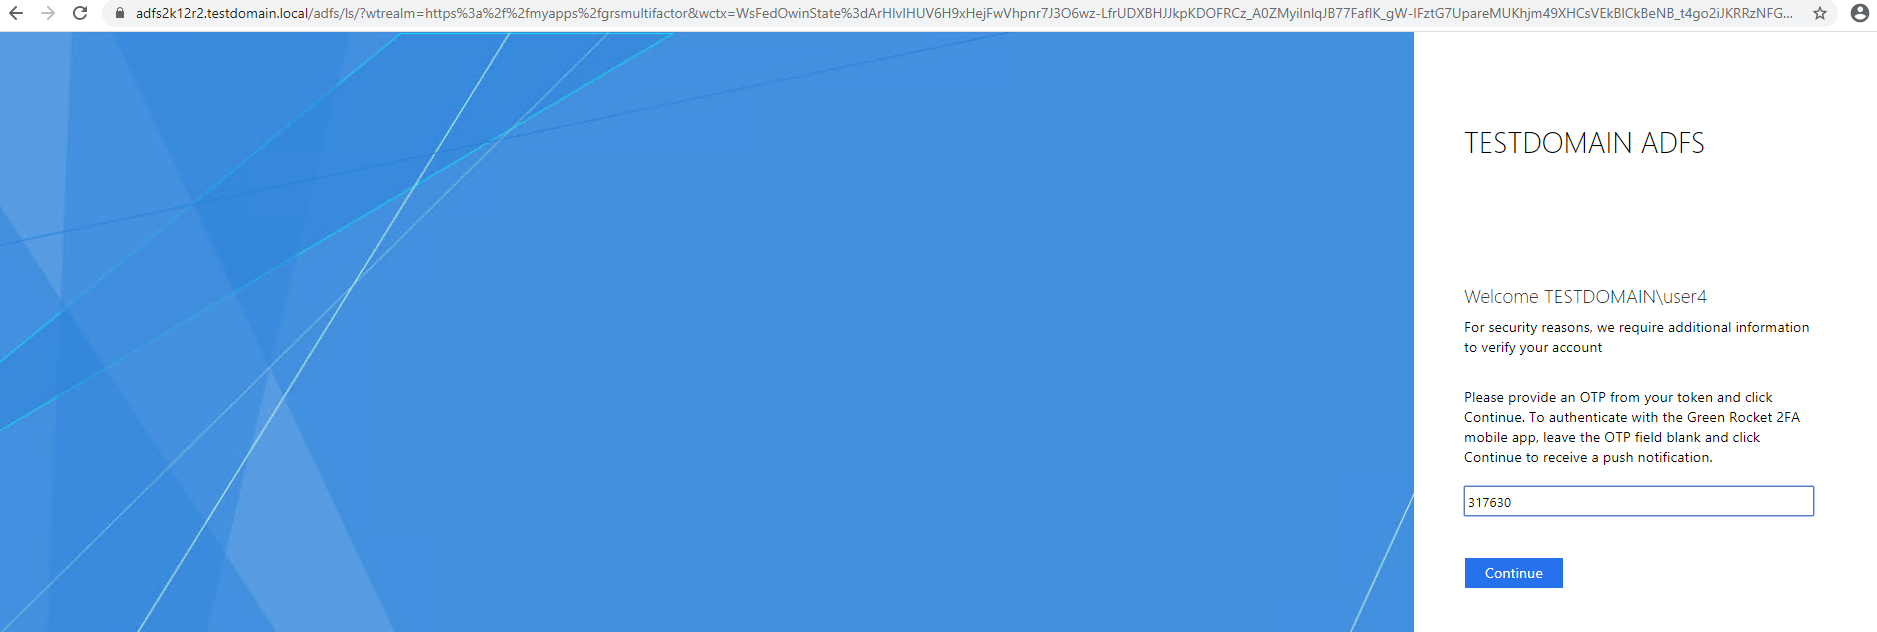
The following tokens are currently supported:
- YubiKeys: YubiKey OTPs are supported. With the cursor in the blank field, after inserting the YubiKey, the user simply touches the YubiKey button.
- Google Authenticator: Google Authenticator and other Authenticator apps are supported as well. In the blank field, the user enters the current six-digit OTP in the Authenticator app, then clicks Continue.
- Green Rocket 2FA Mobile App: Our Green Rocket 2FA Mobile App can also be used. The user leaves the field blank and clicks Continue. The user should then receive a push notification on his or her mobile phone and tap Approve to complete the login.
© 2026 Green Rocket Security Inc. All rights reserved.
GreenRADIUS PAM RADIUS Module for Ubuntu
Introduction
This document explains how to enable Two-Factor Authentication (2FA) for SSH users in Ubuntu using GreenRADIUS virtual appliance.
Prequisites
- This document assumes that GreenRADIUS Virtual Appliance is already set up with users in Ubuntu host using GreenRADIUS Virtual Appliance.
- Ubuntu host 32 or 64 bit
Steps to be Performed on Ubuntu Host
- Login to Ubuntu host using any SSH client programs like PuTTY
- Change current directory to "/tmp" directory using the following command:
cd /tmp/ - Download the "pam_radius_auth.so" file using the following command:
sudo wget -O "pam_radius_auth.so""https://files.greenrocketsecurity.com/pamradiusubuntu" - For 32 bit Ubuntu host, copy the 'pam_radius_auth.so' file to '/lib/security/' using the following command:
sudo cp pam_radius_auth.so /lib/security/ - For 64 bit Ubuntu host, copy the 'pam_radius_auth.so' file to '/lib64/security/' using the following command:
sudo cp pam_radius_auth.so /lib/x86_64-linux-gnu/security/ - Edit file '/etc/pam.d/sshd' and add the following line at the top of this file:
auth required pam_radius_auth.so - Comment the line "@include common-auth" as follows and save the file:
#@include common-auth - Create a directory "raddb" in "/etc/" folder using the following command:
sudo mkdir /etc/raddb/ - Change current directory to "raddb" directory and create a file named "server" using the following commands:
cd /etc/raddb/sudo touch server - Edit the file "/etc/raddb/server" and add the following details into this file (each separated by a space):
<<GreenRADIUS Virtual Appliance IP>><<Shared Secret>><<Timeout(seconds)>>E.g. If your GreenRADIUS Virtual Appliance IP address is "10.51.0.100" and shared secret is "test," you can use the following configuration:10.51.0.100 test 3 - Add a new user without password to the server using the following command:
useradd -d /home/<<user name>> -m <<user name>>E.g. If you want to add user say "john," you can use the following command to add user:useradd -d /home/john -m johnNote: The username added must also be present in any one of the domains created in GreenRADIUS Virtual Appliance. - Restart SSH service using the following command:
sudo /etc/init.d/ssh restart
Steps to Be Performed On GreenRADIUS
- Click the Global Configuration tab
- Click the Client-based Authentication Policies icon
- Enter the IP address of the Ubuntu SSH server. Then enter the same RADIUS secret twice. Then click the Add button.
Test SSH Login on Ubuntu Host Using Two-Factor Authentication
- Login to RedHat host using any SSH client programs like PuTTY
- Type username and hit enter
- You will be prompted for the password. At the prompt for the password, enter the user's password configured in Active Directory/LDAP and immediately followed by an OTP from a token assigned to the user (in our case "John").
- e.g. if username is "John," test login as shown in the image below:
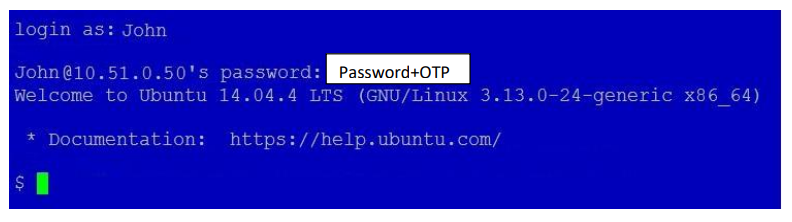
SSH Login with Prompt for OTP
If you want to enable SSH login to prompt for OTP, follow the below steps.
Additional Steps to Be Performed On Ubuntu Host
- First follow the steps performed in the above section "Steps to be performed on Ubuntu host"
- Edit the file "/etc/ssh/sshd_config"
- Find the line "ChallengeResponseAuthentication no" and change it to "ChallengeResponseAuthentication yes"
- Restart SSH service using the following command:
sudo /etc/init.d/ssh restart
Steps to be Performed on GreenRADIUS
-
Log in to the GreenRADIUS web admin console
-
Go to the "Global Configuration" tab and click on "General"

-
Under "General Configuration" section select "OTP Input Method" as "Prompt For OTP (RADIUS only)" and click "Save"
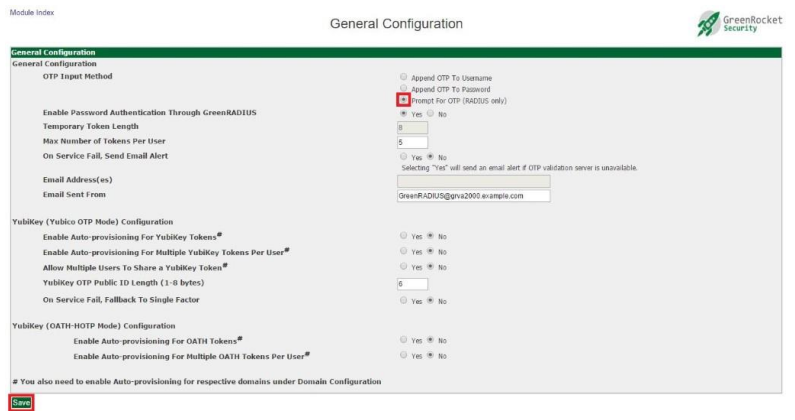
Test SSH Login on Ubuntu Host Using Two-Factor Authentication (Prompt OTP)
- Log in to Ubuntu host using any SSH client programs like PuTTY
- Type username and hit enter.
- You will be prompted for password. Enter the user's password configured in your Active Directory/LDAP and hit enter.
- You will be prompted for OTP. Enter an OTP from any one of the tokens assigned to the user.
- e.g. if username is "John," test login as shown in the image below:
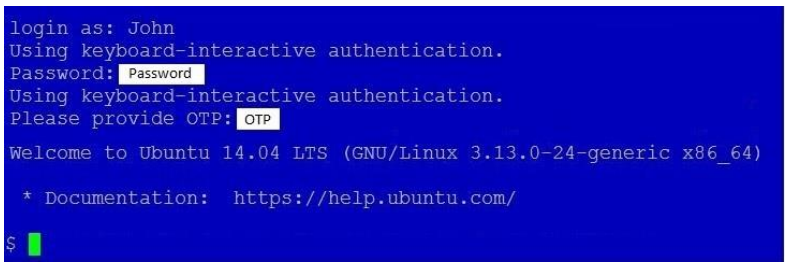
Debugging
For debugging, use following command on Ubuntu host
tail -f /var/log/auth.log
© 2026 Green Rocket Security Inc. All rights reserved.
GreenRADIUS PAM RADIUS Module for RedHat
Introduction
This document explains how to enable Two-Factor Authentication (2FA) for SSH users in RedHat using GreenRADIUS virtual appliance.
Prequisites
- This document assumes that GreenRADIUS Virtual Appliance is already set up with users imported in a domain from Active Directory/LDAP and also tokens are assigned to users
- RedHat host 32 or 64 bit
Steps to be Performed on RedHat Host
- Login to RedHat host using any SSH client programs like PuTTY
- Change current directory to "/tmp" directory using the following command:
cd /tmp/ - Download the "pam_radius_auth.so" file using the following command:
sudo wget -O "pam_radius_auth.so""https://files.greenrocketsecurity.com/pamradiuscentos" - For 32 bit RedHat host, copy the 'pam_radius_auth.so' file to '/lib/security/' using the following command:
sudo cp pam_radius_auth.so /lib/security/ - For 64 bit RedHat host, copy the 'pam_radius_auth.so' file to '/lib64/security/' using the following command:
sudo cp pam_radius_auth.so /lib64/security/ - Edit file '/etc/pam.d/sshd' and add the following line at the top of this file:
auth required pam_radius_auth.so - Comment the line "auth include password-auth" as follows and save the file:
#auth include password-auth - Create a directory "raddb" in "/etc/" folder using the following command:
sudo mkdir /etc/raddb/ - Change current directory to "raddb" directory and create a file named "server" using the following commands:
cd /etc/raddb/sudo touch server - Edit the file "/etc/raddb/server" and add the following details into this file (each separated by a space):
<<GreenRADIUS Virtual Appliance IP>><<Shared Secret>><<Timeout(seconds)>>E.g. If your GreenRADIUS Virtual Appliance IP address is "10.51.0.100" and shared secret is "test," you can use the following configuration:10.51.0.100 test 3 - Add a new user without password to the server using the following command:
useradd -d /home/<<user name>> -m <<user name>>E.g. If you want to add user say "john," you can use the following command to add user:useradd -d /home/john -m johnNote: The username added must also be present in any one of the domains created in GreenRADIUS Virtual Appliance. - Restart SSH service using the following command:
sudo service sshd restart
Steps to Be Performed On GreenRADIUS Virtual Appliance
- Click the Global Configuration tab
- Click the Client-based Authentication Policies icon
- Enter the IP address of the RedHat SSH server. Then enter the same RADIUS secret twice. Then click the Add button.
Test SSH Login on RedHat Host Using Two-Factor Authentication
- Login to RedHat host using any SSH client programs like PuTTY
- Type username and hit enter
- You will be prompted for the password. At the prompt for the password, enter the user's password configured in Active Directory/LDAP and immediately followed by an OTP from a token assigned to the user (in our case "John").
- e.g. if username is "John," test login as shown in the image below:

Debugging
For debugging, use following command on RedHat host:
tail -f /var/log/secure
SSH Login with Prompt for OTP
If you want to enable SSH login to prompt for OTP, follow the below steps.
Additional Steps to Be Performed On RedHat Host
- First follow the steps performed in the above section "Steps to be performed on RedHat host"
- Edit the "/etc/ssh/sshd_config"
- Find the line "ChallengeResponseAuthentication no" and change it to "ChallengeResponseAuthentication yes"
- Restart SSH service using the following command: sudo service sshd restart
Steps to be Performed on GreenRADIUS
- Log in to the GreenRADIUS web admin console
- Go to the "Global Configuration" tab and click on "General"
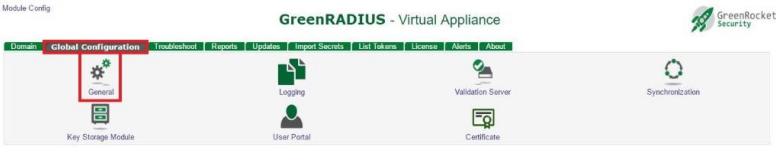
- Under "General Configuration" section select "OTP Input Method" as "Prompt For OTP (RADIUS only)" and click "Save"
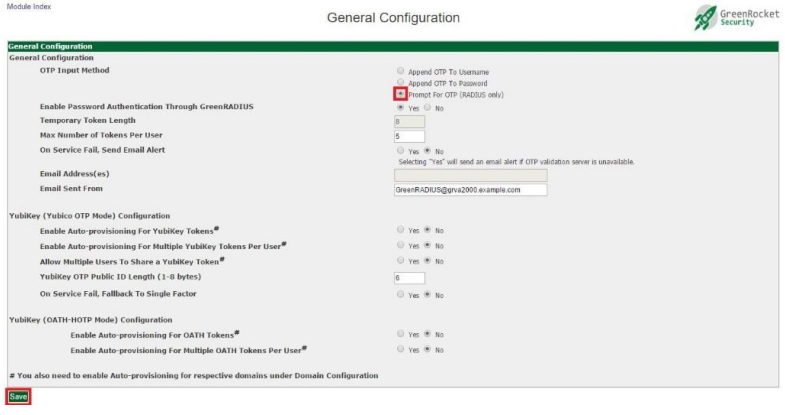
© 2026 Green Rocket Security Inc. All rights reserved.
Configuring WordPress for GreenRADIUS 2FA
Introduction
GreenRADIUS can be used to enforce two-factor authentication for Wordpress installations.
Contact us to evaluate our WordPress plugin for GreenRADIUS 2FA.
Prerequisites
- A WordPress server, with administrative permissions to modify it.
- A publicly accessible GreenRADIUS instance with a valid certificate installed. The certificate must be trusted by the WordPress instance.
- The WordPress 2FA plugin from Green Rocket Security
Steps
- Log into your administrative account on WordPress.
- Click the "Plugins" menu in the left tab, then select "Add New" > "Upload Plugin."
- Select the .ZIP file from Green Rocket Security, and upload it.
- Select "Plugins" -> "Installed Plugins" from the left menu.
- Click "Activate" under the "GreenRADIUS Authentication" entry.
- In the left menu, select "Settings" > "GreenRADIUS Authentication."
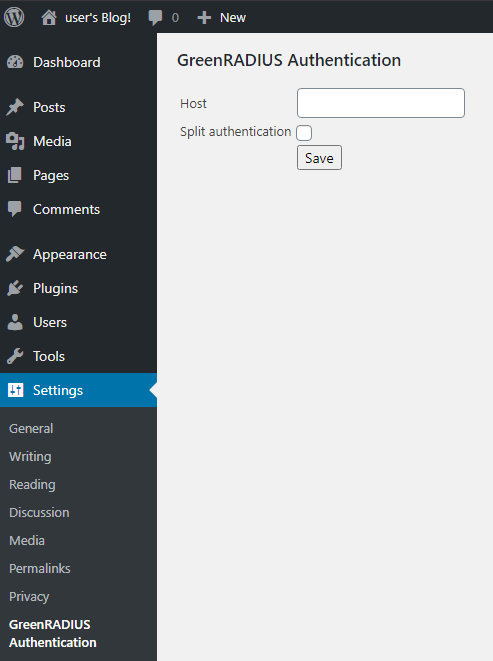
- Enter the hostname of the GreenRADIUS instance and click "Save."
- When you next attempt to log into the WordPress instance, you should see an OTP field:
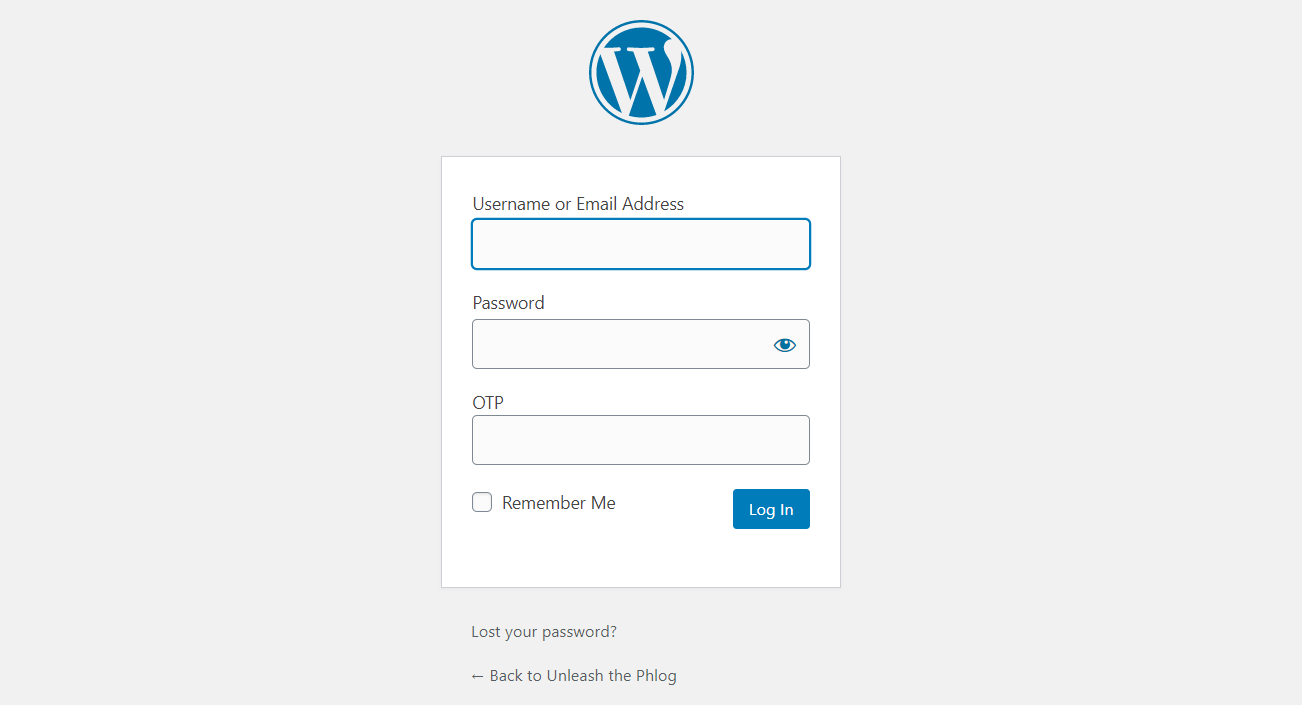
- Log in with a user that is imported in GreenRADIUS. (Only user accounts in GreenRADIUS can now log in. Local WordPress user accounts that do not have a matching LDAP username imported into GreenRADIUS will no longer be able to log in with local credentials.
For example, if there is an existing WordPress user account with a username of "jdoe," there needs to be a corresponding LDAP user account with a username of "jdoe." This LDAP user account also needs to be among the users imported into GreenRADIUS, so that there is a "jdoe" user account in GreenRADIUS.
GreenRADIUS Validation of Token Only
The WordPress plugin and GreenRADIUS can be configured so that WordPress validates the user's local WordPress password and GreenRADIUS validates the token. To do this, follow the steps below:
- In the plugin settings, check the "Split Authentication" checkbox and click the
Savebutton
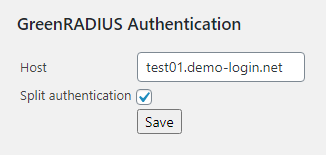
- In the GreenRADIUS web admin interface, go to the "Global Configuration" tab and click the "General" icon
- Set "Enable Password Authentication Through GreenRADIUS" to "No."
- NOTE: This GreenRADIUS setting is a global setting. It will enable or disable password validation through GreenRADIUS for all RADIUS and Web API integrations.
© 2026 Green Rocket Security Inc. All rights reserved.
Deploying the GreenRADIUS FIDO2 App
Prerequisities
- A PC running 64-bit Windows or macOS
- YubiKey or other FIDO2 token
- GreenRADIUS v5.1.2.2 or later
- A valid GreenRADIUS license with the "FIDO2 for RADIUS, LDAP, and 2FA API Integrations" module enabled
- Our GRS FIDO2 Authenticator App v2.1.2 or later
Instructions
1. GreenRADIUS Configuration
- Go to Global Configuration → GRS Authenticator App.

- Configure the following fields:
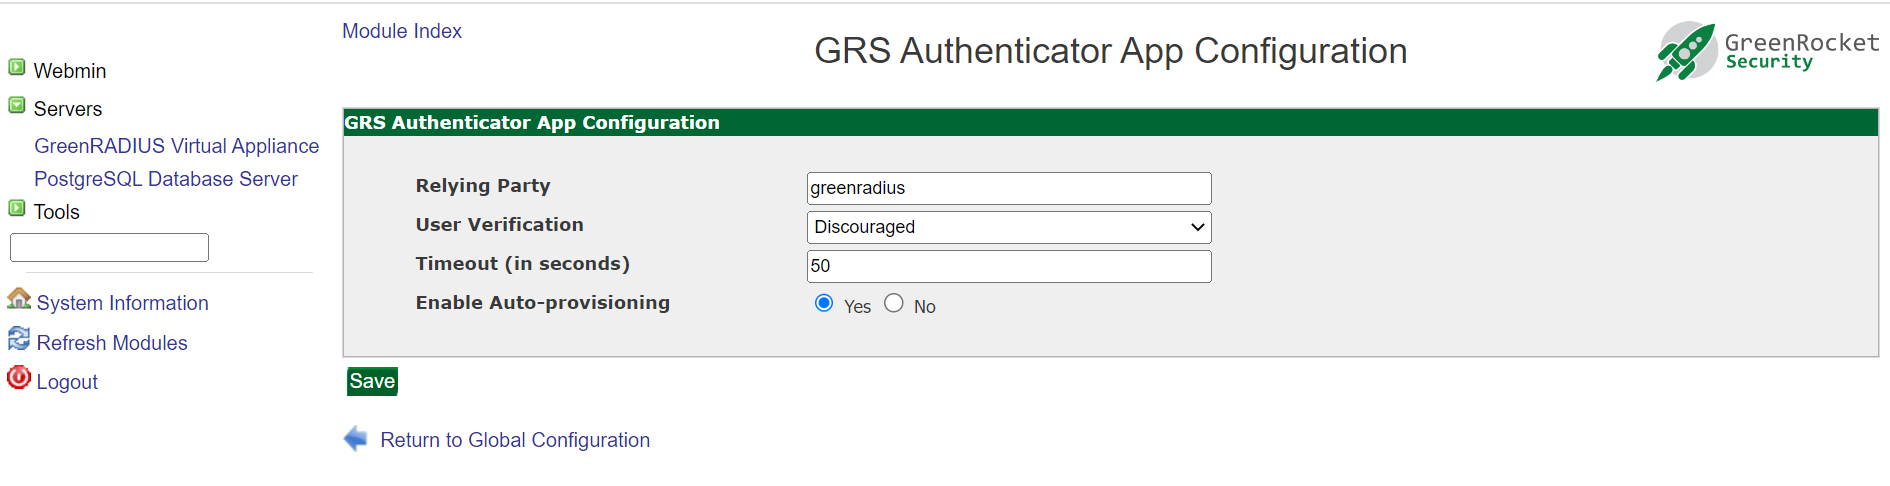
- Relying Party: this should be the same as the GreenRADIUS hostname.
- The relying party name should resolve to the IP of GreenRADIUS. This can be done by adding a DNS entry to the host file of the local system.
- Changing the Relying Party will invalidate all the previously registered tokens.
- User Verification:
- Discouraged: Users are not prompted for FIDO2 token PINs during login attempts
- Preferred: Users are prompted for PINs during login attempts
- Required: Users are always prompted for PINs during login attempts
- Timeout (in seconds): defaults to 60.
- Enable Auto Provisioning: defaults to Yes.
2. Application Installation
2a. Installation on Windows
- Run the GRS FIDO2 Authenticator app installer
- Once the installation is complete, run the application
2b. Installation on macOS
Click on the macOS installer and drag the Green Rocket Security Authenticator icon into the Applications folder, then launch the application.
3. Application Configuration
Once you have launched the GRS FIDO2 Authenticator app, you will need to enter the hostname of GreenRADIUS:
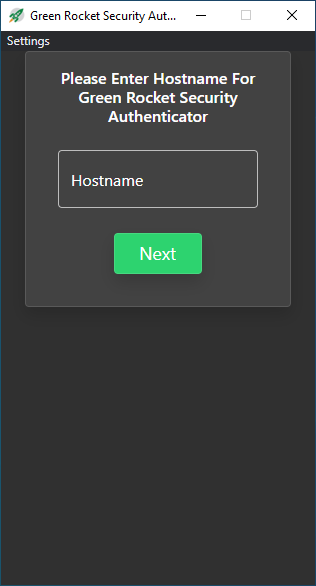
Next, enter your username, password, and an OTP from a token assigned to the user. (A Temporary Token will also work.)
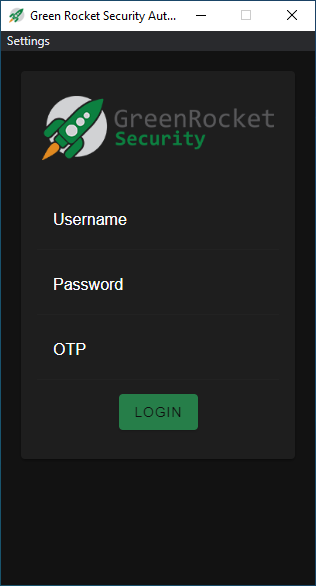
If a FIDO2 token is not already registered to you, you will automatically be redirected to the FIDO2 token setup screen upon successful login. Here, you will enter a human-readable name for your token (such as the YubiKey's serial number).

The standard Windows FIDO2 dialog will now appear. At this point you will need to insert your FIDO2 token into the computer's USB port if you have not already. Enter your FIDO2 token's security PIN (if applicable), and then touch the FIDO2 token when prompted.

The FIDO2 token will now be registered to the user in GreenRADIUS.
To test, send an authentication request using the RADIUS Test feature of GreenRADIUS on the Troubleshoot tab or from another configured RADIUS client
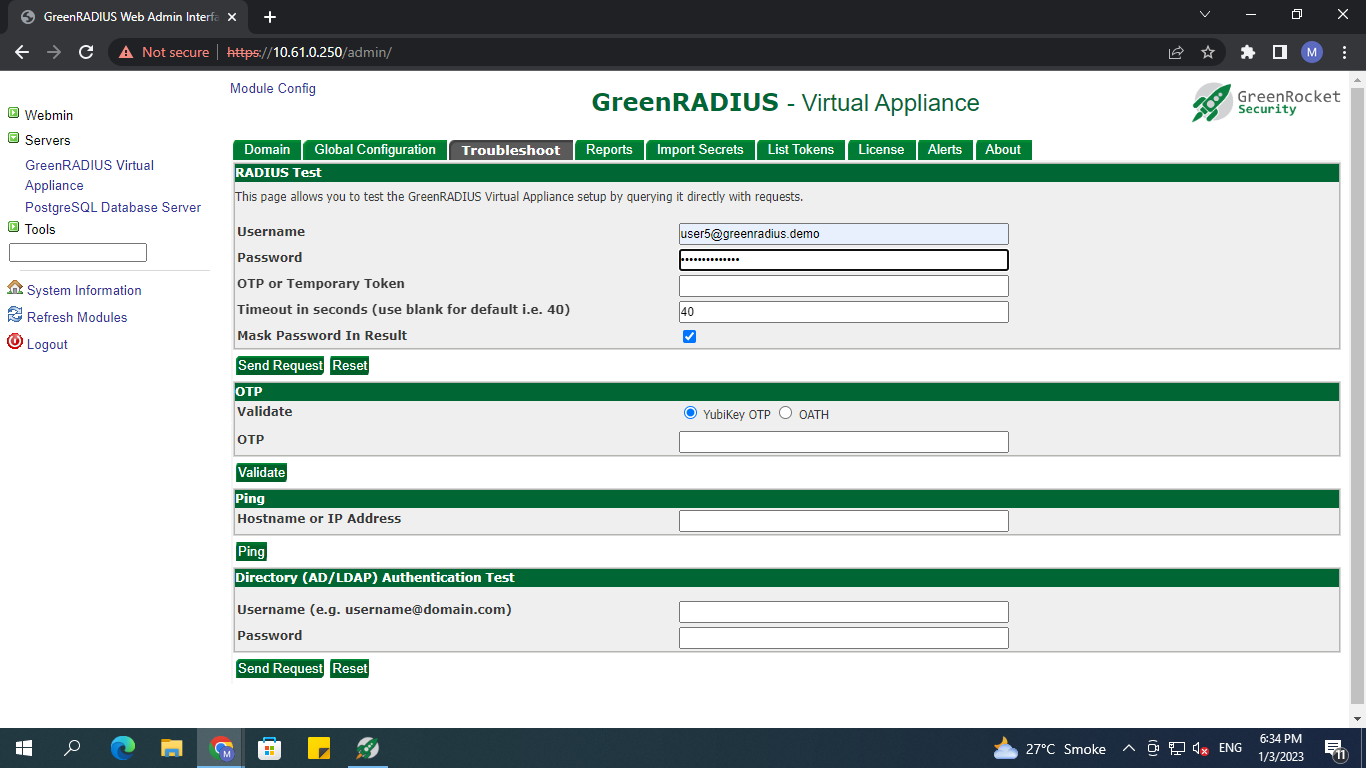
Upon sending the request, you should see a notification from the app:
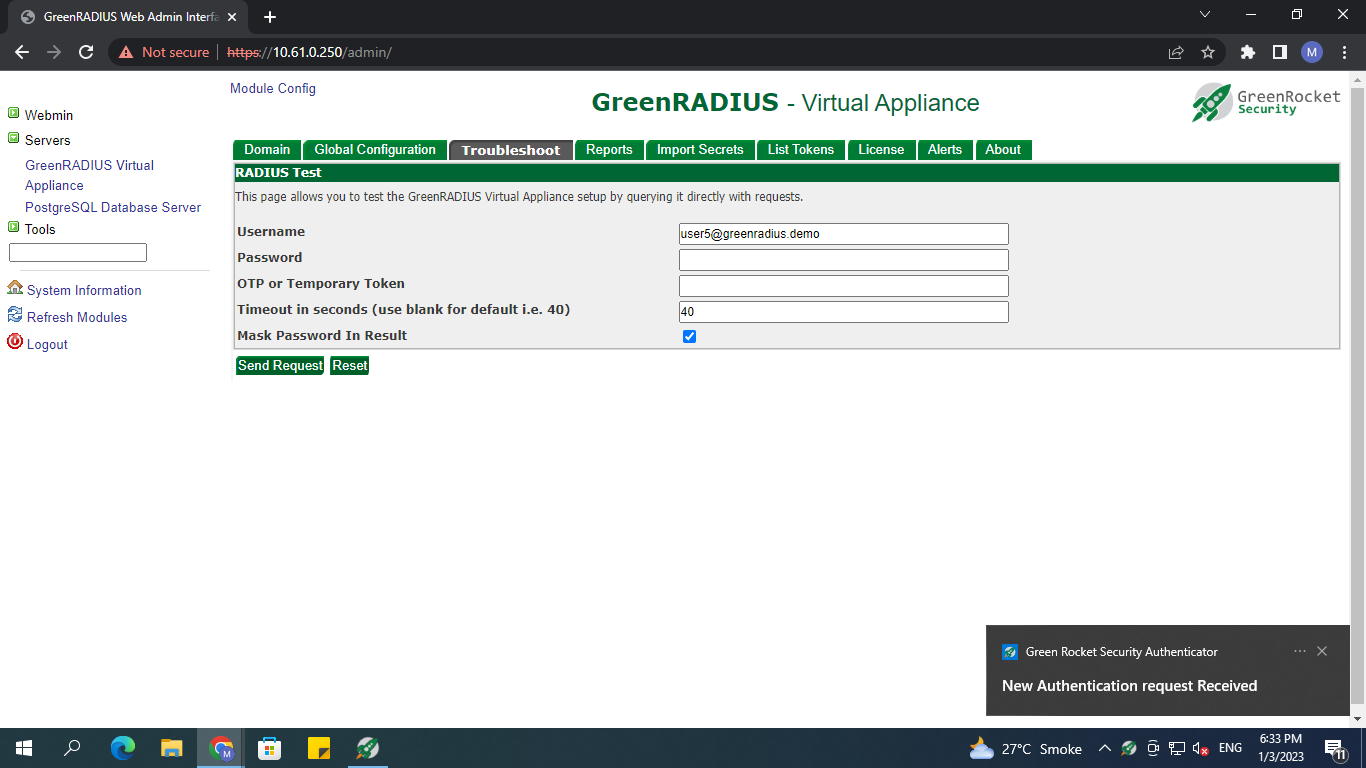
The request will appear in the app dashboard. You can now click the request to decide whether to approve or reject it.
If you decide to approve the request, the standard Windows FIDO2 dialog will appear. Enter the PIN (if prompted), and touch the FIDO2 token. The login should then be successful if performed within the timeout period.
For browser-based logins on any operating system
If users are on a Linux, Android, iOS, or some other platform, or if on Windows or Mac and our FIDO Authenticator App is not installed nor desired, users can complete their FIDO2 login attempt on a browser. The user will need to visit https://[hostname_of_GreenRADIUS]/client. Then, the user will need to log in, and register a FIDO2 token if one is not already registered. Then, when the user logs into any RADIUS or LDAP client, the user will be prompted to complete his or her login attempt following the FIDO2 prompts.
© 2026 Green Rocket Security Inc. All rights reserved.
Appendix
© 2026 Green Rocket Security Inc. All rights reserved.
GreenRADIUS Security Recommendations and Considerations
The following items are recommendations to consider to help secure your GreenRADIUS instances.
- Change default passwords
- Web admin interface (change for both default users
rootandgradmin) - Command line (change for the
gradminuser)- Note: The passwords for web admin interface users and command line users are managed separately, so be sure to change the default passwords for both
- Web admin interface (change for both default users
- Enforce two-factor authentication for GreenRADIUS admin accounts
- On the web admin interface, 2FA can be enforced a couple of ways:
- Replace the default self-signed certificate with a certificate signed by a trusted CA
- See our Certificates guide
- Restrict web admin interface access by IP address
- Webmin > Webmin Configuration > IP Access Control
- IMPORTANT NOTE: If this is configured, 127.0.0.1 must be included in the list of IP addresses
- Webmin > Webmin Configuration > IP Access Control
- Enable the UFW (onboard firewall) and set policies to restrict access (if an external firewall will not be used)
- If the onboard OpenLDAP nor the LDAP Authenticator Module will not be used, use a docker-compose-override file to prevent the OpenLDAP container from starting up
- Enable encryption of token secrets prior to importing or registering any tokens
- Global Configuration tab > General
- If the YubiCloud will be used to validate YubiKey OTPs (instead of validating locally within GreenRADIUS), obtain a new Client ID and API Key from the Yubico site
- Set in Global Configuration tab > Validation Server
- Set strong shared secrets when configuring RADIUS and ADFS clients
- Enable auto-logout after a certain period of inactivity in the web admin interface
- Webmin > Webmin Configuration > Authentication
- Enable blocking of user accounts to prevent brute force attacks
- Make sure to apply the GreenRADIUS updates timely
© 2026 Green Rocket Security Inc. All rights reserved.
GreenRADIUS – Rocket Evaluation Guide
Start Testing Greenradius In Less Than 15 Minutes!
This guide is intended for those that want to evaluate GreenRADIUS and its features quickly before integrating it with external user directories (such as Active Directory) and external RADIUS clients (such as VPN with Cisco, Palo Alto Networks, SonicWALL, and other devices and applications that authenticate with the RADIUS protocol).
Step 1 – Import OVA File In VMWare Or Oracle Virtualbox
After downloading the GreenRADIUS OVA file, import it into either VMware or Oracle VirtualBox. If DHCP is set up, the appliance will try to find an available IP address. If one is not set up automatically or if you would like to change the IP address later, see our guide for configuring network settings.
Step 2 – Log In To The Web Console
After an IP address is assigned, open a new browser tab and go to
https://<IP address of GreenRADIUS>/admin.
The default credentials are:
- Username:
gradmin - Password:
GreenRocket!23
Step 3 – Review The Sample Domain
GreenRADIUS includes a pre-configured, sample domain named
greenradius.demo. (This can be deleted later, and new domains can
be created and configured.) Click on the Domain tab, then click on
greenradius.demo. Five test users are included in this domain
from the onboard OpenLDAP that is included in the virtual appliance. All five test users have a default password of GreenRocket!23.
To access the onboard OpenLDAP, use a third-party LDAP admin tool, such as LDAP Admin. The default credentials are:
- Username:
cn=admin,dc=greenradius,dc=demo - Password:
GreenRocket!23
By default, this domain has our Gradual Deployment feature enabled, so that all test users are in single-factor mode (meaning only username and password are required for authentication). After a test user successfully authenticates with a security token (such as a YubiKey or authenticator apps), the single-factor mode for that user will be disabled so that the user must use two-factor authentication (password + security token) going forward.
Step 4 – Single-Factor Authentication
Click on the GreenRADIUS Virtual Appliance link on the left. Then click on the Troubleshoot tab. The RADIUS Test section at the top can be envisioned to stand in for a client or login page that requires a username and password.
In the username field, enter “user1." In the password field, enter “GreenRocket!23." (We will leave the OTP field blank for this single-factor test authentication.) Then click the Send Request button. You should see a response of “Successful."
Step 5 – Assigning An Authenticator App Token To A User
In a new browser tab, go to https://<IP address of GreenRADIUS>
(with nothing else after the IP address). This is the user self-service
portal where a user can self-assign tokens, including authenticator apps such as
Google Authenticator or Microsoft Authenticator.)
Follow these steps to assign an authenticator app token to a user:
- Click the "Assign a Token" button.
- In the Username field, enter
user1. Then click Proceed. - In the Password field, enter
GreenRocket!23. Then click Submit. - Click on the authenticator app radio button at the top.
- Open the authenticator app on your phone. (If you do not already have it installed on your phone, please download and install the free app.)
- In the authenticator app, navigate to set up a new account and click "Scan a barcode."
- The authenticator app will launch a barcode scanner (like a camera.) Scan the barcode on your browser.
- Once the barcode is captured and a new token is displayed (with six numeric characters), click the Proceed button.
- Enter the current six-digit OTP in the authenticator (assigned to user1@greenradius.demo) in the OTP field. Then click the Verify button. You should receive a successful response.
Step 6 - Two-Factor Authentication
Go back to the Troubleshoot tab. In the RADIUS test section, enter user1 in the Username field, enter GreenRocket!23 in the Password field, and enter the current six-digit OTP in the authenticator app in the OTP field. Then click the Send Request button. You should see a response of "Successful." (If you see a response of "Failed," make sure the server time is correct by following these steps.)
With this same user (user1), you can try with the username and password only, and you will notice that the attempt now fails. Since the user has successfully authenticated with an authenticator app token, this user must use two-factor authentication going forward. (Admins can change this for individual users in the Users/Groups tab in the Domain tab.)
One other note - This RADIUS test section has three separate fields for username, password, and OTP. When RADIUS clients are eventually set up, the default configuration in GreenRADIUS is for users to submit credentials this way:
- Username field of client or login page: username
- Password field: password immediately followed by OTP (no spaces or characters in between)
If you run into any issues or have further questions, please do not hesitate to contact us at 888-793-3247 or email us at info@greenrocketsecurity.com
© 2026 Green Rocket Security Inc. All rights reserved.
GreenRADIUS – Quick Start Guide
This guide is intended for those that want to evaluate GreenRADIUS and its features quickly by integrating it with external user directories (such as Active Directory) and external RADIUS clients (such as VPN with Cisco, Palo Alto Networks, SonicWALL, and other devices and applications that authenticate with the RADIUS protocol).
If you would like to evaluate GreenRADIUS before integrating with your user directory and your RADIUS clients, please refer to our GreenRADIUS "Rocket" Evaluation Guide.
Step 1 – Import OVA File In VMWare Or Oracle Virtualbox
After downloading the GreenRADIUS OVA file, import it into either VMware or Oracle VirtualBox. If DHCP is set up, the appliance will try to find an available IP address. If one is not set up automatically or if you would like to change the IP address later, see our guide for configuring network settings.
Step 2 – Log In To The Web Console
After an IP address is assigned, open a new browser tab and go to
https://<IP address of GreenRADIUS>/admin.
The default credentials are:
- Username:
gradmin - Password:
GreenRocket!23
Step 3 - Set Up a New Domain
GreenRADIUS includes a pre-configured, sample domain named “greenradius.demo”. (You can keep this or delete it, since a new domain will be created.)
In the Domain tab, enter your domain name in the field, then click the “Add Domain” button. Then click on the newly created domain.
Step 4 – Importing Users
Go to the “Directory Server” tab. Enter the IP address of your Active Directory, OpenLDAP, or 389DS. Then enter the username and password of an administrator’s credentials. Click the “Proceed” button.
Complete the additional fields to import users from your Active Directory or OpenLDAP. Note the following:
- For the “Login Name Identifier”:
- For Active Directory, “sAMAccountName” is common, but other identifiers can also be used.
- For OpenLDAP, use “uid”
- For the "Filter" field, consider importing users from a specific security group. An example filter string would be:
(&(objectClass=person)(memberOf=CN=test_group,OU=Technology,DC=domain,DC=local)). Otherwise, to import all users, the filter string should be:(&(objectCategory=person)(objectClass=user)) - The “Set Frequency” drop-down menu sets the scheduled frequency that GreenRADIUS will import/update users from your user directory.
Once all fields have been configured, click the “Save and Import” button to import users.
The import operation should begin. If the import is successful, the end of the message will read “Successfully updated users records. User Import operation completed.” Click “Return to previous page."
Step 5 – Configuring A RADIUS Client
Go to the “RADIUS Clients” tab.
Enter the IP address or hostname of the RADIUS client you want to integrate with GreenRADIUS. (You could also enter a subnet.) Then, enter a shared secret (entirely up to you what you want to use) in the two client secret fields. Then, click the “Add” button.
In the admin/management screen/portal of the RADIUS client you are configuring with GreenRADIUS, make sure to direct authentications to GreenRADIUS as a RADIUS server and use the same shared secret as configured in GreenRADIUS. (If asked, use the PAP protocol. CHAP, MS-CHAP, and MS-CHAPv2 are not supported.)
At this point, you can test single-factor authentications through your normal logon client/page.
Step 6 – Enable Gradual Deployment (Optional)
GreenRADIUS can make implementation easy with the Gradual Deployment feature. When enabled, GreenRADIUS will automatically enforce two-factor authentication for a user after the user’s first successful authentication with password and token. For users that have yet to use a token, they will remain needing only to use their password to successfully authenticate until they use their token or until the Gradual Deployment feature is disabled.
To enable Gradual Deployment, in the Configuration tab of the domain, set the “Enable Gradual Deployment” setting to “Yes." Then click the “Update” button.
Note – Changing this setting from “Disable” to “Enable” will set all users to needing only passwords (single factor only) to authenticate, even those users that have tokens assigned or are set to needing tokens to authenticate. You can check each user’s requirement under the “Single Factor Flag” column in the “Users/Groups” tab. A green check mark means the user only needs a password. A red X means the user needs password and token.
Also note that this Gradual Deployment feature is not available for Windows Logon.
Step 7 – Enable Auto-Provisioning Of YubiKeys (Optional)
Auto-provisioning of YubiKeys to users can be done automatically in GreenRADIUS. When this feature is enabled, users are auto-assigned YubiKeys upon first successful authentication with an unassigned YubiKey. No separate registration of the YubiKey to the user is required.
To enable this feature, in the Configuration tab of the domain, set the “Enable Auto-provisioning For YubiKey Tokens” to “Yes." Then click the “Update” button. (Make sure this setting is also set to “Yes” in the “General” settings in the Global Configuration tab.)
If you run into any issues or have further questions, please do not hesitate to contact us at 888-793-3247 or email us at info@greenrocketsecurity.com.
© 2026 Green Rocket Security Inc. All rights reserved.
Setting Up GreenRADIUS in Hyper-V
Prequisites
- Windows machine on which Hyper-V is installed
- GreenRADIUS VHDX file (complete our download request form here)
Steps
-
Open 'Hyper-V Manager' console, select Action tab, click on New and select Virtual Machine as shown in the screenshot given below:
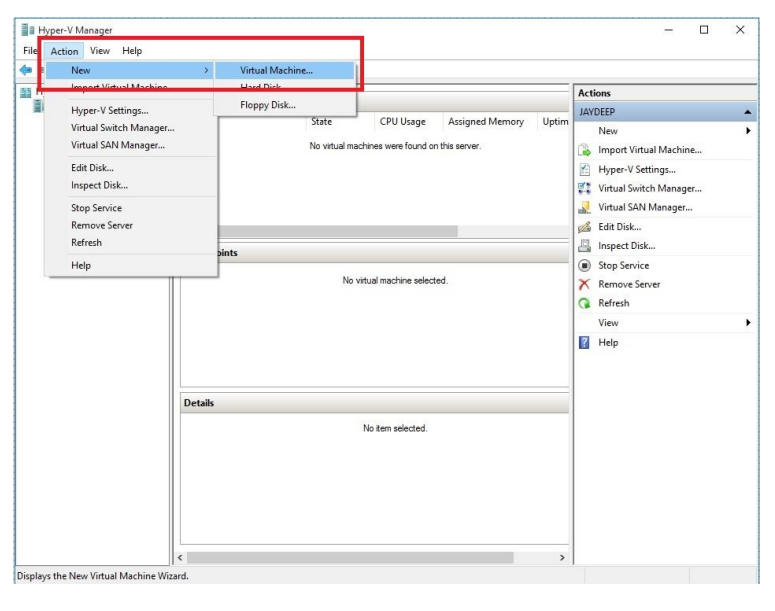
-
In New Virtual Machine Wizard, specify Name and Location and click on Next
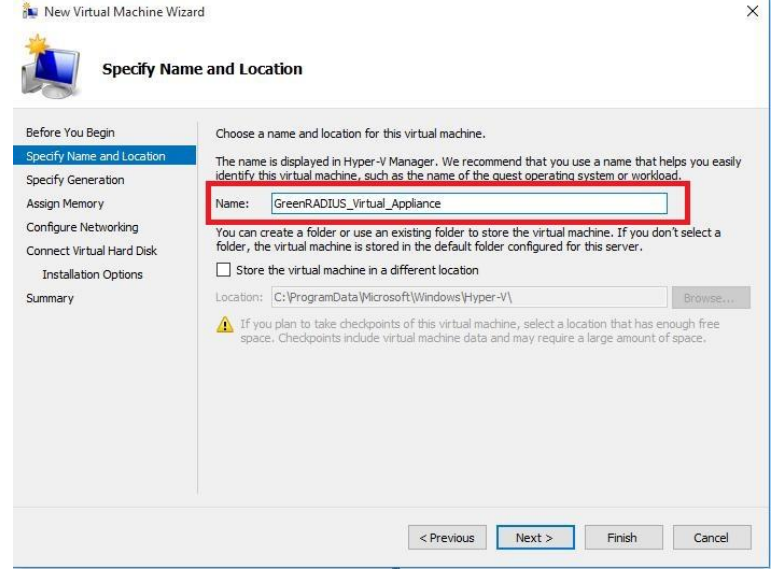
-
Select Generation 1 and click on Next
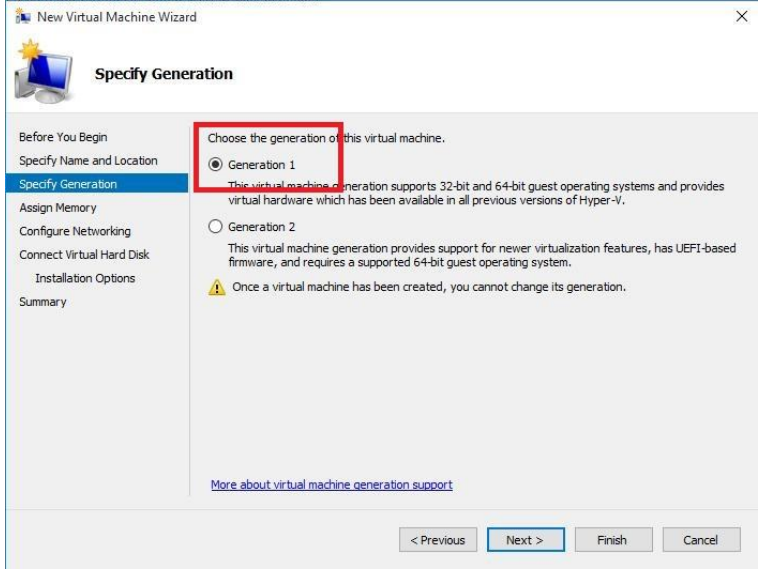
-
Specify RAM for MB for Startup Memory and click on Next
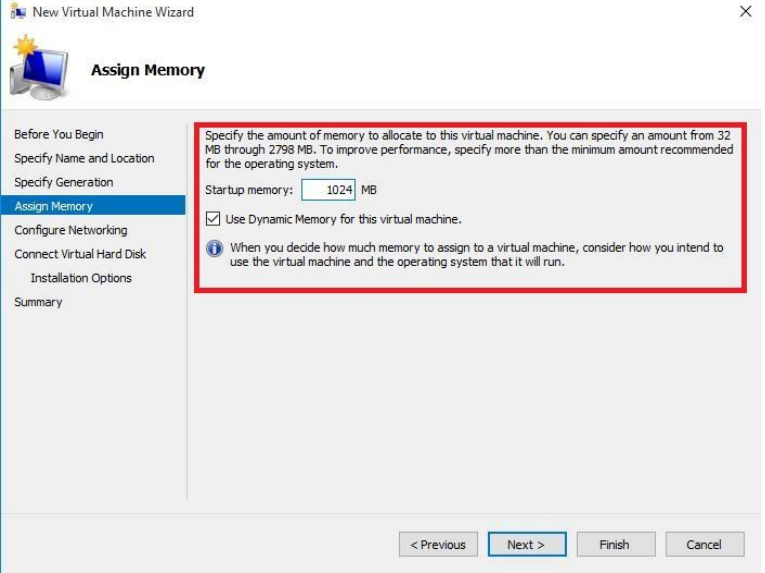
-
Select Network Adapter and click on Next
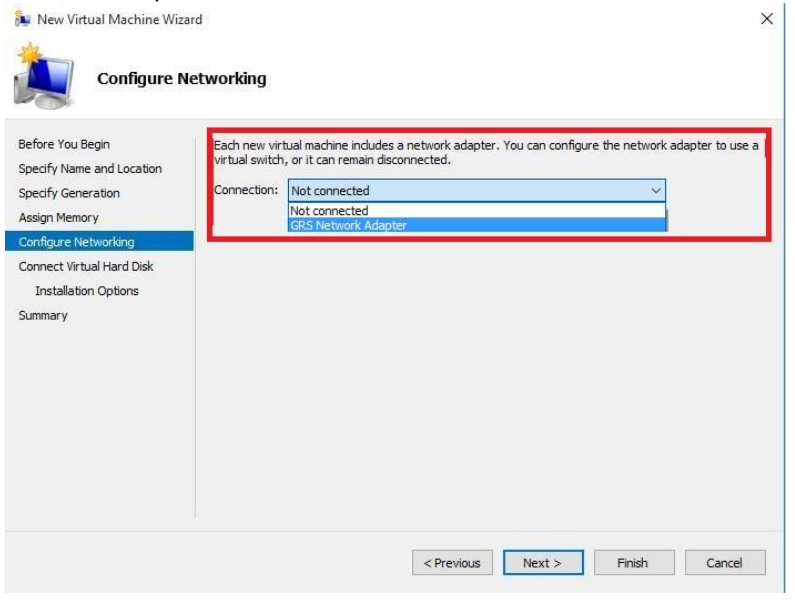
-
Select Use an existing virtual hard disk and provide the path of the vhdx file noted in step 3
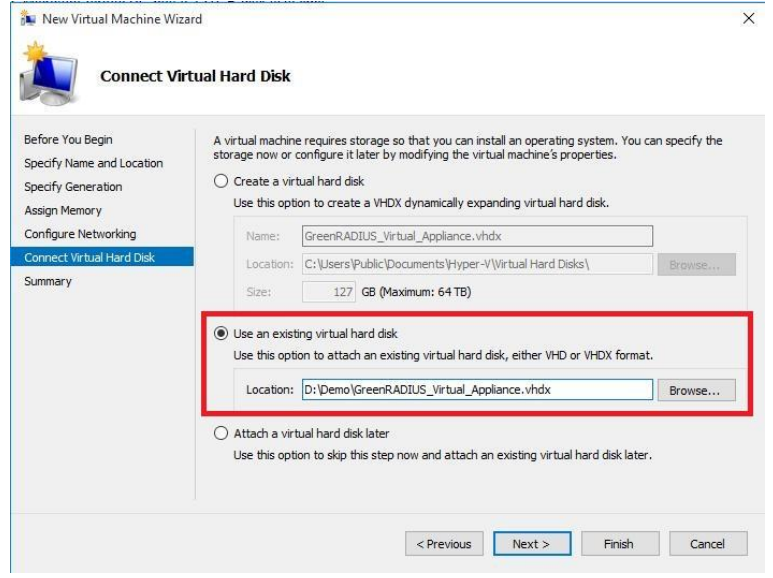
-
Review the settings and click on Finish
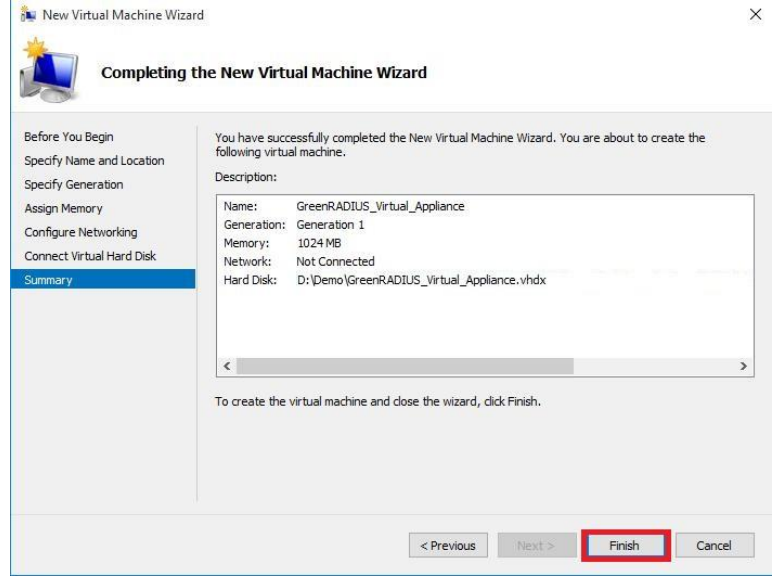
-
Under Virtual Machines, right click on newly created virtual machine and click on Start
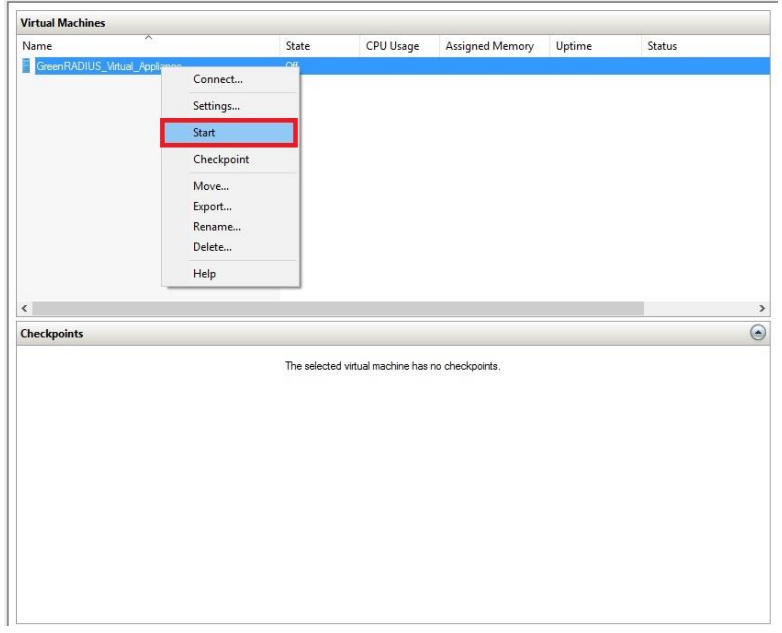
-
You should see the GreenRADIUS virtual appliance console window
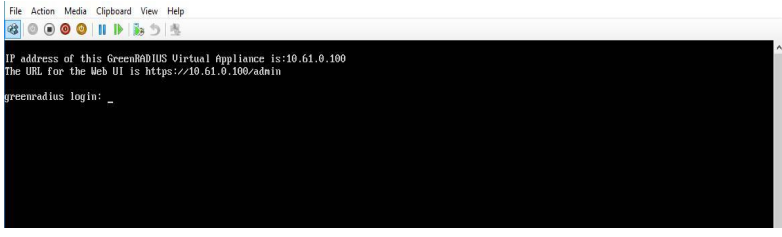
-
Log in to the GreenRADIUS web admin console any web browser and using following link:
https://<hostname or IP address of GreenRADIUS>/admin
© 2026 Green Rocket Security Inc. All rights reserved.
Enabling Two-Factor Authentication for the GreenRADIUS Web Admin Interface
For security, consistency and avoiding the need to remember additional login credentials for GreenRADIUS administrators, it is recommended that they use the same two-factor authentication offered by GreenRADIUS to login to the GreenRADIUS web admin interface.
This document describes the steps to enable two-factor authentication for the GreenRADIUS web admin interface login.
Add a New User to the GreenRADIUS Web Admin Interface
-
Login to the GreenRADIUS web admin interface using root/admin user as shown below (the default password for both users is
GreenRocket!23):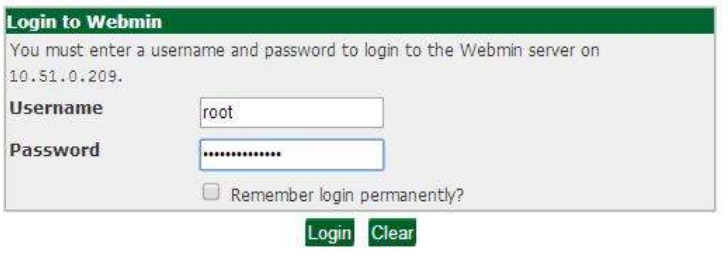
-
On left side panel, navigate to "Webmin=>Webmin Users" as shown in the image below:
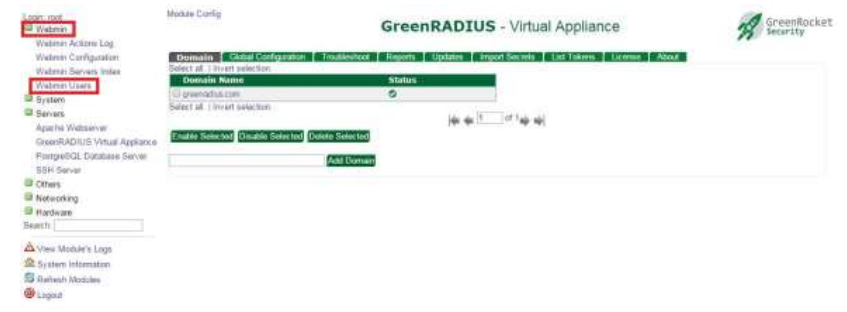
-
Click on "Create a new Webmin user" link as shown in the image below:
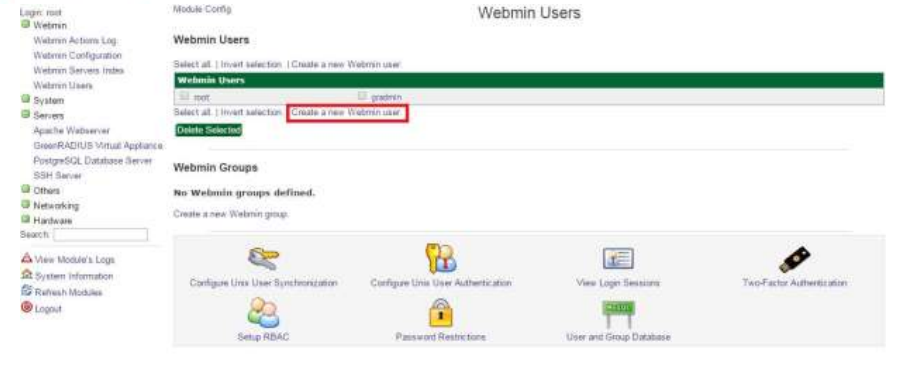
-
Enter username in "Username" field and select "Unix authentication" for Password option as shown in the image below:
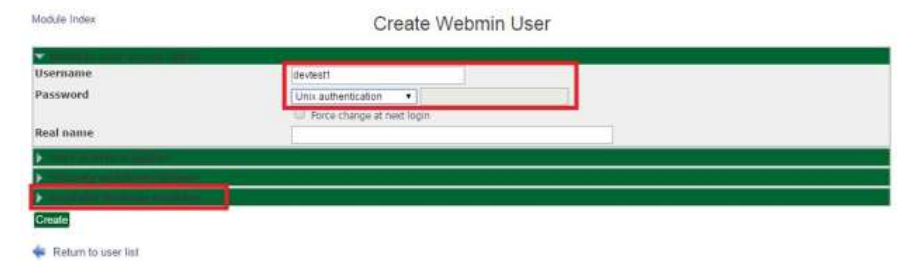
NOTES:
a. The "Username" should be identical to the "Login Name" that is used to authenticate the user with Active Directory/OpenLDAP configured for standard username-password authentication in GreenRADIUS.
b. For authentication to work, the new "Username" must already be imported into GreenRADIUS from the configured Active Directory/LDAP.
c. If your GreenRADIUS has more than one Domain configured, please enter username in "username@domainname" format. Provide "domainname" of domain created in GreenRADIUS.
-
Click to expand the "Available Webmin modules" section as shown in the image below. In the "Available Webmin modules" section, select the desired webmin modules that should be available for the new user. We recommend to select at least "GreenRADIUS Virtual Appliance" for new GreenRADIUS administrator. Click on "create" to save the new user.
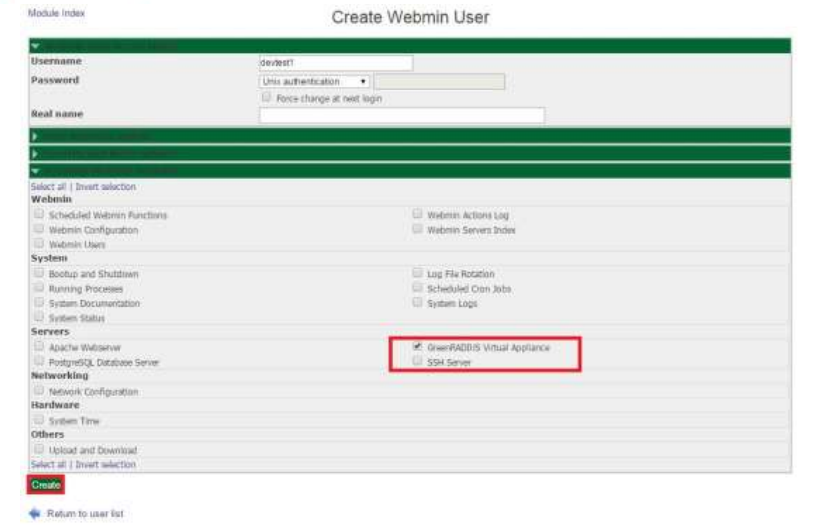
-
Log out from GreenRADIUS admin console and login as new user created in the previous steps as shown in the image below:
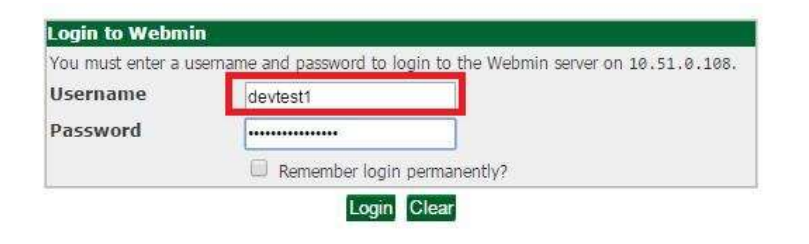
-
In the "Password" field, first type the Active Directory/OpenLDAP password for the user and append a valid OTP from one of the security tokens assigned to the user.
NOTES:
i. For the new user, two-factor authentication will be performed using GreenRADIUS. The username and password are authenticated against the Active Directory/OpenLDAP server configured in GreenRADIUS and a valid OTP assigned from one of the security tokens assigned to the user.
ii. The default users "root" and "gradmin" are configured to authenticate using Webmin's own user store. In order to avoid lockout of all GreenRADIUS admin users in case of failure to authenticate users using GreenRADIUS, it is strongly recommended not to change the "Password" setting for "root" and "gradmin" users to "Unix authentication" or "no password accepted." This is because in case of trouble authenticating users using GreenRADIUS, the users "root" and "gradmin" will still be able to login using local credentials.
© 2026 Green Rocket Security Inc. All rights reserved.
High Availability Cluster Configuration
Introduction
To avoid a single point of failure, GreenRADIUS offers a synchronized mode of operation for High Availability.
In this mode, the following updates are synced across configured GreenRADIUS instances:
- Token secrets
- User-token assignments
- Token states
- User single-factor/two-factor settings
- User-PINs
Because GreenRADIUS is designed for High Availability, depending on the overall network topology, the GreenRADIUS deployment requires a minimum of three (3) servers configured in synchronized mode so the HA cluster can operate and authenticate login attempts even if one of the GreenRADIUS servers is for some reason out of service or unreachable (and thus failing to authenticate.)
This document describes the steps to set up multiple GreenRADIUS servers in synchronized mode for high availability.
Pre-Requisites
- GreenRADIUS servers configured in synchronized mode
- Ensure the following information is identical on all of the GreenRADIUS servers:
- Token secrets
- Domain name(s)
- LDAP configurations
- Users
- Validation server settings
- TCP Port 443 must be kept open and reachable through firewalls for all configured GreenRADIUS servers
GreenRADIUS Sync Configuration
Navigate to the GreenRADIUS web admin interface, Global Configuration > Synchronization.
Determine an alpha-numeric string to be used as the "Server Secret (shared encryption key)" on all GreenRADIUS servers. Enter the secret twice in the "Local Server Configuration" section, then click the "Update" button.
In the "Add Server" configuration section, add the IP address or hostname and the same server secret of another GreenRADIUS server, then click the Add button. Repeat this until all other GreenRADIUS instances havee been added.
For example, in the case of syncing three (3) GreenRADIUS servers, see below:
| GreenRADIUS Server Instance | Server IP of the GreenRADIUS servers to be added |
|---|---|
| GreenRADIUS Server 1 | - GreenRADIUS Server 2 |
| - GreenRADIUS Server 3 | |
| GreenRADIUS Server 2 | - GreenRADIUS Server 1 |
| - GreenRADIUS Server 3 | |
| GreenRADIUS Server 3 | - GreenRADIUS Server 1 |
| - GreenRADIUS Server 2 |
© 2026 Green Rocket Security Inc. All rights reserved.
Programming YubiKeys with the GRS Programming/Auto-Import Tool
Green Rocket Security provides a Windows-based YubiKey programming tool, which programs YubiKeys and also automatically uploads the newly-generated YubiKey secrets to GreenRADIUS in a single-step process. These are the steps to install and use the programming tool.
- Contact Green Rocket Security to receive a copy of the programming tool installation EXE.
- Run the installer as administrator. The programming tool will be installed to the AppData directory for your user. A shortcut will also appear in the Start Menu.
- Enable the programming API on GreenRADIUS, if you have not done so
already. To do this, log into GreenRADIUS, either in the console or
via SSH, and run the command
sudo docker exec -it GRVA-MAIN changepassword grsapiusr. This will prompt you for a new password for thegrsapiusrAPI user. - Insert your YubiKey in a USB port.
- Launch the programming tool as an administrator. To do this, find its entry in the Start Menu, right-click it, and select "Run as Administrator" from the list of options that appears.
- You will need to enter the hostname or IP address of GreenRADIUS as well as the username (
grsapiusr) and password. The password is the one configured in Step 3.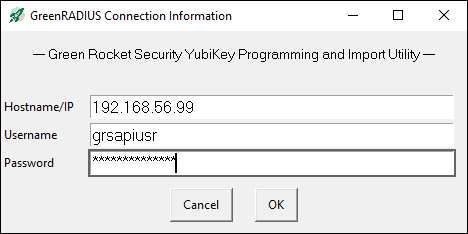
- The tool will now automatically program your YubiKey with a random secret and upload the data to GreenRADIUS. You will be able to see the new token appear in the "List Tokens" screen of the web admin interface.
- You can program as many keys as your wish successively, or exit the tool once you are finished. The data for each key is imported to GreenRADIUS as it is generated, so no final "save" step is necessary.
Configure GreenRADIUS to Validate YubiKeys Locally
To use the tokens, you will need to set your GreenRADIUS to use local validation, since the secrets are stored locally rather than in the YubiCloud. To do this:
- In the GreenRADIUS web admin interface, click the Global Configuration tab.
- Select "Validation Server."
- Set the server to "Local validation server on GreenRADIUS Virtual Appliance" and click "Save" to commit your changes.
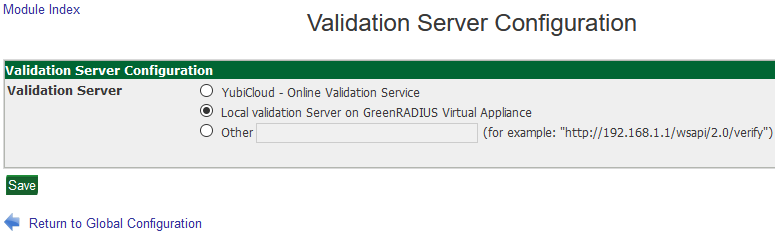
Once this is done, you will be able to use your YubiKeys with GreenRADIUS validating OTPs locally.
© 2026 Green Rocket Security Inc. All rights reserved.
Management APIs
Customers may make use of HTTPS management APIs for specific administrative operations in GreenRADIUS. These allow customers to write their own frontend software to administer their GreenRADIUS instance.
This document lists the endpoints for these APIs and provides examples of how to call each one.
All of these APIs require that the management API password be configured. You can do this by executing the following command from the shell on your GreenRADIUS instance:
sudo docker exec -it GRVA-MAIN changepassword grsapiusr
All requests require parameters to be supplied in the request body as a JSON structure. The Content-Type of the request must be set to application/json. Authentication is required for each request in the form of BasicAuth username/password tokens.
For example, to call the API from Python, you could use the following:
import requests

HOST = 'greenradius.example.com'

requests.post(
    'https://'+HOST+'/gras-api/v2/mgmt/import_token/yubikey',
	auth = ('grsapiusr', 'GreenRocket!23'),
	json = {
    	"yubikeys" : [
            {
                "make": "Yubico OTP",
                "serialno": 3014781,
                "publicname": "ddvcuttiuejt",
                "internalname": "8b428d0f016f",
                "aeskey": "a55adb9c4da2ad57c529737fd4d5ecd0"
            }
        ]
    }
)
The APIs are:
- Import a YubiKey Token
- Delete a YubiKey
- Delete an OATH Token
- Assign a Token
- Assign an OATH Token
- Unassign a Token
- Request Token Assignments/Status
- Request Authentication Records
- List Block/Unblock Status
- Unblock Users
- Enable Token Assignment
- Disable Token Assignment
- Add a Temporary Token
- Update a Temporary Token
- Delete a Temporary Token
- Get Temporary Token Information
Reporting Batch Results
Many of the endpoints allow one to send multiple entries as part of a single request. For example, the YubiKey Import endpoint enables you to send several YubiKey token entries with one request. When this happens, it is possible for some of the assignment requests to succeed and some to fail. Therefore, these endpoints use result batches to report the results of individual logins, rather than reporting the entire batch as a single success or failure.
A result batch is a JSON structure with the following entries:
{
    "count": 2,
    "records": {...}
}
The count is either an integer or a string (callers must expect either.) It indicates the number of results in this batch. The records entry is a JSON structure, unless count is 0, in which case it is the empty list []. It will contain count key-value pairs, each of which represents the result of one of the entries in the initial request. The value will vary depending on which type of batch and which endpoint; the key is always a string (not an int) of the index, starting from 1, of the request in the initial list passed to the endpoint.
For example: say a fictional endpoint square, which computes N2, is called with five individual entries:
{
    "numbers": [
        5,
        2,
        "invalid input",
        6
    ]
}
The result might be two result batches, one containing successes and one containing failures:
{
    "numbers_squared": {
        "count": 3,
        "records": {
            "1": 25,
            "2": 4,
            "4": 36
        }
    },
    "numbers_invalid": {
        "count": 1,
        "records": {
            "3": {...}
        }
    }
}
numbers_invalid["records"]["3"] would be an error structure, as described below.
Paging
When multiple entries are returned by any endpoint, you have the option to request that the results are paged: that is, rather than returning all the entries in one request you can fetch them in slices.
To prevent denial of service, all entry batches are truncated to 10,000 records: no endpoint will return more than 10,000 records at once. This means you must implement batch handling if you need to deal with more than 10,000 results.
To use paging, specify the following two options in the JSON parameters to the endpoint you are using:
| Key | Value Type | Value Description |
|---|---|---|
offset | Int | The offset from which to start the returned records. |
limit | Int | The maximum number of records to return. |
For example, if a query produces 50,000 thousand results, you can fetch the first 10,000 with:
{
    "offset": 0,
    "limit": 10000
}
Then, send another request with the same parameters except the next value of offset:
{
    "offset": 10000,
    "limit": 10000
}
Once a return value contains fewer than limit requests, you have reached the end of the available entries.
Error Reporting
Error Structure
Errors are reported as a structure with the following entries.
| Key | Value Type | Value Description |
|---|---|---|
code | Int | An integer numerical code describing the error. |
short | String | A short, non-user-friendly description of the error. |
description | String | A longer, more user-friendly description of the error. |
Table of Error Codes
| Code | Error |
|---|---|
| 4000 | The Content-Type of the request is not application/json. |
| 4001 | One of the input parameters is invalid. |
| 4002 | A required input parameter is missing. |
| 5000 | No user found. |
| 5001 | The user already has the maximum number of tokens allowed. |
| 5002 | The token is already assigned to the user. |
| 5003 | Assigning a token to a user failed. |
| 5004 | The requested YubiKey token is not present. |
| 5005 | The maximum number of users has been exceeded. |
| 5006 | The token could not be assigned because user-level authentication failed due to invalid credentials. |
| 5007 | Token assignment failed for an unspecified reason. |
| 5008 | Token assignment failed because the token does not exist. |
| 5026 | The requested assignment was not found. |
| 5051 | The YubiKey token is already present. |
Import a YubiKey Token
Overview
This endpoint imports a new YubiKey token. The token will not be assigned to any user, but it will be added to the GreenRADIUS database.
Request Type: POST
Endpoint Path: /gras-api/v2/mgmt/import_token/yubikey
Parameters
{
    "yubikeys" : [...]
}
Each item in the provided list of YubiKeys must be a JSON structure with the following elements:
| Attribute | Type | Description |
|---|---|---|
make | String | The make of this particular token. Should always be set to "Yubico OTP". |
serialno | Int | The serial number of the YubiKey. |
publicname | String | The key's public ID. |
internalname | String | The key's private ID. |
aeskey | String | The secret AES-128 key associated with the YubiKey. |
Return Values
If the request parameter is valid and adheres to the specified format, the endpoint will return a JSON structure similar to the following:
{
    "records_imported": {...},
    "records_invalid": {...},
    "records_skipped": {...}
}
Each of records_imported, records_invalid, and records_skipped will contain a request batch structure. Within this records_imported structure, each record in the batch will be a structure with keys status, make, serialno, and publicname. The latter three elements are the same ones that were passed in; the status attribute is always set to "success".
For failed requests (this includes both records_invalid and records_skipped), the value will be an error entry. Attempting to import a key that is already present in the database is considered an error; that key will be counted in records_skipped.
For an error which makes it impossible to parse the key import requests (such as, for example, the yubikeys parameter is missing entirely or is the wrong type) then the request value will simply be an error structure.
Delete a YubiKey
Overview
This endpoint deletes a YubiKey from the database.
Request Type: DELETE
Endpoint Path: /gras-api/v2/mgmt/delete_token/yubikey
Parameters
{
    "deletealways": false,
    "yubikeys": [...]
}
| Parameter | Type | Description |
|---|---|---|
deletealways | Bool | If true, the YubiKeys will be deleted even if they are currently assigned to users. If false, those requests will instead produce error entries. This parameter is optional and defaults to false. |
yubikeys | List | A list of YubiKeys to delete. Each YubiKey is a JSON structure with a single entry publicname, which is the Public ID of the YubiKey. |
Return Values
If the request is validly formed, the response will be a JSON structure of the form:
{
    "records_deleted": {...},
    "records_invalid": {...},
    "records_skipped": {...}
}
Each of these is a batch structure; records_invalid and records_skipped contain an error structure for each failed deletion. records_deleted contains a batch structure, whose individual entries are of the following form:
{
    "status": "success",
    "publicname": "..."
}
publicname will be the public name of the deleted key.
If the request is not validly formed, the response will be an error structure.
Delete an OATH Token
Overview
This endpoint deletes an OATH token from the database.
Request Type: DELETE
Endpoint Path: /gras-api/v2/mgmt/delete_token/oath
Parameters
{
    "deletealways": false,
    "oathTokens": [...]
}
| Parameter | Type | Description |
|---|---|---|
deletealways | Bool | If true, the tokens will be deleted even if they are currently assigned to users. If false, those requests will instead produce error entries. This parameter is optional and defaults to false. |
oathTokens | List | A list of OATH tokens to delete. Each token is a JSON structure with a single entry publicname, which is the ID of the OATH token as shown in the database (of the form nnnnnnnn:N). |
Return Values
The return structure is identical to the Delete a YubiKey endpoint described above.
Assign a Token
Overview
The endpoint assigns tokens to users. Unlike the YubiKey import endpoint, it is not restricted to Yubikeys; this endpoint works for any token type except OATH/TOTP tokens. For those, there is a special endpoint; see below.
Request Type: POST
Endpoint Path: /gras-api/v2/mgmt/mappings
Parameters
{
    "assignments" : [
        {...}
    ]
}
Each assignment entry should be a structure with the following elements:
| Attribute | Type | Description |
|---|---|---|
username | String | The target user to assign the key to. This must be supplied in user@domain format. |
publicname | String | The public ID of the token to assign to the user. |
Return Values
Like the other endpoints, this returns a single error structure if the input is invalid. However, it does not return regular batch structures on success. Instead, the output is in the following format:
{
    "assignments": [...]
}
Each item in the assignments list corresponds to one of the entries in the original request. These are structures with two entries, input and output. The input attribute is the input that was submitted for this entry (i.e. a structure with username and publicname attributes). The output attribute is a structure. This structure is always guaranteed to have one attribute status, whose value will be either "success" or "failed". If the assignment failed, the structure will also be an error structure, with code,short,and description attributes. If the assignment succeeded, the structure will contain a msg attribute with a success message.
Remarks
If the token is already assigned to a user - even if they are the same as the target of the assignment request - the request will fail.
Assign an OATH Token
Overview
This endpoint assigns OATH/TOTP tokens (e.g. an Authenticator token) to users.
Request Type: POST
Endpoint Path: /gras-api/v2/mgmt/mappings/oath
Parameters and Return Value
The parameters and return value for this endpoint are identical in structure to those of the endpoint above ("Assign a Token"); however, the "publicname" specified in the records should be the identifier for an OATH/TOTP token already present in the system (i.e. visible in the List Tokens tab of the web administration console).
Unassign a Token
Overview
This endpoint un-assigns tokens that are currently assigned to users.
Request Type: DELETE
Endpoint Path: /gras-api/v2/mgmt/mappings
Parameters
{
    "users": [
        {...}
    ]
}
Each entry to unassign should be a structure with either of the two following keys (you need not supply both):
| Attribute | Type | Description |
|---|---|---|
username | String | The username to un-assign from, in user@domain format. |
publicname | String | The public ID of the token to un-assign. |
Remember, for each unassignment, you only need to supply either the user or the token!
Return Value
Like the Assign a Token endpoint, this endpoint returns a structure in this format:
{
    "users": [...]
}
Each item in the users list corresponds to one of the input entries. These entries are structures with input and output attributes, with input again holding the input value for this entry. The output value is either an error structure, if the given entry failed to unassign, or a structure in one of two formats.
If the entry unassigned by username, its corresponding output struct will have the following attributes:
| Attribute | Type | Description |
|---|---|---|
status | String | For successful unassignments, holds "success". |
username | String | The input username. |
tokens_unassigned | List of strings | A list of all tokens unassigned from the user. |
If the entry unassigned by token ID, its output struct will look like this instead:
| Attribute | Type | Description |
|---|---|---|
status | String | For successful unassignments, holds "success". |
publicname | String | The input public ID of the token. |
users_unassigned | List of strings | A list of all users the token was unassigned from. |
Request Token Assignments / Status
Overview
This endpoint returns a list of user-token mappings matching the given criteria.
Request Type: GET
Endpoint Path: /gras-api/v2/mgmt/tokenassignment
Parameters
All parameters are optional. You may supply one, more than one, or none. Supplying no parameters will match all assignments.
| Parameter | Type | Description |
|---|---|---|
token_id | List of strings | A list of Token IDs to match against. |
username | List of strings | A list of user names to match against. These must be provided in user@domain format. |
token_type | List of strings | A list of token types to match against. The following values are accepted: yubikey, oath-totp, oath-hotp, u2f, and m2f. Multiple values may be supplied. |
assigned_before | Int | A "latest date" for any assignment. Matches only assignments earlier than this date. Provided as a number of seconds since 00:00:00 on 1 Jan 1970 in the server's timezone. |
assigned_after | Int | An "earliest date" for any assignment, in the same format as assigned_before. |
Return Value
The return value will be a map with three main elements of interest: records_with_mappings, records_without_mappings, and records_invalid. Each of these elements is a struct with a count element and a records element. The records element will be an empty list or non-existent if there are no records in the given group; otherwise it will be a map. Depending on the parameters provided, this map will have either the usernames or token names as keys, and the mappings for that user or token as the value.
If the search parameters are such that the returned values are tokens, then each token struct will contain a list of user mappings; if the search parameters cause a token list to be returned, then its struct will contain a list of token mappings. In either case, the mappings will be added as a user_mappings element on each returned record.
Token structs are of the following form:
| Parameter | Type | Description |
|---|---|---|
token_id | String | The public ID of the token. |
token_type | String | The type of token, e.g. "Yubikey" or "OATH-TOTP" |
User structs contain the following elements:
| Parameter | Type | Description |
|---|---|---|
user | String | The username, in user@domain format. |
Whichever are the mapping structs (not the returned records) will also contain the following information for each mapping:
| Parameter | Type | Description |
|---|---|---|
status | String | The token status (either "Enabled" or "Disabled"). |
assigned_on | Int | The date that the token was assigned to the user, in Unix epoch format. |
Request Authentication Records
Overview
This endpoint returns a log the of authentications against the GreenRADIUS server, filtered according to provided criteria.
Request Type: GET
Endpoint Path: /gras-api/v2/mgmt/gras-authentication-request-records
Parameters
{
    "authentication_result": //List of strings.
    "token_type": //List of strings.
    "username": //List of strings
    "token_id": //List of strings
    "authentication_agent": //List of strings
    "authentication_endpoint": //List of strings
    "sort_by": //String
    "sort_order": //String
    "from_timestamp": //String. "Earliest date" for authentication requests, in seconds since
    				//00:00:00 on 1 January 1970 in the server's timezone
    "to_timestamp": //String. "Latest date" for authentication requests, in the same format as above.
}
| Parameter | Possible Values (more than one may be supplied) |
|---|---|
authentication_result | SUCCESS_2FA, SUCCESS_SF,SUCCESS_TEMP,FAILED |
token_type | ALL,YUBIKEY,OATH,U2F,MOBILE |
sort_by | AUTHENTICATION_TIME,USERNAME,TOKEN_ID |
sort_order | ASC,DESC |
List Block/Unblock Status
Overview
This endpoint returns the blocking status of users, supporting various filter configurations.
Request Type: GET
Endpoint Path: /gras-api/v2/mgmt/blocked-status
Parameters
If no JSON data is supplied, then the request returns the blocking status of every user across all domains. Otherwise, a JSON map can be used containing one or more of the following filters:
| Parameter | Type | Description |
|---|---|---|
users | List | A list of users, in user@domain format. |
pattern | String | A pattern string, in user@domain format. A ".*" expression can be provided to match some part of the username, e.g. "user.*@test" will match all users in domain test whose username starts with user. A domain cannot be partially specified and partially filled by the regex; either the whole domain must be supplied, or the regex must match the whole domain. |
state | List | Contains either or both of "blocked", "unblocked". Matches only the users in that state. |
Return Value
The return value on success will be a JSON map containing one entry for each user matching the pattern, plus an additional entry with the key "Reporting Time Zone", which lists the timezone in which GreenRADIUS is executing. This must be taken into account when converting UNIX timestamps into date/time structures.
For each of the users, their username (in user@domain format) will be the key for their entry in the map; the value will be a structure containing the following elements:
| Key | Type | Description |
|---|---|---|
status | String | "blocked" or "unblocked". |
last_failed_attempt_at | Integer | This entry is only present is status is blocked. If it is present, it contains the UNIX timestamp of the last failed login. |
Unblock Users
Overview
This endpoint unblocks users who have previously been blocked by exceeding the threshold for consecutive failed login attempts.
Request Type: PUT
Endpoint Path: /gras-api/v2/mgmt/unblock-users
Parameters
The parameter should be a JSON map containing a single entry users. The value of this entry should be an array of usernames, in user@domain format; each user in this array will be unblocked.
{
	"users":[
        "user1@greenradius.demo",
        "user2@greenradius.demo"
    ]
}
Return Value
A JSON map will be returned containing three sub-maps: records-unblocked,records-skipped, and records_not_found. Records in records_skipped are those which were specified in the parameters, but which were already unblocked (unblocking them would be a no-op.) Each of these categories is in the following format:
| Key | Type | Description |
|---|---|---|
count | Number | The number of records in this category |
records | List of strings | The users in this category, in user@domain format. |
Enable Token Assignment
Overview
This endpoint enables a set of given user/token mappings.
Request Type: PUT
Endpoint Path: /gras-api/v2/mgmt/tokenassignment/enable
Parameters
The parameter should be a JSON map containing a single entry token_assignments. The value of this entry should be an array of maps, each providing one mapping to enable. Each map must provide at least one of the following elements (if it is necessary to specify among many mappings for the user or token, both should be provided).
| Key | Type | Description |
|---|---|---|
token_id | String | The public ID of a token mapped to the user. |
username | String | The username of the user with the mapping, in user@domain format. |
NOTE: The token_id parameter currently supports only YubiKey OTP and Authenticator app tokens
Disable Token Assignment
Overview
This endpoint disables a set of given user/token mappings.
Request Type: PUT
Endpoint Path: /gras-api/v2/mgmt/tokenassignment/disable
Parameters
The parameter should be a JSON map containing a single entry token_assignments. The value of this entry should be an array of maps, each providing one mapping to disable. Each map must provide at least one of the following elements (if it is necessary to specify among many mappings for the user or token, both should be provided).
| Key | Type | Description |
|---|---|---|
token_id | String | The public ID of a token mapped to the user. |
username | String | The username of the user with the mapping, in user@domain format. |
NOTE: The token_id parameter currently supports only YubiKey OTP and Authenticator app tokens
Add a Temporary Token
Overview
This endpoint adds temporary tokens for the specified users.
Request Type: POST
Endpoint Path: /gras-api/v2/mgmt/temporary-tokens
Parameters
This endpoint takes a JSON map containing a single entry temporary_tokens, which is a list of records representing temporary tokens to add. Each record is a map in the following form:
| Key | Type | Required | Description |
|---|---|---|---|
username | String | Yes | The user to add the token to, in user@domain format. |
expiry_date | Int | Yes | The expiration date for the token in Unix epoch time. |
temporary_token | String | Yes | The token that the user will use. Its length must match what is specified in Global Configuration, and the last six characters cannot be numeric. |
count_of_max_auth | Int | No | The maximum number of times the user will be allowed to authenticate with this token. Set this to 9999 for unlimited authentications. This defaults to 5 if not specified |
Return Value
The response will be a map containing three batch results: records_created, records_invalid, and records_skipped.
Update a Temporary Token
Overview
Updates the parameters of one or more already-existing temporary tokens.
Request Type: PUT
Endpoint Path: /gras-api/v2/mgmt/temporary-tokens
Parameters & Return Value
The parameters and return values for updating temporary tokens are identical to the parameters for creating a temporary token; however, expiry_date and temporary_token are optional. If unspecified, these parameters will remain unmodified. Otherwise, the new values overwrite the old ones for that user's temporary token.
Delete a Temporary Token
Overview
Delete the temporary tokens of one or more users.
Request Type: DELETE
Endpoint Path: /gras-api/v2/mgmt/temporary-tokens
Parameters
This endpoint takes a JSON map containing a single entry, usernames, which should be a list of users whose temporary tokens should be deleted. The usernames should be in user@domain format.
Return Values
This returns a three batches: records_deleted, records_invalid, and records_skipped, consistent with other endpoints.
Get Temporary Token Information
Overview
Get the details associated with the temporary tokens of one or more users.
Request Type: GET
Endpoint Path: /gras-api/v2/mgmt/temporary-tokens
Parameters
This endpoint takes a JSON map containing a single entry, usernames, which should be a list of users to get the temporary token information for. The usernames should be in user@domain format.
Return Values
The return value is three batches: records_found, records_invalid, records_skipped. The records_found entries will be maps representing a user-token mapping; these will be in the
same form as the parameters to the Add a Temporary Token endpoint.
© 2026 Green Rocket Security Inc. All rights reserved.
Validation Protocol
The YubiKey Validation Protocol enables GreenRADIUS to validate YubiKey OTPs through a special endpoint without performing username/password validation nor user-YubiKey assignment validation.
Prerequisites
- GreenRADIUS 4.4.1.1 or later
- A valid license which supports OTPOnly functionality
Usage
The endpoint is accessible at https://<IP/hostname of GreenRADIUS>/wsapi/2.0/verify by POST or GET request.
HTTP parameters should be supplied in the usual way as "form-input" style entries, e.g.
https://<IP/hostname of GreenRADIUS>/wsapi/2.0/verify?nonce=12341234123412341234&id=99999&otp=grktccrrijbribbcdtveetgbvergnrvcnkngnfljjfcj
The following parameters are required:
id: The Client ID for this requestor.otp: The OTP to validatenonce: A unique identifier for this request. Must be between 16 and 40 characters in length.
The following parameters are optional:
timestamp: If1, session counter information and timestamp will be returned with response.
The response will be returned as a series of key=value pairs, separated by newlines. The otp and nonce will be echoed back, accompanied by time stamp, session counter, and session use if timestamp was set in the request. An HMAC signature will also be returned, as the h parameter. The result will be returned in the status parameter, and takes the following possible values:
OK: The OTP is valid.BAD_OTP: The OTP is invalid.REPLAYED_OTP: The OTP has already been used in a previous request.REPLAYED_REQUEST: The OTP/nonce combination has already been used in a previous request.MISSING_PARAMETER: The request is lacking a required parameter.NO_SUCH_CLIENT: The Client ID does not exist in GreenRADIUS.BACKEND_ERRORAn internal error has occurred. Please contact Green Rocket Security if you see this message.
Example of a request response:
h=u7EiYbXxElBBKRfkkCNCxf6zj/4=
t=2021-10-13T20:13:02Z0820
otp=grktccrrckjlbejchetblehkefgcnrtgdevvgiikkdfc
nonce=12341234123412345
timestamp=9323959
sessioncounter=2
sessionuse=0
status=OK
Adding a Client
To add a client in GreenRADIUS, click on the Global Configuration tab, then click Client-based Authentication Policies. Then click the "Add a New Client" button.
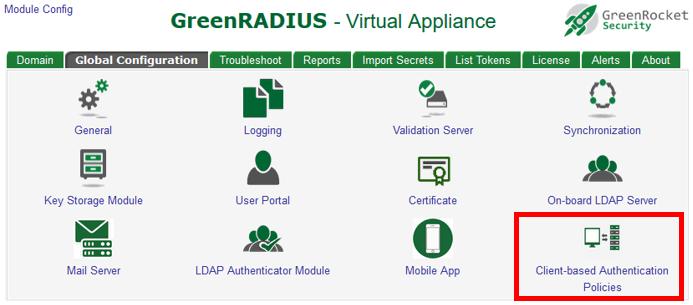
You will then be able to add the Client ID, description, and shared HMAC key for the client. (Client ID "1" is reserved for internal purposes and must not be used.)
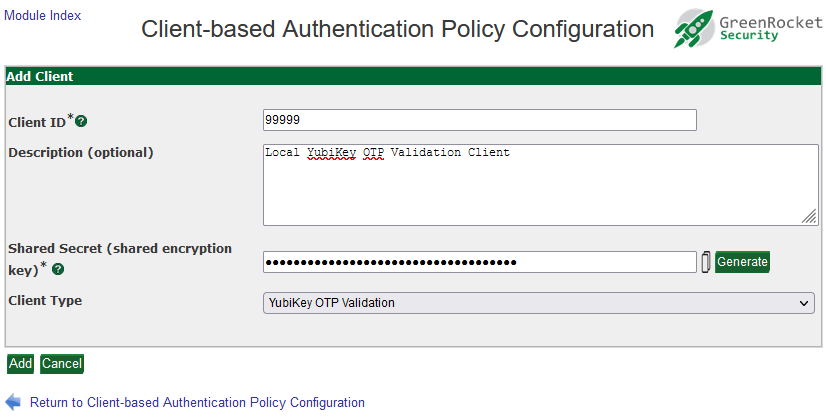
© 2026 Green Rocket Security Inc. All rights reserved.
Deploying FIDO2 with GreenRADIUS for PHP-powered websites
Prerequisites
- A web application which supports PHP integration and has a valid certificate installed
- PHP 7.3.27 or later
- GreenRADIUS v5.1.2.2 or later
Multiple Relying Parties
Starting with version 5.2.6.6 GreenRADIUS offers support for multiple FIDO2 relying parties. For each relying party, follow the instructions below to set up and configure it.
Configuration Instructions
- Download and unzip the FIDO2 relying party installation package.
- The module is divided into two sections. One is written in Javascript and runs on the client's browser; the other is written in PHP and runs server-side. These are stored in the
js/andphp/subdirectories, respectively, of the installation package. Both need to be installed in your web application; the exact location and configuration depends on your specific web server. In this guide, the location of the PHP modules will be referred to as$PHPCLIENTand the location of the Javascript modules as$JSCLIENT. - On the server, run the following commands as root:
touch /var/log/fido2.logchown www-data:root /var/log/fido2.log
- Configure the
$PHPCLIENT/config.php. The following should be configured:server: IP address/hostname of the GreenRADIUS server to authenticate against.relying-party: A valid domain string that identifies the FIDO2 relying party (e.g. fido2demo.com). The same identifier with have to be configured on the GreenRADIUS FIDO2 server.client-id: A unique identifier for this particular client. The same ID must be configured in GreenRADIUS and cannot be shared by any other client.shared-secret: A shared secret key to authenticate the client module with GreenRADIUS. The same secret must also be configured in GreenRADIUS.
- In GreenRADIUS, go to Global Configuration > Client-Based Authentication Policies and select Add a New Client.
- Populate the new client with the same client ID, shared secret, and relying party identifier as in the
$PHPCLIENT/config.phpfile. Set the client type toFIDO2_Web_API, and configure the other settings as preferred. - You can now begin to develop your application. To help with this, a minimal example site has been provided as part of the installation package in the
demo-site/directory. To deploy the demo site, place the$JSCLIENTfiles into the same directory as the demo site, and place the$PHPCLIENTfile so that auth.php is accessible at the/mgmt-api/path on the server. You may need to make adjustments depending on your particular configuration.
More details about the GreenRADIUS FIDO2 token registration and authentication processes plus integration with a web application can be found in this integration guide.
Note
The FIDO2 relying party support on GreenRADIUS allows the relying party (that is, the server side of your web application) to register new FIDO2 tokens to a user, even if Single Factor is disabled for that user and a key is already present. Care must be taken, therefore, to write your server application to prohibit this unless you have already verified the user's identity through another token.
© 2026 Green Rocket Security Inc. All rights reserved.
Deploying GreenRADIUS on Ubuntu 20/24
Prerequisites
- An Ubuntu 20/24 server
- Ensure the network interface is configured with a static IP, netmask, gateway, and DNS
- The update package for GreenRADIUS 6.1.15.15 or later
Steps
- Log in as a user with sudo access.
- Run
sudo apt-get update - Run
sudo apt-get install apt-transport-https ca-certificates curl gnupg-agent software-properties-common - Run
curl -fsSL https://download.docker.com/linux/ubuntu/gpg | sudo apt-key add - - Run
sudo add-apt-repository "deb [arch=amd64] https://download.docker.com/linux/ubuntu $(lsb_release -cs) stable" - Run
sudo apt-get install docker-ce docker-ce-cli containerd.io - Run
sudo curl -L "https://github.com/docker/compose/releases/download/1.29.2/docker-compose-Linux-x86_64" -o /usr/local/bin/docker-compose - Run
sudo chmod +x /usr/local/bin/docker-compose - Create a symlink to to this path with
sudo ln -s /usr/local/bin/docker-compose/usr/bin/docker-compose - Run
sudo apt-get install unzip net-tools - Run
sudo adduser gradmin - Run
sudo adduser gradmin sudo - Run
sudo chmod -R 750 /home/gradmin - Run
sudo chown -R gradmin:gradmin /home/gradmin - Reboot and log in as the
gradminuser. - Run
sudo su - Run
mkdir /home/gradmin/temp - Run
cd /home/gradmin/temp - Copy the GreenRADIUS update package to the
/home/gradmin/tempdirectory of the Ubuntu instance. - For the following commands, replace
xxxxwith the version number of the GreenRADIUS update package: - Run
sudo unzip GreenRADIUS_xxxx_Update.zip - Run
sudo tar -xvzf GreenRADIUS_xxxx_Update/images.tgz -C . - Run
sudo tar -xvzf GreenRADIUS_xxxx_Update/others.tgz -C . - Run
sudo docker load -i images/greenradius_xxxx_init_image - Run
sudo docker load -i images/greenradius_xxxx_main_image - Run
sudo docker load -i images/greenradius_xxxx_openldap_image - Run
sudo docker load -i images/greenradius_xxxx_postgres_image - Run
sudo docker load -i images/greenradius_xxxx_rsyslog_image - Run
sudo docker load -i images/greenradius_xxxx_freeradius_image - Run
sudo docker load -i images/greeenradius_xxxx_grs_queue_image - Run
sudo docker load -i images/greenradius_xxxx_grs_auth_app_image - Run
sudo mkdir -p /home/gradmin/grs-docker-compose - Run
sudo cp others/docker-compose.yml /home/gradmin/grs-docker-compose/ - Run
cd /home/gradmin/grs-docker-compose - Run
sudo docker-compose up -d - Once the previous step completes, the web administration console should be visible if you navigate to the server's IP address or hostname in your browser. Keep in mind that GreenRADIUS does not serve HTTP for security reasons; if you are getting Connection Refused errors, make sure the scheme is set to HTTPS.
- Run
sudo touch /etc/systemd/system/grs-docker-compose-app.service - Edit the file and insert the following:
[Unit]
Description=Docker Compose Application Service
Requires=docker.service
After=docker.service

[Service]
Type=oneshot
RemainAfterExit=yes
WorkingDirectory=/home/gradmin/grs-docker-compose
ExecStart=/usr/local/bin/docker-compose up -d
ExecStop=/usr/local/bin/docker-compose down
TimeoutStartSec=0

[Install]
WantedBy=multi-user.target
- Save the file.
- Run
sudo systemctl enable grs-docker-compose-app - Run
sudo systemctl start grs-docker-compose-app.service - Run
sudo bash -c 'rm -rf /home/gradmin/temp/*'
The installation is now complete.
For installing subsequent GreenRADIUS updates:
In the following steps, replace xxxx with the version number of the new update.
- Copy the GreenRADIUS update package to the
/home/gradmin/tempdirectory. - Log in as
gradmin. - Run
sudo apt-get update - Run
sudo apt-get upgrade - Run
cd /home/gradmin/temp/ - Run
sudo unzip GreenRADIUS_xxxx_Update.zip - Run
sudo tar -xvzf GreenRADIUS_xxxx_Update/images.tgz -C . - Run
sudo tar -xvzf GreenRADIUS_xxxx_Update/others.tgz -C . - If upgrading from 5.2.11.11 or lower, run
sudo nash others/scripts/system_upgrade_docker.shcd /home/gradmin/grs-docker-composesudo docker-compose downsudo bash -c 'rm -rf /usr/local/bin/docker-compose/usr/bin/docker-composesudo curl -L "https://github.com/docker/compose/releases/download/v5.0.1/docker-compose-$(uname -s)-$(uname -m)" -o /usr/local/bin/docker-compose- Create a symlink to this path with
sudo ls -s /usr/local/bin/docker-compose /usr/bin/docker-compose sudo chmod +x /usr/local/bin/docker-composesudo docker compose up -dcd /home/gradmin/temp
- Run
sudo docker load -i images/greenradius_xxxx_init_image - Run
sudo docker load -i images/greenradius_xxxx_main_image - Run
sudo docker load -i images/greenradius_xxxx_openldap_image - Run
sudo docker load -i images/greenradius_xxxx_postgres_image - Run
sudo docker load -i images/greenradius_xxxx_rsyslog_image - Run
sudo docker load -i images/greenradius_xxxx_grs_queue_image - Run
sudo docker load -i images/greenradius_xxxx_freeradius_image - Run
sudo docker load -i images/greenradius_xxxx_grs_auth_app_image - Run
cd /home/gradmin/grs-docker-compose - Run
sudo docker-compose down - Run
sudo cp /home/gradmin/temp/others/docker-compose.yml . - Run
sudo docker-compose up -d
To start or stop the containers:
Before starting or stopping the containers, make sure you are in the grs-docker-compose
directory with cd /home/gradmin/grs-docker-compose.
Start the containers
sudo docker-compose up -d
Stop the containers
sudo docker-compose down
© 2026 Green Rocket Security Inc. All rights reserved.
Deploying GreenRadius on Oracle Linux 7.x
Prerequisites
- A target machine running Oracle Linux 7.5 or greater
- The update package for GreenRADIUS v4.4.6.6
- The update package for the latest version of GreenRADIUS
- The zip file containing:
- The
docker-compose.ymlfile for GreenRADIUS with appropriate patches for RHEL/OEL - The
docker-compose.override.ymlfile - The
timezone_handle_for_docker_on_CentOS.shfile
- The
Deployment Instructions
- Log in with a user that has sudo access
- Run
sudo yum update - Run
sudo yum-config-manager --enable *addons - Run
cd /etc/yum.repos.d/ - Run
sudo wget http://yum.oracle.com/public-yum-ol7.repo - Run
sudo yum-config-manager --enable *addons - Run
sudo yum update - Run
sudo yum install docker-engine - Run
sudo systemctl start docker - Run
sudo systemctl enable docker - Run
sudo curl -L "https://github.com/docker/compose/releases/download/1.29.2/docker-compose-$(uname -s)-$(uname -m)" -o /usr/local/bin/docker-compose - Run
sudo chmod +x /usr/local/bin/docker-compose - Run
sudo ln -s /usr/local/bin/docker-compose /usr/bin/docker-compose - Run
sudo yum install https://dl.fedoraproject.org/pub/epel/epel-release-latest-7.noarch.rpm - Run
sudo yum install incron - Run
sudo yum install unzip - Run
sudo yum install net-tools - Run
sudo useradd -d /home/gradmin -m -G wheel -s /bin/bash gradmin - Run
sudo passwd gradminand set the password forgradminappropriately - Run
sudo chmod -R 750 /home/gradmin - Run
sudo chown -R gradmin:gradmin /home/gradmin - Run
sudo mkdir /home/gradmin/grs-docker-compose - As root, edit the
/etc/selinux/configfile and disable SELinux - Run
sudo service firewalld stop - Run
sudo systemctl disable firewalld - Reboot and login as
gradmin - Copy the 4.4.6.6 update package to /tmp/
- Copy the
docker-compose.ymlanddocker-compose.override.ymlfiles to /home/gradmin/grs-docker-compose, and thetimezone_handle_for_docker_on_CentOS.shfile to /home/gradmin - Run
sudo unzip /tmp/GreenRADIUS_xxxx_Update.zip -d /tmp/ - Run
sudo tar -xvzf /tmp/GreenRADIUS_xxxx_Update/images.tgz -C /tmp/ - Run
sudo tar -xvzf /tmp/GreenRADIUS_xxxx_Update/others.tgz -C /tmp/ - Run
sudo mkdir -p /opt/grs/scripts - Run
sudo cp /tmp/others/vm_incron_scripts/* /opt/grs/scripts/ - Run
cd /opt/grs/scripts && sudo chown root:root *.sh && sudo chmod 511 freeradius_restart.sh get_host_info.sh incron_script.sh openldap_cmd_template_3.sh openldap_restart.sh openldap_update_ca_certificates.sh rsyslog_restart.sh && cd - - Run
sudo bash -c "echo 'gradmin ALL=(root) NOPASSWD:/opt/grs/scripts/get_host_info.sh , /opt/grs/scripts/incron_script.sh , /opt/grs/scripts/rsyslog_restart.sh , /opt/grs/scripts/freeradius_restart.sh , /opt/grs/scripts/openldap_restart.sh , /opt/grs/scripts/openldap_update_ca_certificates.sh , /opt/grs/scripts/openldap_cmd_template_3.sh' > /etc/sudoers.d/grs" - Run
sudo mkdir -p /opt/grs/host-comm/request - Run
sudo mkdir -p /opt/grs/host-comm/response - Run
sudo chown -R gradmin:gradmin /opt/grs/host-comm - Run
sudo bash -c "echo 'gradmin' > /etc/incron.allow" - Run
sudo bash -c "echo '/opt/grs/host-comm/request IN_CLOSE_WRITE sudo /opt/grs/scripts/incron_script.sh \$#' > /var/spool/incron/gradmin" - Run
sudo systemctl enable incrond - Run
sudo service incrond restart - Run
sudo docker load -i /tmp/images/greenradius_4466_init_image - Run
sudo docker load -i /tmp/images/greenradius_4466_main_image - Run
sudo docker load -i /tmp/images/greenradius_4466_openldap_image - Run
sudo docker load -i /tmp/images/greenradius_4466_postgres_image - Run
sudo docker load -i /tmp/images/greenradius_4466_rsyslog_image - Run
sudo docker load -i /tmp/images/greenradius_4466_freeradius_image - Run
sudo chmod -R 750 /home/gradmin - Run
sudo chown -R gradmin:gradmin /home/gradmin - Run
sudo timedatectl set-timezone UTC - Run
sudo sh /home/gradmin/timezone_handle_for_docker_on_CentOS.sh - Run
cd /home/gradmin/grs-docker-compose. - Run
sudo docker-compose -f docker-compose.yml -f docker-compose.override.yml up -d - Verify that a GreenRADIUS 4.4.6.6 instance is accessible via the web. You should be able to visit
https://<ip address of instance>/adminin your browser and via the login page for the web administration console. - Run
sudo docker-compose down - Copy the latest update package for GreenRADIUS into the /tmp/ directory
- Run
sudo unzip /tmp/GreenRADIUS_xxxx_Update.zip -d /tmp/(where "xxxx" is the version number of the GreenRADIUS update package) - Run
sudo tar -xvzf /tmp/GreenRADIUS_xxxx_Update/images.tgz -C /tmp/ - Run
sudo tar -xvzf /tmp/GreenRADIUS_xxxx_Update/others.tgz -C /tmp/ - Run
sudo docker load -i /tmp/images/greenradius_xxxx_init_image - Run
sudo docker load -i /tmp/images/greenradius_xxxx_main_image - Run
sudo docker load -i /tmp/images/greenradius_xxxx_openldap_image - Run
sudo docker load -i /tmp/images/greenradius_xxxx_postgres_image - Run
sudo docker load -i /tmp/images/greenradius_xxxx_rsyslog_image - Run
sudo docker load -i /tmp/images/greenradius_xxxx_freeradius_image - Run
sudo docker load -i /tmp/images/greenradius_xxxx_grs_auth_app_image - Edit
/home/gradmin/grs-docker-compose/docker-compose.ymland replace every occurrence of "4466" with the version for your latest version of GreenRADIUS (e.g. "4499" for v4.4.9.9) - Run
cd /home/gradmin/grs-docker-compose - Run
sudo docker-compose -f docker-compose.yml -f docker-compose.override.yml up -d - Confirm that the latest GreenRADIUS version is accessible via your browser at the same URL as before.
On future startups, you will need to run sudo docker-compose -f docker-compose.yml -f docker-compose.override.yml up -d from the grs-docker-compose directory, as shown above, to launch the containers.
To apply subsequent updates
- Copy the update package to the
/tmpdirectory. - Log in as
gradmin. - Run
sudo yum update - Run
sudo unzip /tmp/GreenRADIUS_xxxx_Update.zip -d /tmp/. Note that in this command and below,xxxxshould be replaced with the current version number. - Run
sudo tar -xvzf /tmp/GreenRADIUS_xxxx_Update/images.tgz -C /tmp/ - Run
sudo tar -xvzf /tmp/GreenRADIUS_xxxx_Update/others.tgz -C /tmp/ - Run
sudo docker load -i /tmp/images/greenradius_xxxx_init_image - Run
sudo docker load -i /tmp/images/greenradius_xxxx_main_image - Run
sudo docker load -i /tmp/images/greenradius_xxxx_openldap_image - Run
sudo docker load -i /tmp/images/greenradius_xxxx_postgres_image - Run
sudo docker load -i /tmp/images/greenradius_xxxx_rsyslog_image - Run
sudo docker load -i /tmp/images/greenradius_xxxx_freeradius_image - Run
sudo docker load -i /tmp/images/greenradius_xxxx_grs_auth_app_image - Run
cd /home/gradmin/grs-docker-compose - Run
sudo docker-compose down - Run
sudo cp /tmp/others/docker-compose.yml /home/gradmin/grs-docker-compose/ - Run
cd /home/gradmin/grs-docker-compose - Run
sudo docker-compose -f docker-compose.yml -f docker-compose.override.yml up -d
© 2026 Green Rocket Security Inc. All rights reserved.
Deploying GreenRadius on Amazon Linux 2
Prerequisites
- A target machine (
x86_64) running Amazon Linux 2 - A GreenRADIUS update package (v5.1.3.3 or later)
- The
docker-compose-override-tz.yml,docker-compose-override.yml, andtimezone_handle_for_docker_on_Amazon-Linux-2.shfiles from this deployment package
Deployment Instructions
- Log in with a user that has sudo access.
- Configure a static IP, netmask, gateway and DNS servers for the server.
- Run
sudo yum update - Run
sudo yum install -y yum-utils device-mapper-persistent-data lvm2 - Run
sudo yum -y install curl wget unzip awscli aws-cfn-bootstrap nfs-utils chrony conntrack jq ec2-instance-connect socat - Run
if sudo yum list installed | grep ec2-net-utils; then sudo yum remove ec2-net-utils -y -q; fi - Run
sudo amazon-linux-extras enable docker - Run
sudo yum -y install docker - Run
sudo systemctl enable docker - Run `sudo curl -L "https://github.com/docker/compose/releases/download/1.28.2/docker-compose-$(uname -s)-$(uname -m)" -o /usr/local/bin/docker-compose
- Run
sudo chmod +x /usr/local/bin/docker-compose - Run
sudo yum install unzip - Run
sudo amazon-linux-extras install epel -y - Run
sudo yum install incron - Run
sudo yum install net-tools - Run
sudo useradd -d /home/gradmin -m -G wheel -s /bin/bash gradmin - Run
sudo passwd gradmin - Run
chmod -R 750 /home/gradmin - Run
chown -R gradmin:gradmin /home/gradmin - Reboot and log in as the
gradminuser. - Copy the latest GreenRADIUS update package to the
/tmp/directory. - Copy the provided
docker-compose.override-tz.ymlfile to/tmpdirectory. - Copy the provided
docker-compose.override.ymlfile to/tmpdirectory. - Copy the provided
timezone_handle_for_docker_on_Amazon-Linux-2.shscript to/home/gradmindirectory. - Run
sudo chmod 750 /home/gradmin/timezone_handle_for_docker_on_Amazon-Linux-2.sh - Run
sudo chown gradmin:gradmin /home/gradmin/timezone_handle_for_docker_on_Amazon-Linux-2.sh - Run
sudo service docker start - Run
sudo unzip /tmp/GreenRADIUS_xxxx_Update.zip -d /tmp/. In this instruction and those following, replacexxxxwith the version number for the upgrade package. - Run
sudo tar -xvzf /tmp/GreenRADIUS_xxxx_Update/images.tgz -C /tmp/ - Run
sudo tar -xvzf /tmp/GreenRADIUS_xxxx_Update/others.tgz -C /tmp/ - Run
sudo mkdir -p /opt/grs/scripts - Run
sudo cp /tmp/others/vm_incron_scripts/* /opt/grs/scripts/ - Run
cd /opt/grs/scripts && sudo chown root:root *.sh && sudo chmod 511 freeradius_restart.sh get_host_info.sh incron_script.sh openldap_cmd_template_3.sh openldap_restart.sh openldap_update_ca_certificates.sh rsyslog_restart.sh && cd - - Run
sudo bash -c "echo 'gradmin ALL=(root) NOPASSWD:/opt/grs/scripts/get_host_info.sh , /opt/grs/scripts/incron_script.sh , /opt/grs/scripts/rsyslog_restart.sh , /opt/grs/scripts/freeradius_restart.sh , /opt/grs/scripts/openldap_restart.sh , /opt/grs/scripts/openldap_update_ca_certificates.sh , /opt/grs/scripts/openldap_cmd_template_3.sh' > /etc/sudoers.d/grs" - Run
sudo mkdir -p /opt/grs/host-comm/request - Run
sudo mkdir -p /opt/grs/host-comm/response - Run
sudo chown -R gradmin:gradmin /opt/grs/host-comm - Run
sudo bash -c "echo 'gradmin' > /etc/incron.allow" - Run
sudo bash -c "echo '/opt/grs/host-comm/request IN_CLOSE_WRITE sudo /opt/grs/scripts/incron_script.sh \$#' > /var/spool/incron/gradmin" - Run
sudo systemctl enable incrond - Run
sudo service incrond restart - Run
sudo docker load -i /tmp/images/greenradius_xxxx_init_image - Run
sudo docker load -i /tmp/images/greenradius_xxxx_main_image - Run
sudo docker load -i /tmp/images/greenradius_xxxx_openldap_image - Run
sudo docker load -i /tmp/images/greenradius_xxxx_postgres_image - Run
sudo docker load -i /tmp/images/greenradius_xxxx_rsyslog_image - Run
sudo docker load -i /tmp/images/greenradius_xxxx_freeradius_image - Run
sudo docker load -i /tmp/images/greenradius_xxxx_grs_auth_app_image - Run
sudo mkdir -p /home/gradmin/grs-docker-compose - Run
sudo cp /tmp/others/docker-compose.yml /home/gradmin/grs-docker-compose/ - Run
sudo chmod 750 /home/gradmin/grs-docker-compose/docker-compose.yml - Run
sudo chown gradmin:gradmin /home/gradmin/grs-docker-compose/docker- compose.yml - Run
sudo cp /tmp/docker-compose.override-tz.yml /home/gradmin/grs-docker-compose/ - Run
sudo chmod 750 /home/gradmin/grs-docker-compose/docker-compose.override-tz.yml - Run
sudo chown gradmin:gradmin /home/gradmin/grs-docker-compose/docker- compose.override-tz.yml - Run
sudo cp /tmp/docker-compose.override.yml /home/gradmin/grs-docker-compose/ - Run
sudo chmod 750 /home/gradmin/grs-docker-compose/docker-compose.override.yml - Run
sudo chown gradmin:gradmin /home/gradmin/grs-docker-compose/docker-compose.override.yml - Set the proper timezone using the command
sudo timedatectl set-timezone <time zone>. You can view a list of valid timezones withsudo timedatectl list-timezones | less. - Run
file /etc/timezone. If and only if it is a directory:- Run
sudo rm -rf /etc/timezone. - Run
sudo touch /etc/timezone. - Edit
/etc/timezoneand enter the value set in step 59.
- Run
- Run
sudo sh /home/gradmin/timezone_handle_for_docker_on_Amazon-Linux-2.sh - Run
sudo su - - Run
cd /home/gradmin/grs-docker-compose - Run
docker-compose -f docker-compose.yml -f docker-compose.override.yml -f docker- compose.override-tz.yml up -d - Run
sudo touch /etc/systemd/system/grs-docker-compose-app.service - Edit
/etc/systemd/system/grs-docker-compose-app.serviceand enter the following:# /etc/systemd/system/grs-docker-compose-app.service [Unit] Description=Docker Compose Application Service Requires=docker.service After=docker.service [Service] Type=oneshot RemainAfterExit=yes WorkingDirectory=/home/gradmin/grs-docker-compose ExecStart=/usr/local/bin/docker-compose -f docker-compose.yml -f docker-compose.override.yml -f docker-compose.override-tz.yml up -d ExecStop=/usr/local/bin/docker-compose down TimeoutStartSec=0 [Install] WantedBy=multi-user.target - Save the file.
- Run
sudo systemctl enable grs-docker-compose-app - Run
sudo systemctl start grs-docker-compose-app.service
To apply subsequent updates
- Copy the update package to the
/tmpdirectory. - Log in as
gradmin. - Run
sudo yum update - Run
sudo unzip /tmp/GreenRADIUS_xxxx_Update.zip -d /tmp/. Note that in this command and below,xxxxshould be replaced with the current version number. - Run
sudo tar -xvzf /tmp/GreenRADIUS_xxxx_Update/images.tgz -C /tmp/ - Run
sudo tar -xvzf /tmp/GreenRADIUS_xxxx_Update/others.tgz -C /tmp/ - Run
sudo docker load -i /tmp/images/greenradius_xxxx_init_image - Run
sudo docker load -i /tmp/images/greenradius_xxxx_main_image - Run
sudo docker load -i /tmp/images/greenradius_xxxx_openldap_image - Run
sudo docker load -i /tmp/images/greenradius_xxxx_postgres_image - Run
sudo docker load -i /tmp/images/greenradius_xxxx_rsyslog_image - Run
sudo docker load -i /tmp/images/greenradius_xxxx_freeradius_image - Run
sudo docker load -i /tmp/images/greenradius_xxxx_grs_auth_app_image - Run
cd /home/gradmin/grs-docker-compose - Run
sudo docker-compose down - Run
sudo cp /tmp/others/docker-compose.yml /home/gradmin/grs-docker-compose/ - Run
cd /home/gradmin/grs-docker-compose - Run
sudo docker-compose -f docker-compose.yml -f docker-compose.override.yml -f docker-compose.override-tz.yml up -d
To manually start/stop containers
First, change the directory with cd /home/gradmin/grs-docker-compose/.
To start the container, run sudo docker-compose -f docker-compose.yml -f docker-compose.override.yml -f docker-compose.override-tz.yml up -d.
To stop the container, run sudo docker-compose down.
© 2026 Green Rocket Security Inc. All rights reserved.
Deploying GreenRadius on Amazon Linux 2023
Prerequisites
- A target machine (
x86_64) running Amazon Linux 2023 - A GreenRADIUS update package (v5.1.6.6 or later)
- If you have installed firewall software, make sure that it is set up properly to allow incoming connections.
- SELinux set to "permissive" or "disabled" (this is the default on fresh installations)
- The
docker-compose-override-tz.yml,docker-compose-override.yml, andtimezone_handle_for_docker_on_Amazon-Linux-2.shfiles from this deployment package
Deployment Instructions
- Log in with a user that has sudo access.
- Run
sudo yum update - Run
sudo yum install -y yum-utils device-mapper-persistent-data lvm2 - Run
sudo yum -y install wget unzip awscli aws-cfn-bootstrap nfs-utils chrony conntrack jq ec2-instance-connect socat - Run
sudo yum install curl - Run
sudo yum install libxcrypt-compat - Run
if sudo yum list installed | grep ec2-net-utils; then sudo yum remove ec2-net-utils -y -q; fi - Run
sudo yum -y install docker - Run
sudo systemctl enable docker - Run `sudo curl -L "https://github.com/docker/compose/releases/download/1.28.2/docker-compose-$(uname -s)-$(uname -m)" -o /usr/local/bin/docker-compose
- Run
sudo chmod +x /usr/local/bin/docker-compose - Run
sudo yum install unzip - Run
wget https://dl.fedoraproject.org/pub/epel/8/Everything/x86_64/Packages/i/incron-0.5.12-12.el8.x86_64.rpm - Run
sudo rpm -i incron-0.5.12-12.el8.x86_64.rpm - Run
sudo yum install net-tools - Run
sudo useradd -d /home/gradmin -m -G wheel -s /bin/bash gradmin - Run
sudo passwd gradmin - Run
chmod -R 750 /home/gradmin - Run
chown -R gradmin:gradmin /home/gradmin - Run
sudo su gradminto assume the permissions of the gradmin user - Run
mkdir ~/temp - Run
cd ~/temp - Copy the latest GreenRADIUS update package to the
/home/gradmin/temp/directory. - Copy the provided
docker-compose.override-tz.ymlfile to the/home/gradmin/temp/directory. - Copy the provided
docker-compose.override.ymlfile to the/home/gradmin/temp/directory. - Copy the provided
timezone_handle_for_docker_on_Amazon-Linux-2.shscript to/home/gradmindirectory. - Run
sudo chmod 750 /home/gradmin/timezone_handle_for_docker_on_Amazon-Linux-2.sh - Run
sudo chown gradmin:gradmin /home/gradmin/timezone_handle_for_docker_on_Amazon-Linux-2.sh - Run
sudo service docker start - Run
sudo unzip GreenRADIUS_xxxx_Update.zip. In this instruction and those following, replacexxxxwith the version number for the upgrade package. - Run
sudo tar -xvzf GreenRADIUS_xxxx_Update/images.tgz -C . - Run
sudo tar -xvzf GreenRADIUS_xxxx_Update/others.tgz -C . - Run
sudo mkdir -p /opt/grs/scripts - Run
sudo cp others/vm_incron_scripts/* /opt/grs/scripts/ - Run
cd /opt/grs/scripts && sudo chown root:root *.sh && sudo chmod 511 freeradius_restart.sh get_host_info.sh incron_script.sh openldap_cmd_template_3.sh openldap_restart.sh openldap_update_ca_certificates.sh rsyslog_restart.sh && cd - - Run
sudo bash -c "echo 'gradmin ALL=(root) NOPASSWD:/opt/grs/scripts/get_host_info.sh , /opt/grs/scripts/incron_script.sh , /opt/grs/scripts/rsyslog_restart.sh , /opt/grs/scripts/freeradius_restart.sh , /opt/grs/scripts/openldap_restart.sh , /opt/grs/scripts/openldap_update_ca_certificates.sh , /opt/grs/scripts/openldap_cmd_template_3.sh' > /etc/sudoers.d/grs" - Run
sudo mkdir -p /opt/grs/host-comm/request - Run
sudo mkdir -p /opt/grs/host-comm/response - Run
sudo chown -R gradmin:gradmin /opt/grs/host-comm - Run
sudo bash -c "echo 'gradmin' > /etc/incron.allow" - Run
sudo bash -c "echo '/opt/grs/host-comm/request IN_CLOSE_WRITE sudo /opt/grs/scripts/incron_script.sh \$#' > /var/spool/incron/gradmin" - Run
sudo systemctl enable incrond - Run
sudo service incrond restart - Run
sudo docker load -i images/greenradius_xxxx_init_image - Run
sudo docker load -i images/greenradius_xxxx_main_image - Run
sudo docker load -i images/greenradius_xxxx_openldap_image - Run
sudo docker load -i images/greenradius_xxxx_postgres_image - Run
sudo docker load -i images/greenradius_xxxx_rsyslog_image - Run
sudo docker load -i images/greenradius_xxxx_freeradius_image - Run
sudo docker load -i images/greenradius_xxxx_grs_auth_app_image - Run
sudo mkdir -p /home/gradmin/grs-docker-compose - Run
sudo cp others/docker-compose.yml /home/gradmin/grs-docker-compose/ - Run
sudo chmod 750 /home/gradmin/grs-docker-compose/docker-compose.yml - Run
sudo chown gradmin:gradmin /home/gradmin/grs-docker-compose/docker- compose.yml - Run
sudo cp docker-compose.override-tz.yml /home/gradmin/grs-docker-compose/ - Run
sudo chmod 750 /home/gradmin/grs-docker-compose/docker-compose.override-tz.yml - Run
sudo chown gradmin:gradmin /home/gradmin/grs-docker-compose/docker-compose.override-tz.yml - Run
sudo cp docker-compose.override.yml /home/gradmin/grs-docker-compose/ - Run
sudo chmod 750 /home/gradmin/grs-docker-compose/docker-compose.override.yml - Run
sudo chown gradmin:gradmin /home/gradmin/grs-docker-compose/docker-compose.override.yml - Set the proper timezone using the command
sudo timedatectl set-timezone <time zone>. You can view a list of valid timezones withsudo timedatectl list-timezones | less. - Run
file /etc/timezone - If and only if
/etc/timezoneexists and is a directory, runsudo rm -rf /etc/timezone - Run
sudo touch /etc/timezone - Edit
/etc/timezoneand enter the value set in step 59. - Run
sudo sh /home/gradmin/timezone_handle_for_docker_on_Amazon-Linux-2.sh - Run
sudo su - - Run
cd /home/gradmin/grs-docker-compose - Run
docker-compose -f docker-compose.yml -f docker-compose.override.yml -f docker- compose.override-tz.yml up -d - Run
sudo touch /etc/systemd/system/grs-docker-compose-app.service - Edit
/etc/systemd/system/grs-docker-compose-app.serviceand enter the following:# /etc/systemd/system/grs-docker-compose-app.service [Unit] Description=Docker Compose Application Service Requires=docker.service After=docker.service [Service] Type=oneshot RemainAfterExit=yes WorkingDirectory=/home/gradmin/grs-docker-compose ExecStart=/usr/local/bin/docker-compose -f docker-compose.yml -f docker-compose.override.yml -f docker-compose.override-tz.yml up -d ExecStop=/usr/local/bin/docker-compose down TimeoutStartSec=0 [Install] WantedBy=multi-user.target - Save the file.
- Run
sudo systemctl enable grs-docker-compose-app - Run
sudo systemctl start grs-docker-compose-app.service - Run
sudo rm -rf /home/gradmin/temp/*
To apply subsequent updates
- Copy the update package to the
/home/gradmin/temp/directory. - Log in as
gradmin. - Run
sudo yum update - Run
sudo unzip /home/gradmin/temp/GreenRADIUS_xxxx_Update.zip -d /home/gradmin/temp/. Note that in this command and below,xxxxshould be replaced with the current version number. - Run
cd /home/gradmin/temp - Run
sudo tar -xvzf GreenRADIUS_xxxx_Update/images.tgz -C . - Run
sudo tar -xvzf GreenRADIUS_xxxx_Update/others.tgz -C . - Run
sudo docker load -i images/greenradius_xxxx_init_image - Run
sudo docker load -i images/greenradius_xxxx_main_image - Run
sudo docker load -i images/greenradius_xxxx_openldap_image - Run
sudo docker load -i images/greenradius_xxxx_postgres_image - Run
sudo docker load -i images/greenradius_xxxx_rsyslog_image - Run
sudo docker load -i images/greenradius_xxxx_freeradius_image - Run
sudo docker load -i images/greenradius_xxxx_grs_auth_app_image - Run
cd /home/gradmin/grs-docker-compose - Run
sudo docker-compose down - Run
sudo cp /home/gradmin/temp/others/docker-compose.yml /home/gradmin/grs-docker-compose/ - Run
cd /home/gradmin/grs-docker-compose - Run
sudo docker-compose -f docker-compose.yml -f docker-compose.override.yml -f docker-compose.override-tz.yml up -d - Run
sudo rm -rf /home/gradmin/temp/*
To manually start/stop containers
First, change the directory with cd /home/gradmin/grs-docker-compose/.
To start the container, run sudo docker-compose -f docker-compose.yml -f docker-compose.override.yml -f docker-compose.override-tz.yml up -d.
To stop the container, run sudo docker-compose down.
© 2026 Green Rocket Security Inc. All rights reserved.
Deploying GreenRadius on RedHat Enterprise Linux Using Podman
Prerequisites
- A target machine running RHEL 8 or 9
- Adjust SELinux in a way that allows GreenRADIUS to function smoothly
- A GreenRADIUS update package (v6.1.15.15 or later)
Deployment Instructions
- Log in with a user that has sudo access.
- Run
sudo yum update - Run
sudo yum install https://dl.fedoraproject.org/pub/epel/epel-release-latest-$(rpm -E '%{rhel}').noarch.rpm - Run
sudo yum -y install container-selinux - Run
sudo yum makecache --refresh - Run
sudo yum -y install fuse-overlayfs - Run
sudo yum -y install slirp4netns - Run
sudo dnf update - Run
sudo dnf install epel-release - Run
sudo dnf install --enablerepo="epel" ufw - Run
sudo yum remove docker-ce docker-ce-cli containerd.io - Run
sudo dnf install podman - Run
sudo dnf install podman-plugins - Run
sudo systemctl enable podman.socket --now - Run
sudo curl -L "https://github.com/docker/compose/releases/download/v5.0.1/docker-compose-$(uname -s)-$(uname -m)" -o /usr/local/bin/docker-compose - Run
sudo chmod +x /usr/local/bin/docker-compose - Create a symlink to this path with
sudo ln -s /usr/local/bin/docker-compose /usr/bin/docker-compose - Run
sudo touch /usr/bin/podman-compose - Run
sudo bash -c 'echo -e "#!/bin/sh\npodman compose \"\$@\"\n">/usr/bin/podman-compose' - Run
sudo chmod +x /usr/bin/podman-compose - Run
sudo yum install unzip - Run
sudo yum install net-tools - Run
sudo useradd -d /home/gradmin -m -G wheel -s /bin/bash gradmin - Run
sudo passwd gradminand set the password forgradminappropriately - Run
sudo chmod -R 750 /home/gradmin - Run
sudo chown -R gradmin:gradmin /home/gradmin - Run
sudo mkdir /home/gradmin/grs-podman-compose - Run
sudo systemctl disable firewalld - Reboot and login as
gradmin - Copy the GreenRADIUS update package to the
/tmp/directory - Run
sudo unzip /tmp/GreenRADIUS_xxxx_Update.zip -d /tmp/(Note: For this step and subsequent steps with "GreenRADIUS_xxxx_Update.zip", replace "xxxx" with the appropriate version number of the GreenRADIUS update package.) - Run
sudo tar -xvzf /tmp/GreenRADIUS_xxxx_Update/images.tgz -C /tmp/ - Run
sudo tar -xvzf /tmp/GreenRADIUS_xxxx_Update/others.tgz -C /tmp/ - Run
sudo cp /tmp/others/docker-compose.yml /home/gradmin/grs-podman-compose/ - Run
sudo cp /tmp/others/podman-compose.override.yml /home/gradmin/grs-podman-compose/ - Run
sudo mkdir -p /opt/grs/scripts - Run
sudo podman load -i /tmp/images/greenradius_xxxx_init_image - Run
sudo podman load -i /tmp/images/greenradius_xxxx_main_image - Run
sudo podman load -i /tmp/images/greenradius_xxxx_openldap_image - Run
sudo podman load -i /tmp/images/greenradius_xxxx_postgres_image - Run
sudo podman load -i /tmp/images/greenradius_xxxx_rsyslog_image - Run
sudo podman load -i /tmp/images/greenradius_xxxx_freeradius_image - Run
sudo podman load -i /tmp/images/greenradius_xxxx_grs_queue_image - Run
sudo podman load -i /tmp/images/greenradius_xxxx_grs_auth_app_image - Run
sudo chmod -R 750 /home/gradmin - Run
sudo chown -R gradmin:gradmin /home/gradmin - Run
sudo timedatectl set-timezone UTC - Run
sudo cp /tmp/others/scripts/get_system_timezone.sh /opt/grs/scripts/ - Run
sudo sh +x /opt/grs/scripts/get_system_timezone.sh - Run
sudo sh +x /tmp/others/scripts/prerequisite_for_getting_system_timezone.sh - Run
cd /home/gradmin/grs-podman-compose - Run
sudo podman compose -f docker-compose.yml -f podman-compose.override.yml up -d - Verify that the GreenRADIUS instance is accessible via the web. You should be able to
visit
https://<IP_address_of_GreenRADIUS>/adminin your browser to access the GreenRADIUS web admin interface.
Note: Whenever the timezone on the server will be changed, the server will have to be rebooted for the timezone to be reflected in the containers
Enabling auto-start of GreenRADIUS containers on boot
- Run
sudo touch /tmp/grs-podman-compose-app.service - Edit the
/tmp/grs-podman-compose-app.servicefile in your editor of choice. - Paste in the following:
# /etc/systemd/system/grs-podman-compose-app.service
[Unit]
Description=Podman Compose Application Service
Requires=podman.service
After=podman.service
[Service]
Type=oneshot
RemainAfterExit=yes
WorkingDirectory=/home/gradmin/grs-podman-compose
ExecStart=/usr/bin/podman compose -f /home/gradmin/grs-podman-compose/docker-compose.yml -f /home/gradmin/grs-podman-compose/podman-compose.override.yml up -d
ExecStop=/usr/bin/podman compose down
TimeoutStartSec=0
[Install]
WantedBy=multi-user.target
- Run
sudo cp /tmp/grs-podman-compose-app.service /etc/systemd/system/ - Run
sudo systemctl enable grs-podman-compose-app
Migrating from GreenRADIUS v5.x to v6.x
Migrating GreenRADIUS servers in containerized deployment from v5.x to v6.x requires some steps to change the compose plugin used by podman to start containers. These steps will stop GreenRADIUS services.
- Run
cd /home/gradmin/grs-podman-compose - Run
sudo podman-compose -f docker-compose.yml -f podman-compose.override.yml down - Run
sudo podman network rm grs-podman-compose_grs_net. Ignore if network does not exist - Run
sudo pip3 uninstall podman-compose - Run
sudo curl -L "https://github.com/docker/compose/releases/download/v5.0.1/docker-compose-$(uname -s)-$(uname -m)" -o /usr/local/bin/docker-compose - Create a symlink to this path with
sudo ln -s /usr/local/bin/docker-compose /usr/bin/docker-compose - Run
sudo chmod +x /usr/local/bin/docker-compose - Run
sudo systemctl enable podman.socket --now - Run
sudo podman compose -f docker-compose.yml -f podman-compose.override.yml up -d - If you had enabled auto-start for GreenRADIUS in the earlier deployment, redo the steps from this updated guide.
- Continue with usual steps for applying GreenRADIUS Updates.
Applying Updates to Your GreenRADIUS Instance
-
Copy the latest update package for GreenRADIUS into the /tmp/ directory
-
Run
sudo unzip /tmp/GreenRADIUS_xxxx_Update.zip -d /tmp/ (where "xxxx" is the version number of the GreenRADIUS update package) -
Run
sudo tar -xvzf /tmp/GreenRADIUS_xxxx_Update/images.tgz -C /tmp/ -
Run
sudo tar -xvzf /tmp/GreenRADIUS_xxxx_Update/others.tgz -C /tmp/ -
If upgrading from 5.2.11.11 or lower, run
sudo bash /tmp/others/scripts/system_upgrade_podman.sh -
Run
sudo podman load -i /tmp/images/greenradius_xxxx_init_image -
Run
sudo podman load -i /tmp/images/greenradius_xxxx_main_image -
Run
sudo podman load -i /tmp/images/greenradius_xxxx_openldap_image -
Run
sudo podman load -i /tmp/images/greenradius_xxxx_postgres_image -
Run
sudo podman load -i /tmp/images/greenradius_xxxx_rsyslog_image -
Run
sudo podman load -i /tmp/images/greenradius_xxxx_grs_queue_image -
Run
sudo podman load -i /tmp/images/greenradius_xxxx_freeradius_image -
Run
sudo podman load -i /tmp/images/greenradius_xxxx_grs_auth_app_image -
Run
cd /home/gradmin/grs-podman-compose -
Run
sudo podman compose down -
Run
sudo bash -c '[ -f /usr/bin/podman-compose ] || echo -e "#!/bin/sh\npodman compose \"\$@\"" > /usr/bin/podman-compose && chmod +x /usr/bin/podman-compose' -
Run
sudo cp /tmp/others/docker-compose.yml /home/gradmin/grs-podman-compose/docker-compose.yml -
Run
sudo cp /tmp/others/podman-compose.override.yml /home/gradmin/grs-podman-compose/podman-compose.override.yml(Enteryif prompted to overwrite.) -
Run
cd /home/gradmin/grs-podman-compose/ -
Run
sudo podman compose -f docker-compose.yml -f podman-compose.override.yml up -d -
Confirm that the latest GreenRADIUS version is accessible via your browser at the same URL as before. On future startups, you will need to run
sudo podman compose -f docker-compose.yml -f podman-compose.override.yml up -dfrom the grs-podman-compose directory, as shown above, to launch the containers.
Additional Steps in Containerized Deployment
Note: These steps need to be performed after all the containerized deployment steps if the containers are running but the services aren't up. These steps may fix the issue.
- Run
sudo podman exec -it GRS-POSTGRES bash -c 'chown -R root:postgres /opt/grs/greenradius/certificates/postgres/server' - Run
cd /home/gradmin/grs-podman-compose - Run
sudo podman compose stop - Run
sudo podman compose start
© 2026 Green Rocket Security Inc. All rights reserved.
Migrating from GreenRADIUS v3.1.6.7 to v4.1.3.4
Introduction
GreenRADIUS version 4.1.3.4 is equipped with a tool to migrate users, tokens, and settings from v3.1.6.7. This document describes how to use the migration tool, detailing the steps to perform. It also covers how to deal with certain configurations not covered by the migration tool.
The following configuration is migrated with this tool:
- Database tables containing general configuration, user-token assignments, user information, domain information, directory server information, RADIUS clients, token states, token secrets, etc.
- Certificates
- License file
- RADIUS configuration
Additionally, the following configuration can optionally be migrated as well:
- Onboard firewall configuration
- Onboard OpenLDAP server configurations
- Network configuration migration, including DHCP settings and (if applicable) static IP address
- Hostname
- Time zone
Prerequisites
- The GreenRADIUS instance to migrate from must be running GreenRADIUS v3.1.6.7
- A fresh GreenRADIUS v4.1.3.4 must be deployed as the migration
target
- Make sure temporary network settings are configured. Follow our network configuration guide.
- The v4.X instance must be able to reach the v3.1.6.7 instance
- On the GreenRADIUS v3.1.6.7 instance, the
gradmincommand line user account (not the web admin interface account) needs to have a password that does not include special characters - The Docker containers auto-start on boot. If the containers have been stopped manually, they need to be restarted before beginning the migration.
- For on-board OpenLDAP server configuration migration, a resolvable hostname/FQDN
must be configured in GreenRADIUS v4.X as follows:
- Log in to GreenRADIUS.
- Navigate to Global Configuration→Certificate
- Set the value in the Server Hostname/FQDN field.
- Under the Create Certificate tab, enter a common name matching the hostname/FQDN configured in the above step. Click the Create and Install button.
Steps
Once GreenRADIUS v4.1.3.4 is running, invoke the migration script from the command line:
$ cd /home/gradmin/GRS-Migration-Tool/
$ sudo python migration.py
This will produce a dialog of migration options like this:
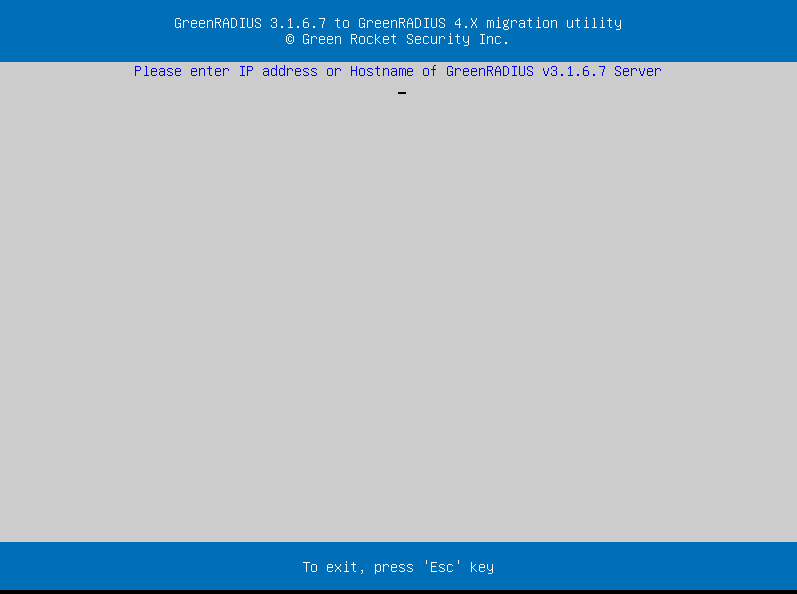
The migration tool prompts for the hostname or IP address of a v3.1.6.7 instance.
It will then request an administrator username and password of a command-line user on the v3.1.6.7 instance.
You will be prompted as to whether you wish to migrate on-board firewall configuration, on-board LDAP configuration, hostname, network, and timezone settings.
The migration process may take some time. When it is finished, a completion message will be displayed:
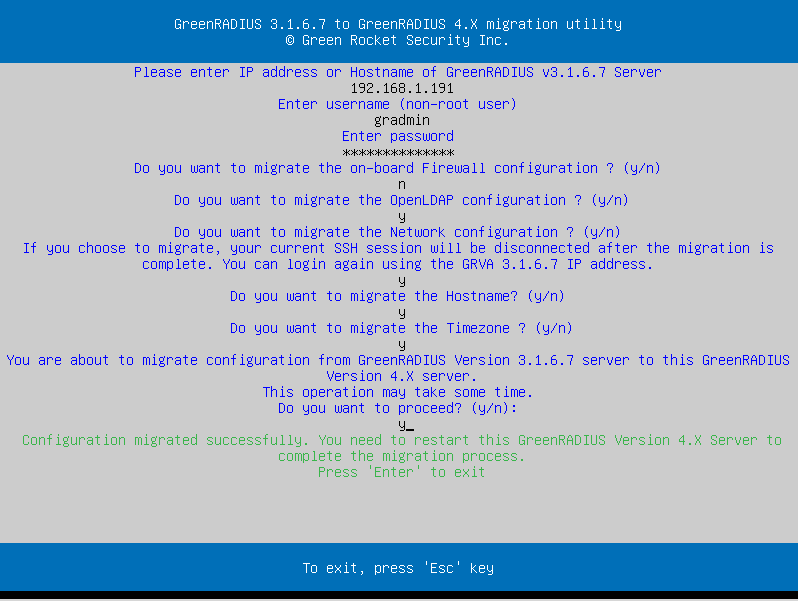
If your v3.1.6.7 instance was configured not to use DHCP, then the v4.1.3.4 instance will try to use its IP address the next time it starts (if you selected to migrate the network configuration.) To prevent the GreenRADIUS instances from colliding over the IP address, you should shut both down and then reboot only the v4.1.3.4 instance without rebooting the v3.1.6.7 one.
After reboot, you will find that most settings from your v3.1.6.7 instance have been migrated.
IMPORTANT NOTE: If there are multiple servers configured in synchronization, one GreenRADIUS v4.1.3.4 instance should be deployed for each v3.1.6.7 instance and migration from each v3.1.6.7 instance should be done to the corresponding v4.1.3.4 server instance. Once the migration is done, the server entries in the synchronization configuration should be deleted and re-added on each of the v4.1.3.4 server instances.
Additionally, in some cases, the network configuration is not migrated.
In such cases, manually configure the network by following our network
configuration guide.
Settings to Check and Configure Manually
Not all settings are migrated. Please be sure to check the following settings and make changes as necessary:
- YubiKey OATH-HOTP OTP length (in case YubiKeys programmed in OATH-HOTP mode are being used, this setting is found under Global Configuration→General)
- User portal OATH algorithm for soft tokens
(in case Google Authenticator or similar soft tokens are being used, a
setting of
TOTPis recommended, this setting is found under Global Configuration→User Portal) - Temporary tokens must be re-established for those users assigned temporary tokens
- LDAP server certificates (in the Directory Server tab of the GreenRADIUS domain) if you are using secure connection (over port 636)
- Local web admin console user accounts and settings
Contact Green Rocket Security for further instructions to upgrade from v4.1.3.4 to the latest GreenRADIUS version
© 2026 Green Rocket Security Inc. All rights reserved.
GreenRADIUS Web API Guide
Introduction
GreenRADIUS provides state-of-the-art two-factor authentication (2FA) while allowing easy integration with your existing enterprise directory service. In many cases, organizations want a way to add 2FA to a custom website and similar. The GreenRADIUS Web API provides exactly this, an easy eay to use Web API to applications to integrate with GreenRADIUS over HTTPS, Rest API.
Purpose
This document describes the GRAS Web API interface for interfacing to GRAS/GreenRADIUS for system integrators, application developers, and anyone else interested in integrating GreenRADIUS with their systems.
Working of the Web API
GreenRADIUS carries out two-factor authentication by validating the username and password, and the OTP/Response from a token associated with the user as described in this section. The following token types are currently supported.
- YubiKey OTP
- OATH-HOTP and OATH-TOTP (such as YubiKey in OATH-HOTP mode, Google Authenticator and other Authenticator apps)
- Green Rocket 2FA mobile app (which uses push notifications)
- FIDO U2F
- FIDO2 WebAuthN (coming soon)
- Temporary Token (please refer to GreenRADIUS admin guide for details) The Web API returns "OK" if the user credentials and the token are both successfully authenticated/validated. Otherwise, an error message is returned. The returning of the error details in the response is configurable. It is controlled by a configuration entry "grasapi_show_error_details" present in the sys_settings table in the ykrop2 database. The default state is "true," i.e. error detais are returned. To disable the returning of error details, set the value of the 'grasapi_show_error_details' setting to "false." The response format is described in the RESPONSE FORMAT as listed as listed in the sections below.
The Web API - HTTP 'POST' REQUEST Parameters and the Response Format (For GreenRADIUS v4.3.2.2 or later)
Web API for 2FA using OTP or Green Rocket 2FA Mobile App
Request format
>https://<
| Parameter | Type | Required | Description |
|---|---|---|---|
| User or User+OTP | String | Yes | The username with or without OTP appended |
| Authenticating Agent | String | Optional | The calling application may specify its own IP/hostname which will be logged by GreenRADIUS |
| Authenticating Endpoint | String | Optional | The IP/hostname of the authenticating endpoint which will be logged by GreenRADIUS |
Response Format when grasapi_show_error_details is set to false
t=2020-12-16T14:14:323Z0763
status=OK
UserName=user1
domain=greenradius.demo
Class=Domain User
t=2020-12-16T1414:14:32Z0763
status=AUTHENTICATION_ERROR
| Parameter | Type | Description |
|---|---|---|
| T | String | Response time |
| Status | String | The status of the authentication request: |
| OK=Authentication successful | ||
| AUTHENTICATION_ERROR=Authentication unsuccessful. | ||
| (invalid username and/or OTP or the user account is locked and authentication requests cannot be processed, but masking the actual error details. Please refer to the Lockout Mechanism in the Web API section below. | ||
| Class | String | The class (or the configured return attribute) for returning user's group membership information |
| UserName | String | username in authentication request |
| Domain | String | GreenRADIUS domain to which the authenticated user belongs |
Response Format when grasapi_show_error_details is set to true
t=2020-12-16T14:14:32Z0763
status=OK
UserName=user1
domain=greenradius.demo
Class=Domain User
t=2020-05-15T09: 09: 57Z0407
status=ACCOUNT_LOCKEDOUT
code=503
message=Service Unavailable
| Parameter | Type | Description |
|---|---|---|
| T | String | The status of the authentication request |
| Status | String | OK=Authentication Successful |
| REPLAYED_OTP = OTP has already been used | ||
| INVALID_OTP =The OTP/Temporary Token is invalid | ||
| AUTHENTICATION_ERROR =Authentication Unsuccessful. | ||
| (invalid username and/or password and/or OTP) | ||
| ACCOUNT_LOCKEDOUT =User account is locked and authentication request cannot be processed. Please refer to the Lockout Mechanism in the Web API section below. | ||
| MISSING_PARAMETER - When username or password is missing | ||
| code | String | Code corresponding to the error |
| 503: Service Unavailable | ||
| message | String | The message describing the error |
| Class | String | The class (or the configured return attribute) fo rreturning user's group membership information |
| UserName | String | username in authentication request |
| **Domain ** | String | GreenRADIUS domain to which the authentication user belongs |
Note: The "code" and "message" parameters are returned only in case of "ACCOUNT_LOCKEDOUT" status.
Username and Password Validation
-
Determines if OTP is appended to username or password and accordingly extracts the values of the username and password for authentication.
-
If authentication fails, returns "AUTHENTICATION_ERROR" status
OTP Validation Depending upon the token type, an OTP is validated as follows:
| Token Type | Validation |
|---|---|
| YubiKey | - Checks if the token is blocked |
| - Validations OTP with configured | |
| - Checks if the token is assigned to user | |
| - If not, and if the auto-provisioning feature is enabled in GreenRADIUS, the token is automatically assigned to the user if the authentication is successful (including username and password validation | |
| - If OTP validation is successful, the system switches to 2FA mode for the user if single factor or Temporary Token is enabled prior to authentication | |
| Temporary Token | - Checks if the max use of the Temporary Token has been reached |
| - Checks if the Temporary Token is expired (time expiration) | |
| - Validates Temporary Token | |
| OATH-HOTP and OATH-TOTP | - Checks if the token is expired |
| - Checks if the token if assigned to user | |
| - Checks if the token is blocked | |
| - Validates OTP | |
| FIDO U2F and FIDO2 WebAuthN | - Checks if the token is assigned to the user |
| - Validates the tokens |
Web API for 2FA using FIDO2 YubiKey (Coming soon)
GreenRADIUS 2FA using FIDO2 tokens involves the use of the following API twice during the processing of one authentication request.
Request Format
>https://<
| Parameter | Type | Required | Description |
|---|---|---|---|
| Authentication-Request-ID | String | Optional | For starting a new authentication session, this parameter may not be specified or specified as NULL |
| For all subsequent calls to the API within the same logical authentication session, the calling application shall provide the Authentication-Request-ID returned by the API during the first API call at the start of the new authentication session | |||
| User | String | Yes | The username |
| Password | String | Optional | The password is mandatory at the start for a new authentication request and may not be specified for sibsequent calls to the API |
| Application-Session-ID | String | Optional | The calling application may specify its own session ID which will be logged by GreenRADIUS and returned in the API response |
| Signed-Response | String | Optional | This parameter is optional and may not be specified for the first call to the API when a new authentication session is started |
| After the first call to the API has returned a FIDO2 challenge and the application has processed the challenge to get a response signed by a FIDO2 YubiKey, the application makes subsequent call to the API and provides the Signed-Response to GreenRADIUS for validation. |
Response Format t=2020-12-16T14:14:32Z0763 status=OK Authentication-Request-ID= E665BB2C9CC47ED238C73D1306E0AFE Application-Session-ID= 0DB6FD264068AA45FB8171AC53C45122 Challenge={json encoded FIDO2 challenge}
| Parameter | Type | Description |
|---|---|---|
| t | String | The status of authentication request: |
| OK= Authentication Successful | ||
| CHALLENGE-ISSUED =FIDO2 challenge | ||
| AUTHENTICATION_ERROR =Authentication unsuccessful (invalid username and/or password and/or OTP) | ||
| MISSING_PARAMETER - When username and password is missing | ||
| Authentication-Request-ID | String | For a new authentication session, GreenRADIUS will generate a unique Authentication-Request-ID and will return it to the calling application |
| Application-Session-ID | String | The Application-Session-ID parameter provided by the caller will be returned for use by caller |
| Challenge | String | Json encoded FIDO2 challenge (if applicable) |
Username and Password Validation
- For the first call to the API (i.e. when the Authentication-Request-ID is not provided or is NULL), GreenRADIUS validates the username and password
- If the authentication fails, it returns "AUTHENTICATION_ERROR" status
- On successful validation, if a FIDO2 token is assigned to the specified user, GreenRADIUS will generate a challenge and return it in response
FIDO2 Validation
| Token Type | Validation |
|---|---|
| FIDO U2F and FIDO2 WebAuthN | - Checks if the token is assigned to the user |
| - Validates the token |
NOTE
The Web APIs only support the POST request type. When it receives any other request type, it responds with "ERROR Invalid Request."
Lockout Mechanism in Web API
An attacker could attempt to determine the user password by brute-forcing the user password against the Web API. To deal with this, the lockout mechanism has been introduced in the Web API. When the lockout mechanism is enabled and when the consecutive failed attempts from a user exceed a certain limit, the rate limiting kicks in and the user account is locked-out for a specified amount of time. Any further attempts for that user are ignored during the lockout period.
Disabling the Lockout Mechanism
The lockout mechanism is disabled by default. Setting the value of the 'maximum_allowed_failed_attempts' setting in sys_settings table in the ykrop2 database to 0 disables the lockout mechanism. The default value of this setting is 0.
Enabling the Lockout Mechanism
To enable the lockout mechanism, set the value of the 'maximum_allowed_failed_attempts" setting in the sys_settings table in ykrop2 database to any positivr integer. This value defines the number of consecutive attempts allowed by a user.
The duration for which a user account will remain locked (in seconds) is defined by the setting 'authentication_lockout_duration' in sys_settings table in ykrop2 database. The default value is 600 seconds.
| Setting | Permitted Values | Default Value |
|---|---|---|
| maximum_allowed_failed_attempts | Any positive integer | 0 |
| authentication_lockout_duration (in seconds | Any positive integer | 600 |
Abbreviations
- API - Application Programming Interface
- VA - Virtual Appliance
- OATH - Open Authentication
- OTP - One-Time Password
- HOTP - Event based OTP - RFC 4226
- TOTP - Time based OTP - RFC 6238
- HMAC OTP - used in YubiKey OTP (propietary format)
- AD - Active Directory
- LDAP - Lightweight Directory Access Protocol
© 2026 Green Rocket Security Inc. All rights reserved.
Instructions to Generate Support Package
Introduction
This document provides step by step instructions to enable detailed logging and generate support package.
Steps to Enable Detailed Logging and Generate Support Package
- Login to the GreenRADIUS web admin interface:
URL:https://<<IP address of GreenRADIUS Virtual Appliance>>/admin
Username: gradmin or root
Password GreenRocket!23
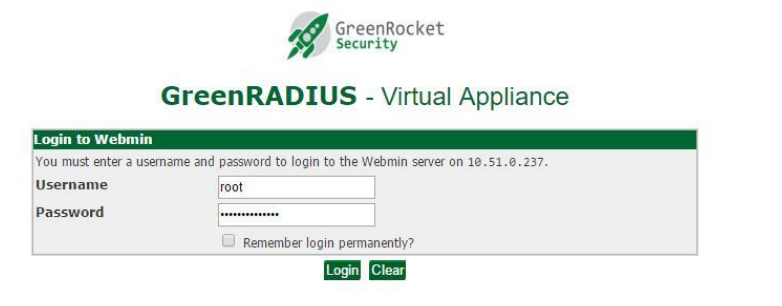
-
Click on 'Global Configuration'
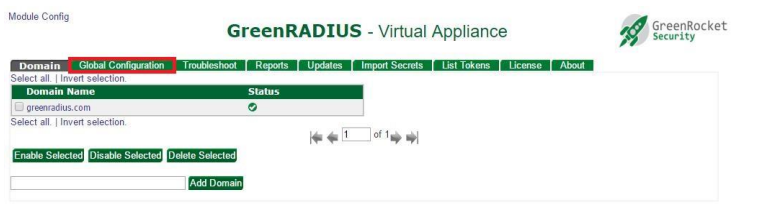
-
Click on 'Logging'
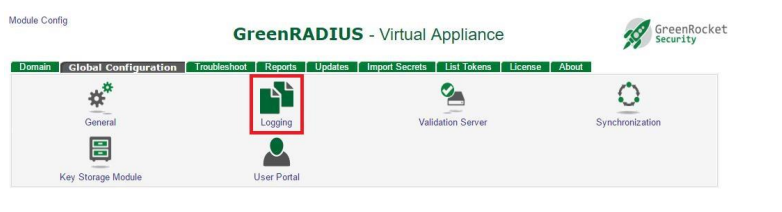
-
You will see the screen for 'Logging Configuration' as shown here. Various options to enable detailed logging are described in the table below.
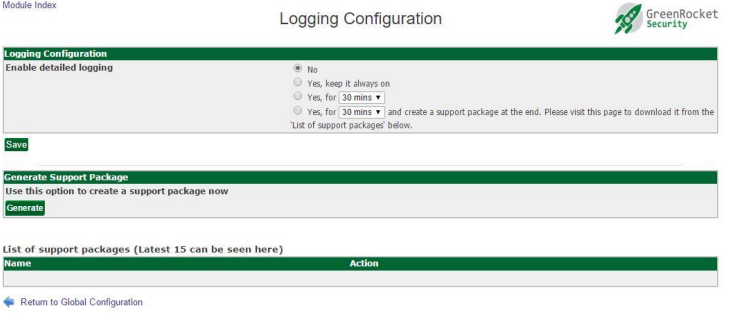
The detailed logging configuration options are described as follows:
| Option | Working |
|---|---|
| No | Disables detailed logging altogether |
| Yes, keep it always on | Enables detailed logging until it is disabled manually |
| Yes, for xx mins/hr | Enables detailed logging for the specified time period only |
| Yes, for xx mins/hr and create a support package at the end | Enables logging for the specified time period. After the specified period is over, detailed logging is disabled and support package is generated. The support package will be listed in the 'List of Support Packages' table shown on the same screen from where you can download it. |
-
Select an appropriate option as your requirement and click 'Save'
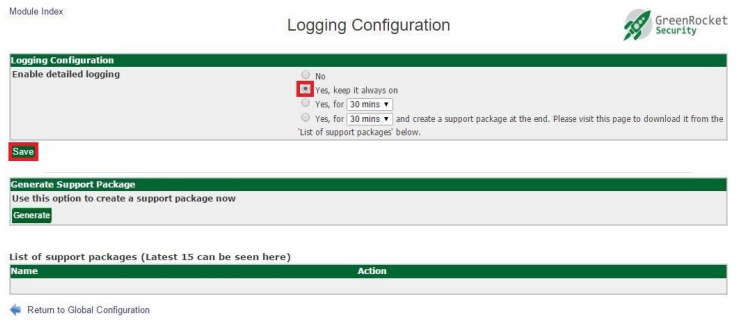
-
Click on 'Generate' button in the 'Generate Support Package' section, to generate a support package manually.
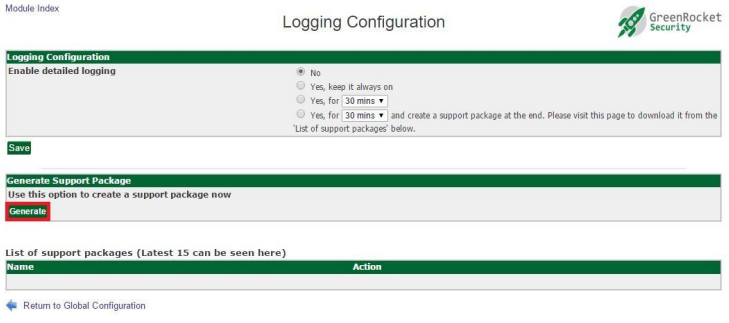
-
You will see a support packed listed in the 'List of support packages' table:
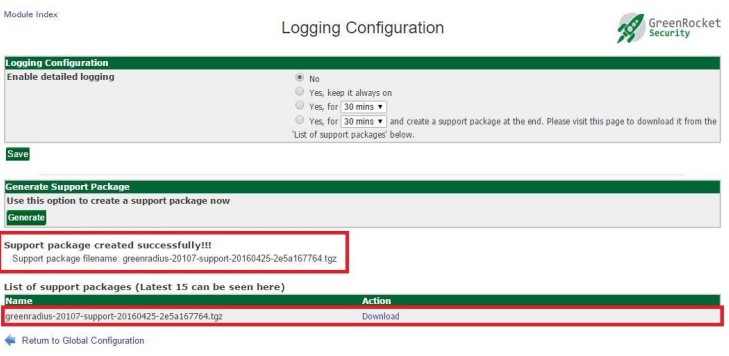
-
To download the support package, click on the 'Download' link for the support package filename:
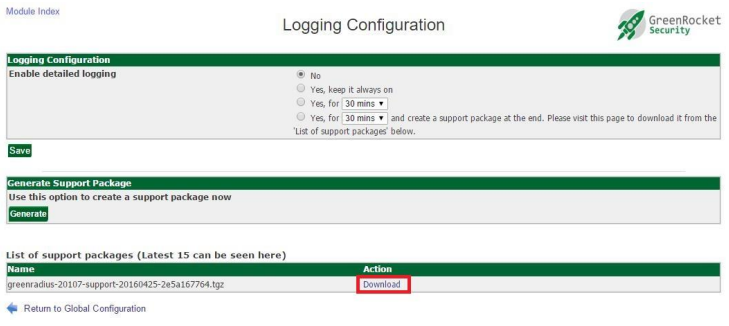
© 2026 Green Rocket Security Inc. All rights reserved.
pfSense and GreenRADIUS - Integration Guide
Before starting, make sure GreenRADIUS is configured with users imported from your LDAP and can communicate with your FortiGate
Configuring GreenRADIUS
In the GreenRADIUS web admin interface, add the pfSense Server as a RADIUS client.
- Click the Global Configuration tab
- Click the Client-based Authentication Policies icon
- Enter the IP address of the pfSense Server. Then enter the same RADIUS secret twice. Then click the Add button.
Configuring the pfSense Server
Generating the Certificate Authority (CA)
- From the menus at the top of the screen, select Systems > Cert. Manager
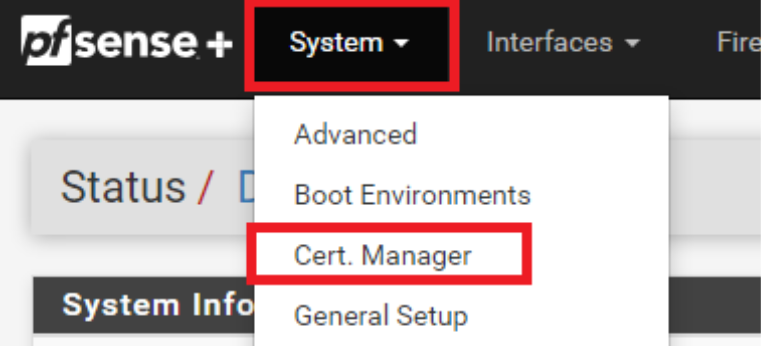
- Click the
Addbutton at the bottom right.
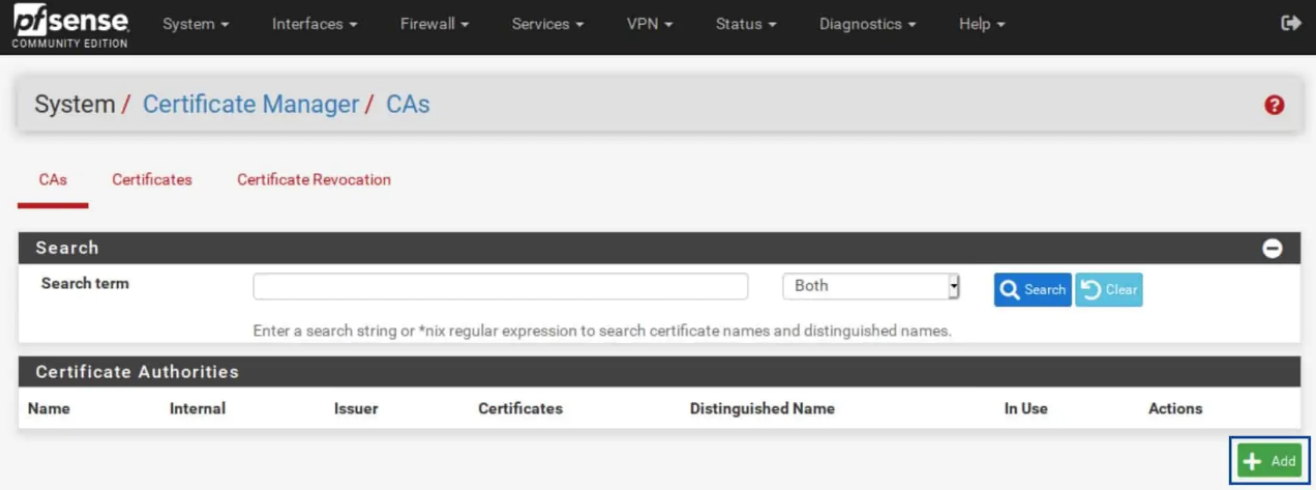
- Enter a name for your CA.
- Make sure Method is set to Creat an Internal Certificate Authority.
- Select your Key type. I will be using RSA for this example, but you can also use ECDSA.
- Set your Key length to at least 2048.
- Set your Digest Algorithm to at least sha256.
- Choose a Common Name for your certificate or leave the default of internal-ca. Then click Save.
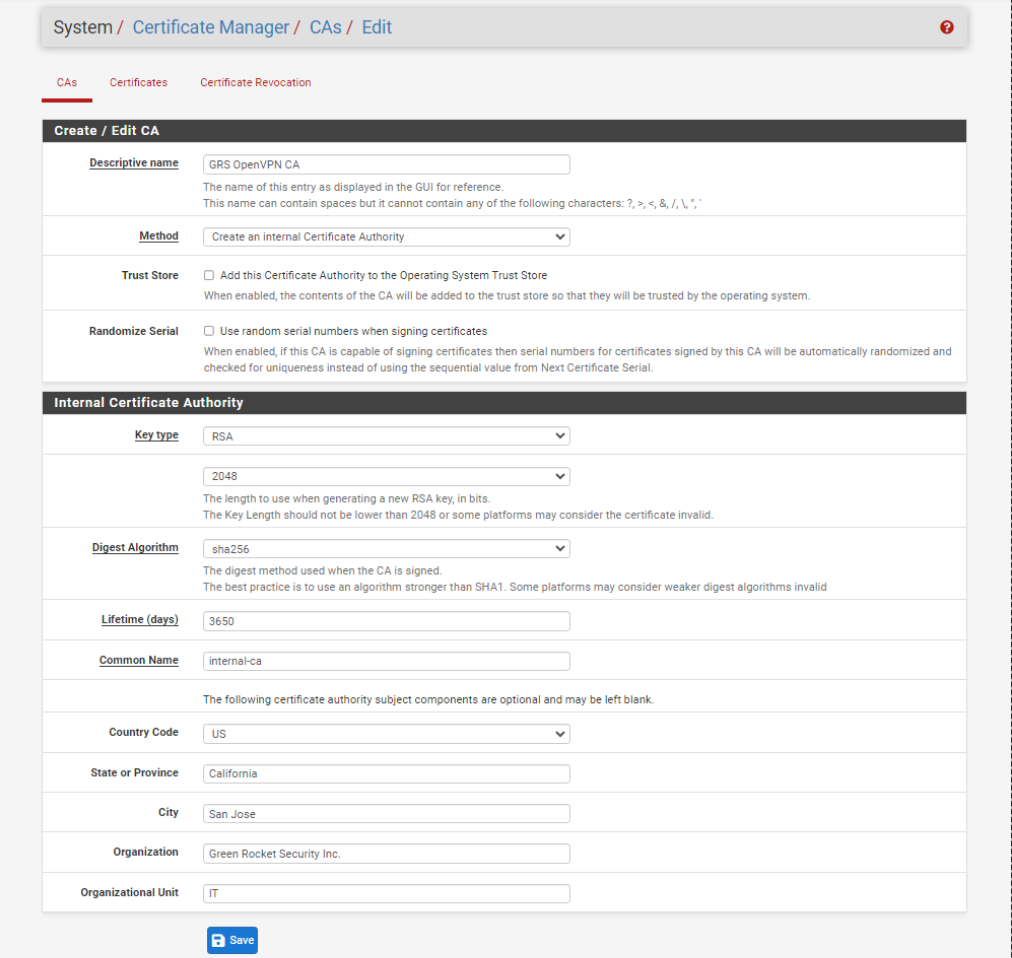
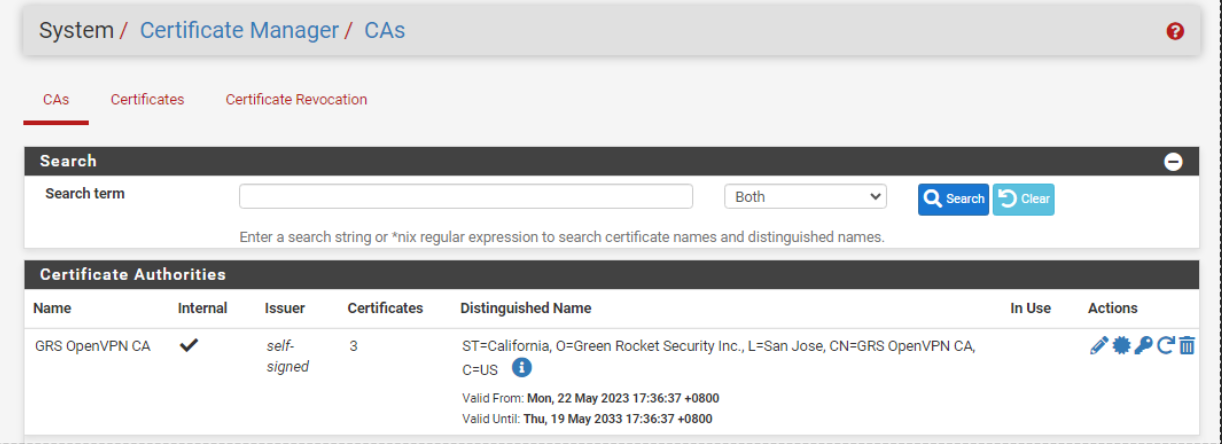
Generating the Server Certificate
Select System > Cert. Manager. Select the Certificates sub-menu.
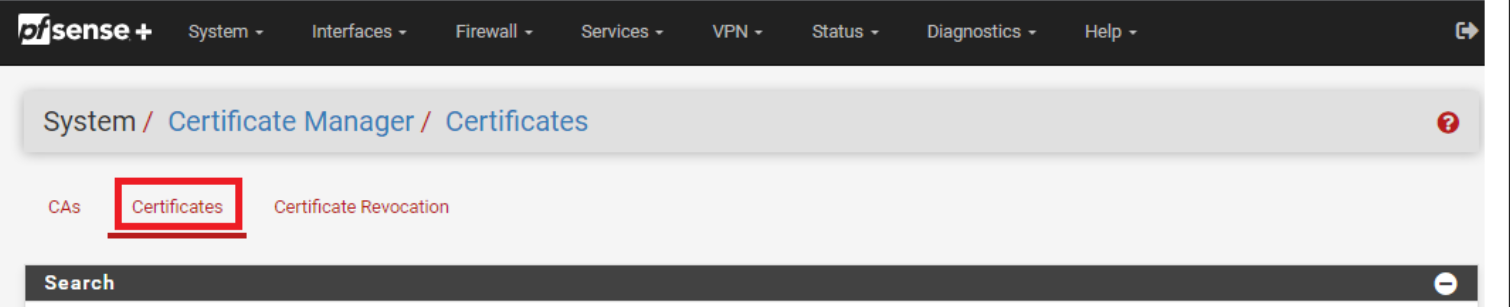
- From the Certificates sub-menu, click the Add/Sign button at the bottom right.
- Make sure Method is set to Create an Internal Certificate.
- Enter a descriptive name for your certificate.
- Use the same values you set for the Certificate Authority for the Key type and length, as well as for the Digest Algorithm.
- Set the Lifetime to 365 days.
- Set the Server Certificate as the Certificate Type.
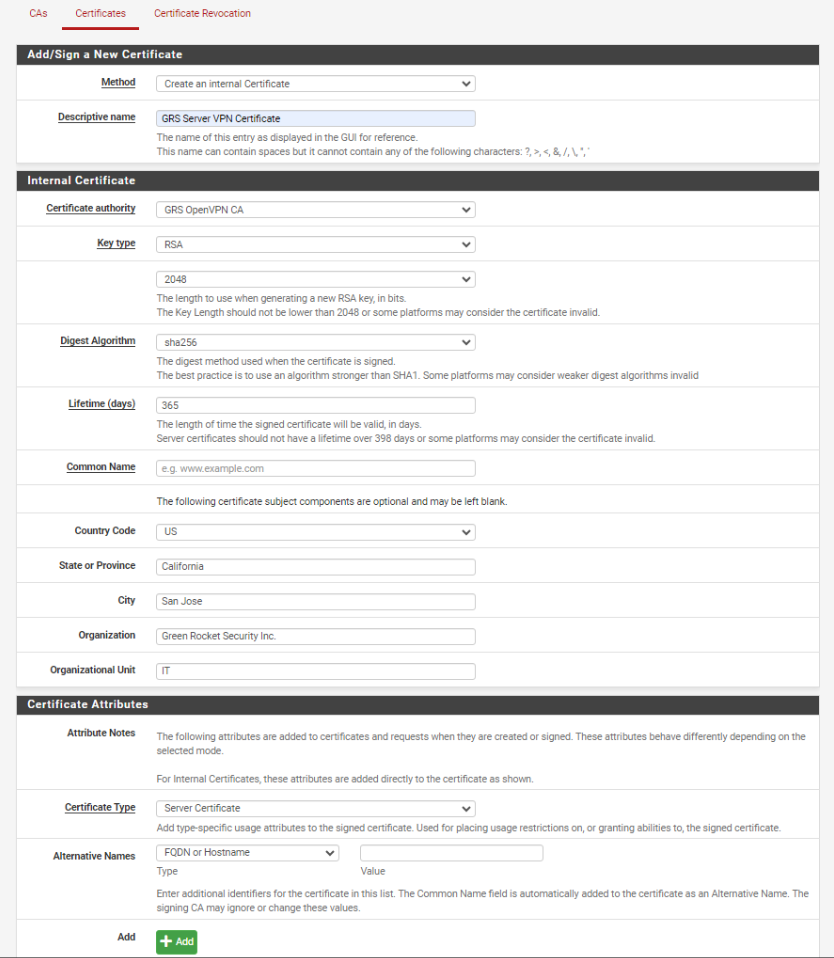
Adding GreenRADIUS as Authentication Server
- Go to System > User Manager
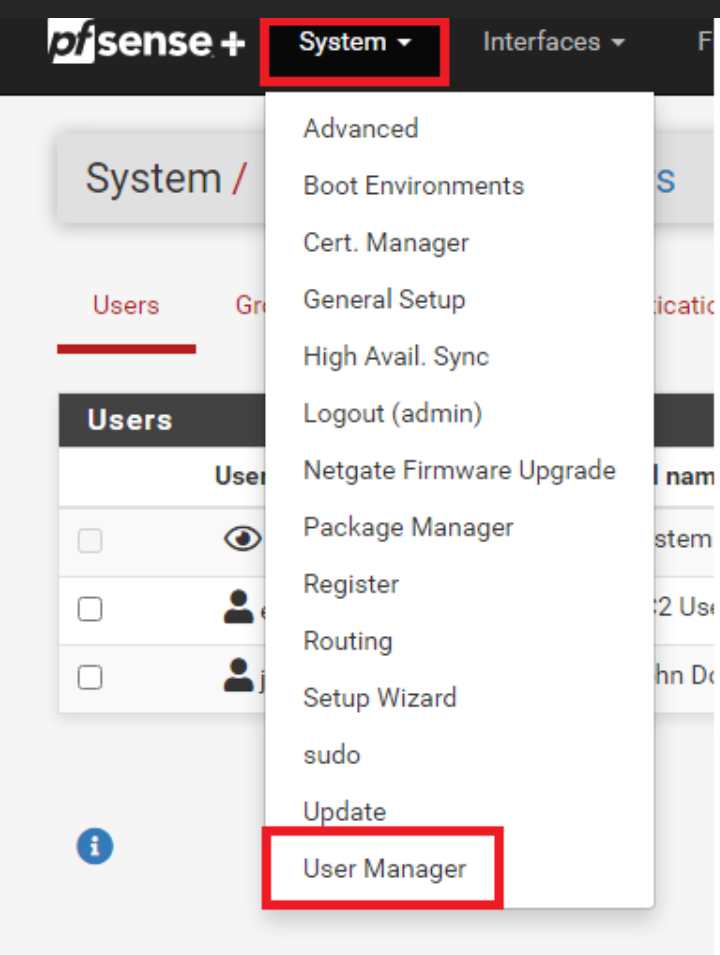
- Go to Authentication Servers and click Add.
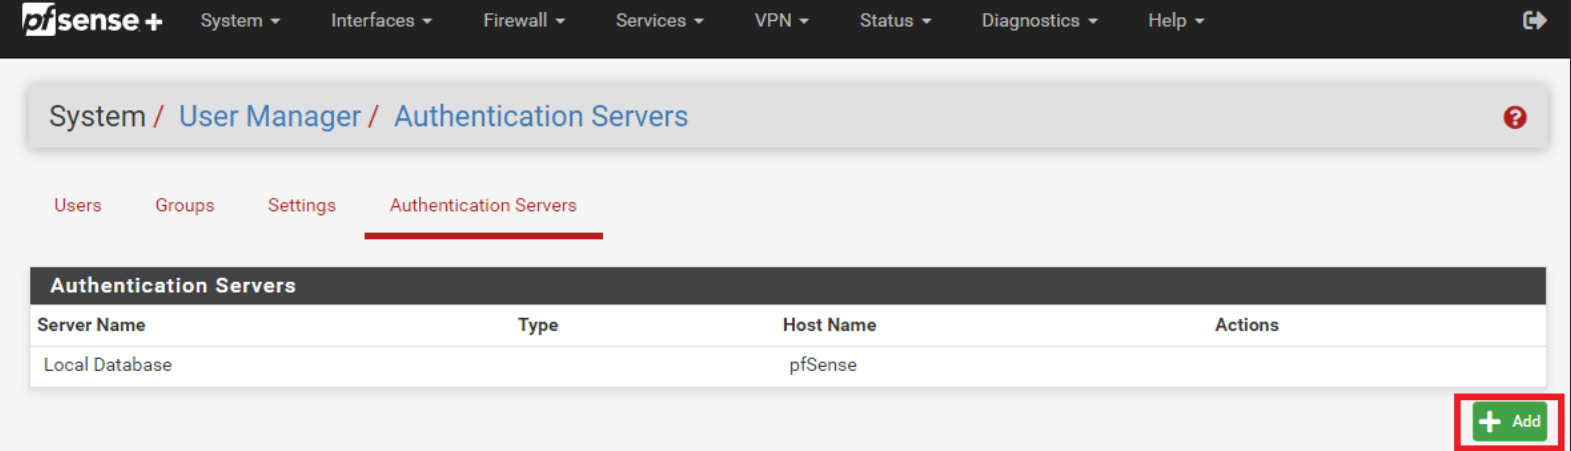
- Fill out the required details for your GreenRADIUS server.
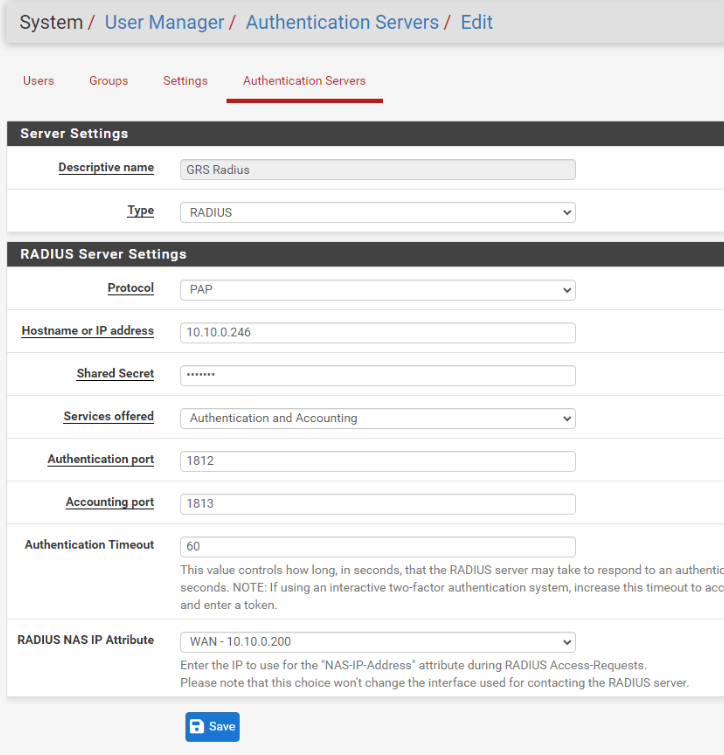
Creating the OpenVPN Server
- From the menus at the top of the screen, select VPN > OpenVPN. You are taken to the OpenVPN Servers sub-menu. Then click Add.
General Information
- Set the Server Mode to either Remote Access (SSL/TLS), Remote Access (User Auth), or Remote Access (SSL/TLS+User Auth). As mentioned above, I will be using Remote Access (SSL/TLS+User Auth) for this example.
- Select the GreenRADIUS Server you added as Authentication Server.
- Change the Local port to a different port if required by your network topology or leave it at the default (1194).
- Enter a name for your server in the Description field.
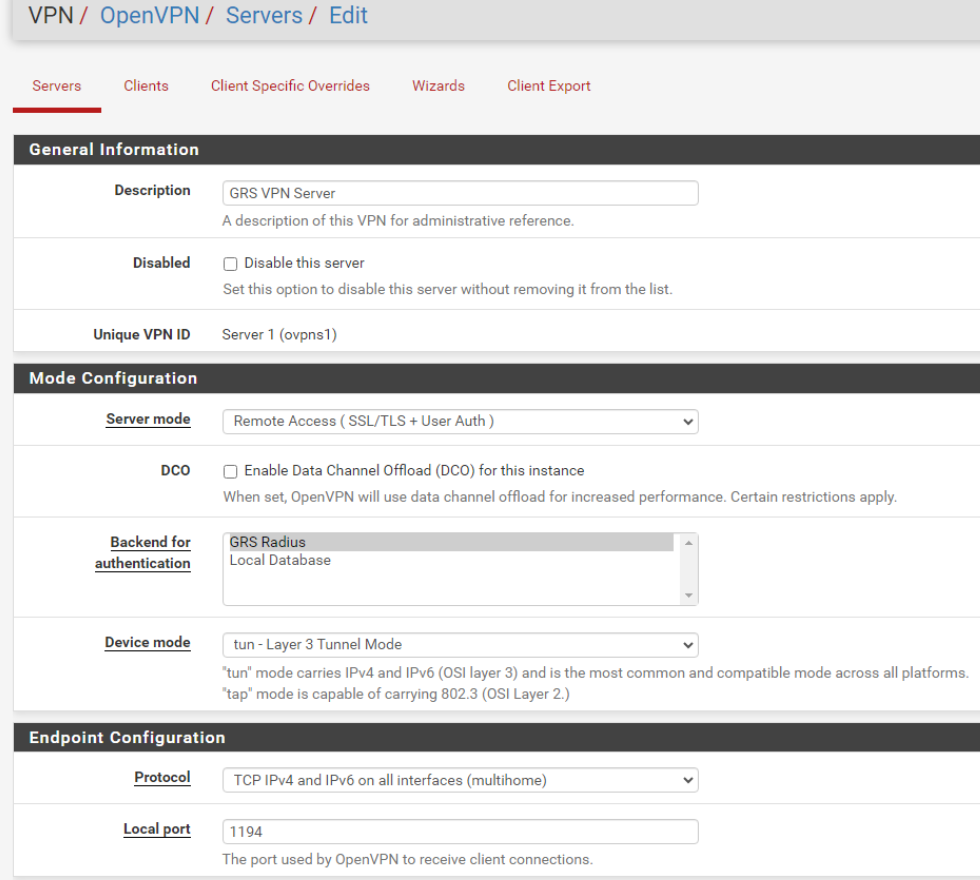
Cryptographic Settings
- Make sure Use a TLS Key and Automatically generate a TLS Key are enabled.
- Make sure your Peer Certificate Authority is set to the CA we created earlier.
- Set the Server Certificate field to the server certificate we created earlier.
- Select 2048 for the DH Parameter Length setting.
- Set the Auth digest algorithm to SHA256 (256-bit)
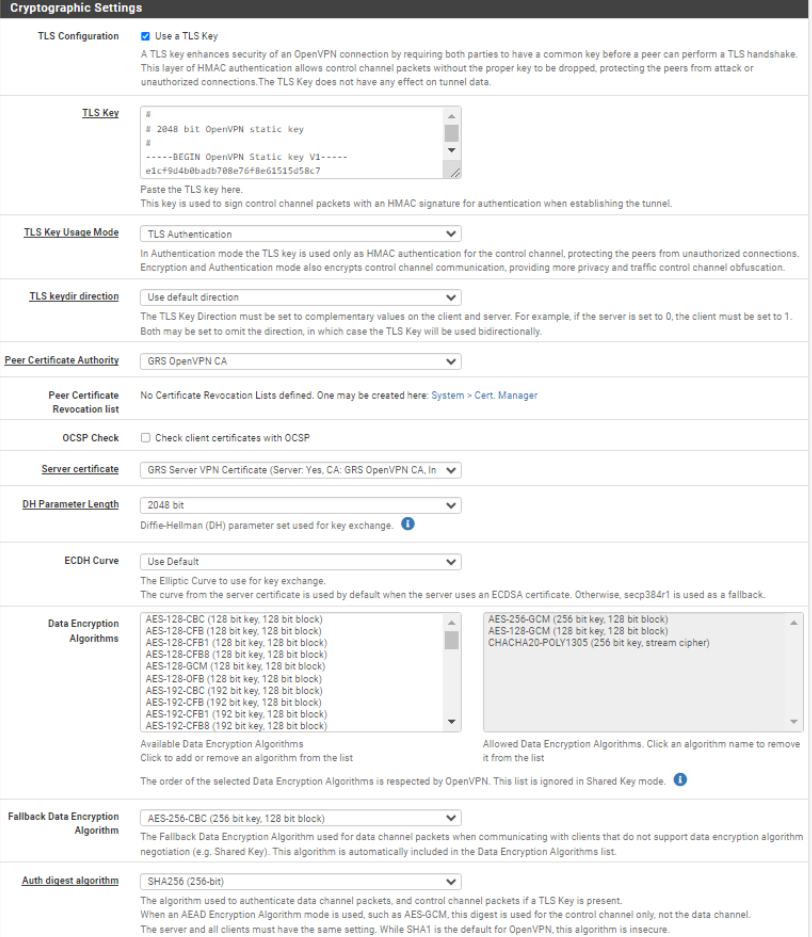
Tunnel Settings
- In the IPv4 Tunnel Network field, enter a subset that is not present on your network to be used as the OpenVPN network's internal subnet. In my case, I'm using 192.168.3.0/24
- If your network also supports IPv6 and you want your OpenVPN tunnel to support IPv6 as well, enter an unused IPv6 subnet in the IPv6 Tunnel Network field. In this example, I am configuring my network for IPv4 only.
- Enable Redirect IPv4 Gateway in order to route all IPv4 traffic over the VPN tunnel. Enable Redirect IPv6 Gateway in order to route all IPv6 traffic over the VPN tunnel, if needed.
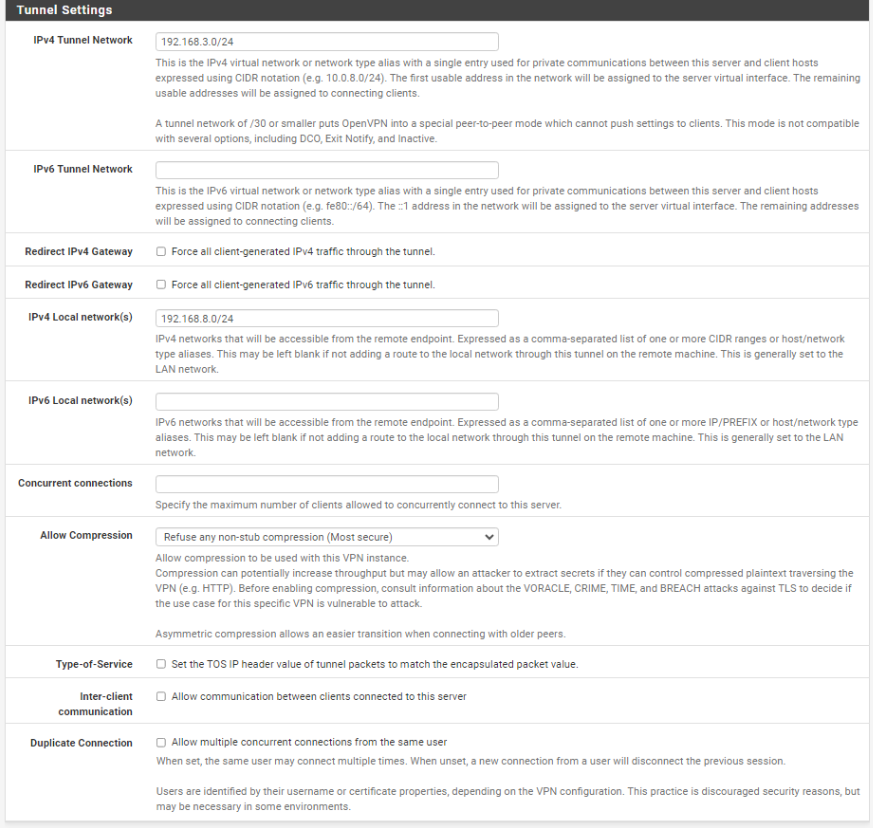
Ping Settings
- Set Inactive n seconds for OpenVPN to disconnect after that seconds. In this example, I set it to 0 to disable the settings.
- Interval and Timeout set for your preferred n seconds.
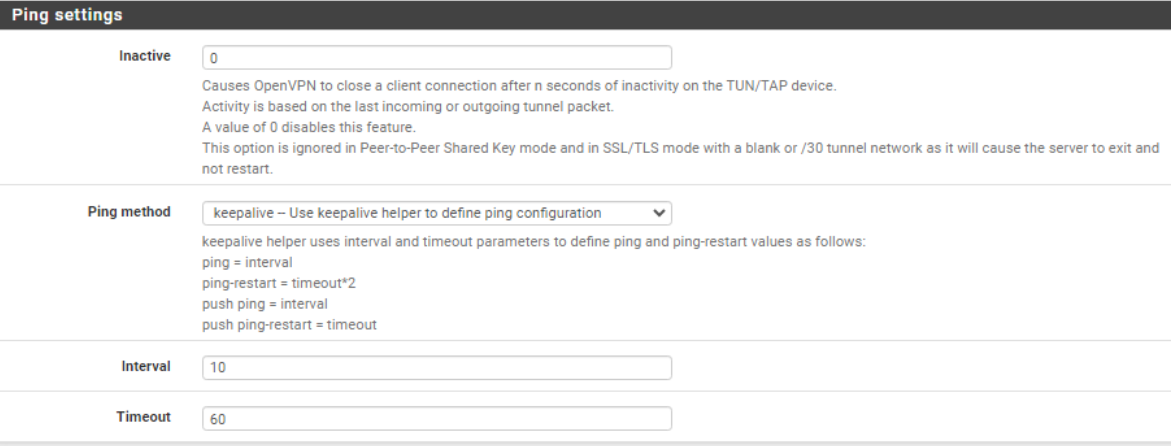
Create firewall rules
Now that our OpenVPN server is configured, we need to create a firewall rule to allow traffic to and from our server.
OpenVPN rule
This rule will allow traffic from the OpenVPN subset out to the internet.
- From the menus at the top of the screen, select Firewall > Rules.
- Select the OpenVPN sub-menu.
- Click the Add button to create a new rule at the top of the list.
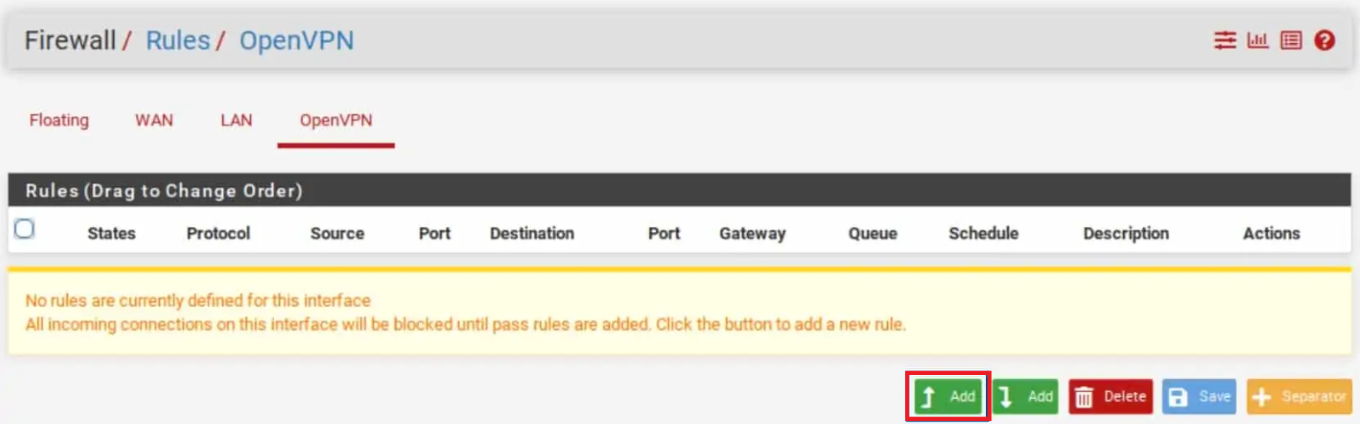
- Set the Address Family to IPv4 + IPv6 if your system is using both IPv4 and IPv6. If not, leave it at the default value of IPv4.
- Set the Protocol field to Any.
- Set the Source to Network.
- Enter a description for this rule in the Description field.
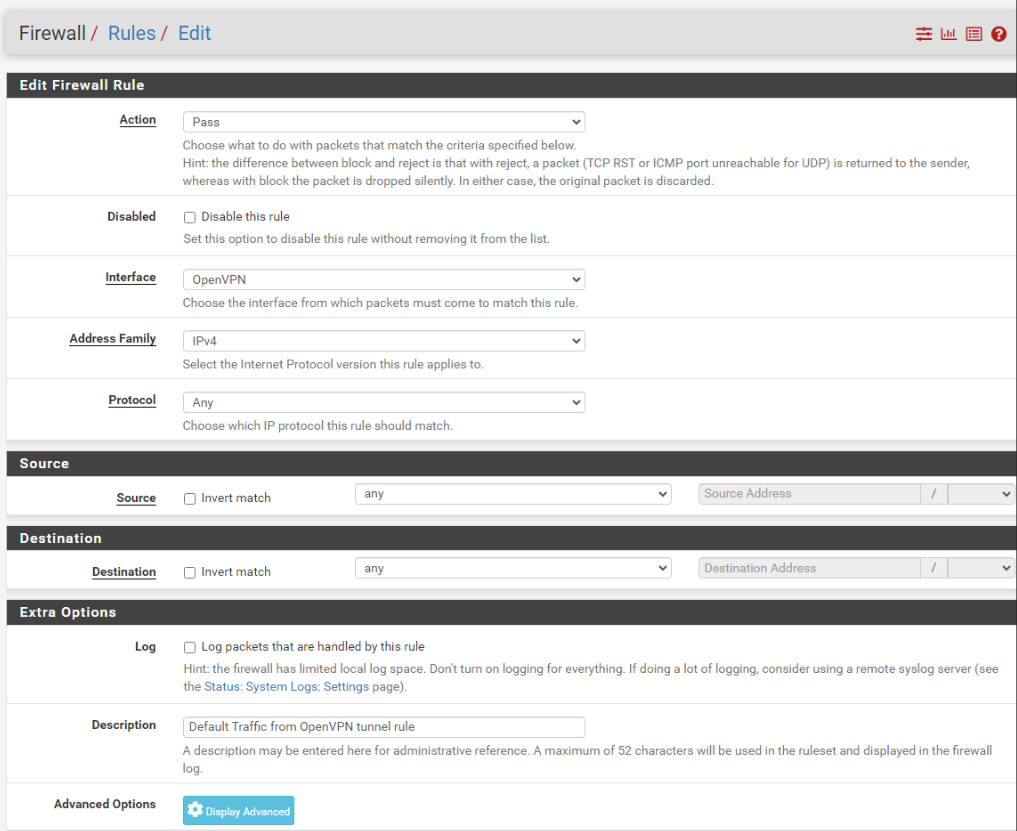
WAN rule
In order to connect your OpenVPN server from the outside world (i.e., the internet), you're going to need to open the port your server runs on (1194, in this example) on your WAN interface. This rule will allow your client to connect to your OpenVPN server from the internet.
- From the menus at the top of the screen, select Firewall > Rules.
- Select the WAN sub-menu (the default).
- Click the Add button to create a new rule at the top of the list.
- Set the Address Family to IPv4+IPv6 if your system is using both IPv4 and IPv6. If not, leave it at the default value of IPv4.
- Make sure Source is set to Any.
- Set the Protocol field to UDP.
- Set the Destination Port Range to 1194.
- Enter a description for this rule in the Description field.
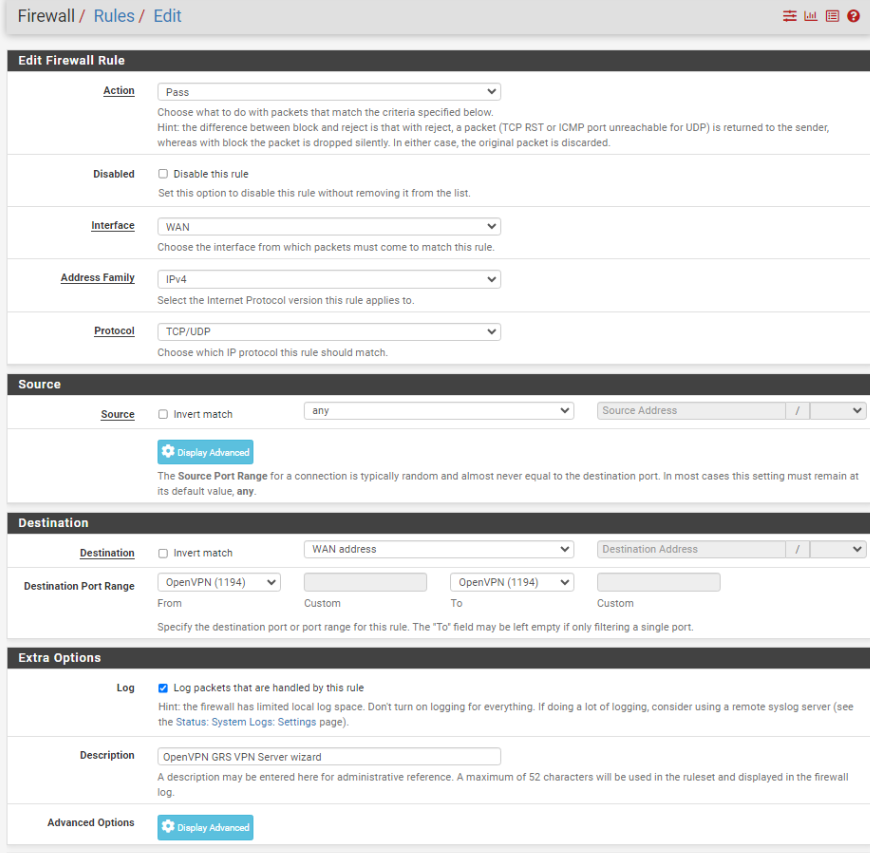
Install the OpenVPN Client Export Utility
In order to easily configure our OpenVPN client, pfSense provides an automated configuration generator for OpenVPN. However, it's not installed by default. We need to install the package from the pfSense Package Manager manually.
- From the menus at the top of the screen, select System > Package Manager. You are taken to the Package Manager.
- Select the Available Packages sub-menu.
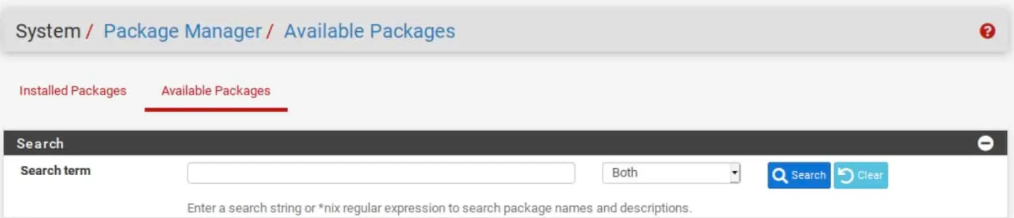
- Scroll down until you see
openvpn-client-exportand click the Install button to its right. You are taken to the Package Installer page.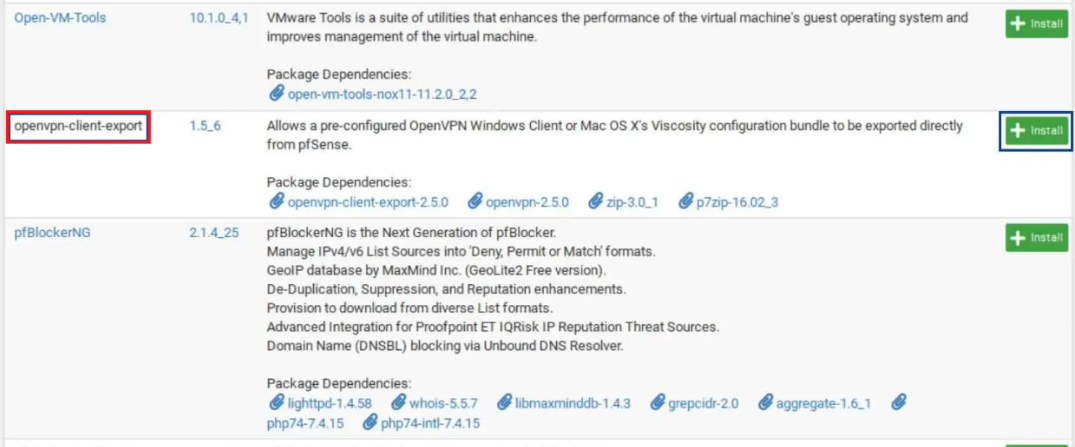
- Click Confirm. The installation begins.
- Once the installation is finished, the progress bar turns green, and you should see Success displayed in the package installation window.
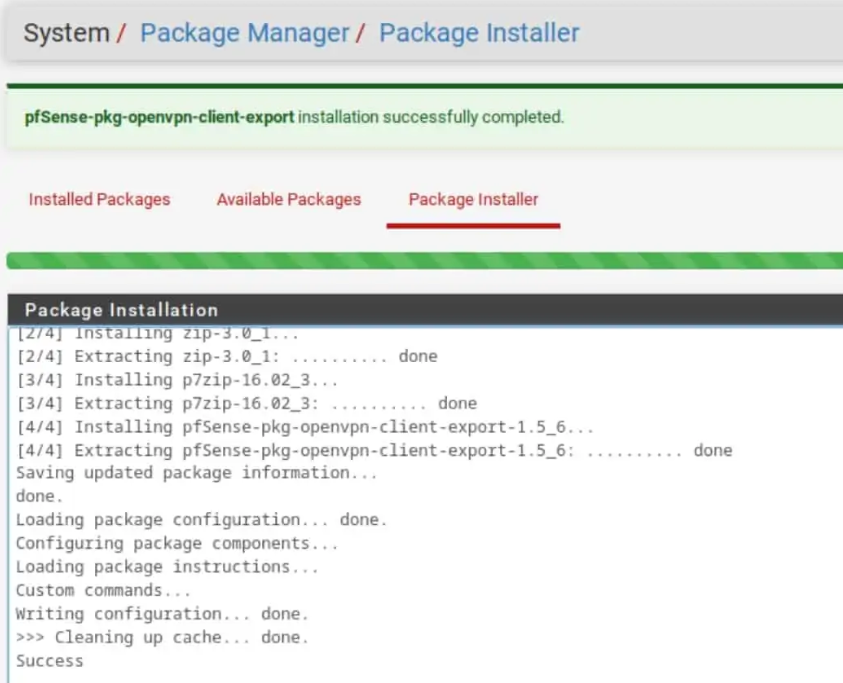
Creating User Certificate for the GreenRADIUS User
- Go to System > Certificate Manager > Certificate tabs. Add new.
- Method should be Create an Internal Certificate
- Select the CA created earlier for the OpenVPN in Certificate Authority then other fields will auto-populate.
- Make sure User Certificate is selected in Certificate Type.
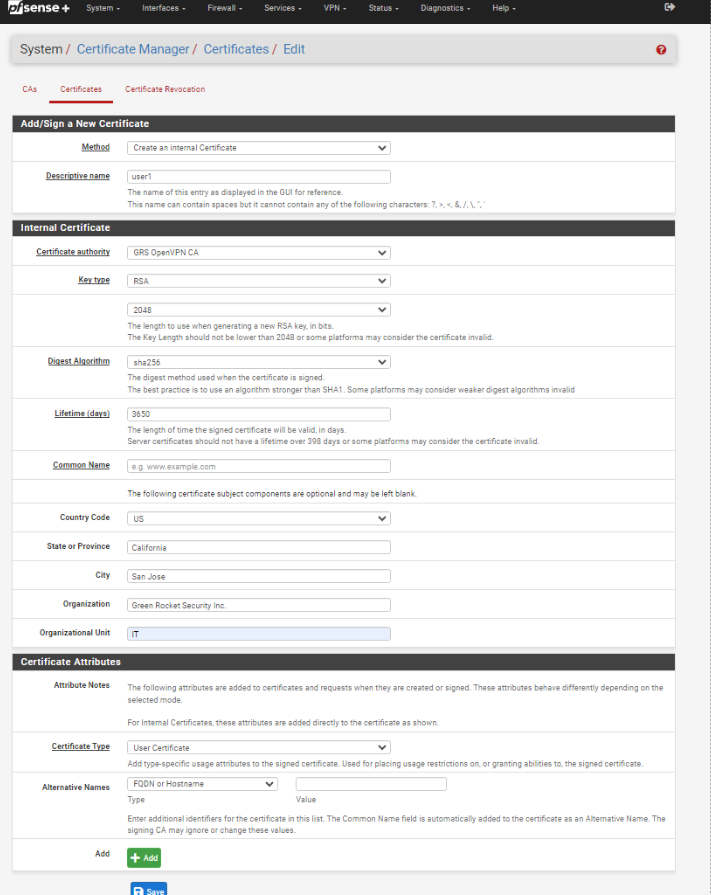
Export the OpenVPN Client Configuration
- From the menus at the top of the screen, select VPN > OpenVPN
- Select the Client Export sub-menu.
- Make sure the correct OpenVPN server is selected next to Remote Access Server.
- If you're using Dynamic DNS to access your pfSense WAN, select Other from the "Host Name Resolution" drop-down menu. Then enter the hostname in the "Host Name" box that appears below. This allows you to access your pfSense WAN by hostname rather than by IP address, which means you won't lose access to your OpenVPN server if your ISP changes your WAN IP address. If you're not using Dynamic DNS, leave "Host Name Resolution" set to "Interface IP Address."
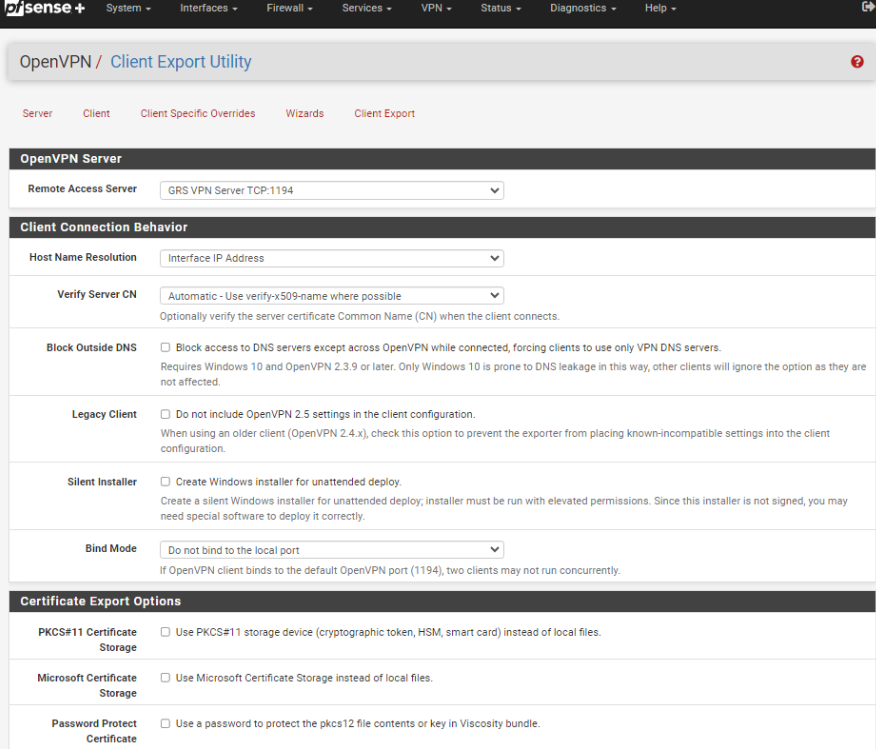
- Scroll down to the bottom of the page, and you'll find generated configurations for various systems and apps. Select the user certificate created earlier that matches to the GreenRADIUS user; in this example I used
user1. Click on the appropriate configuration for your device(s) to download it to your computer.
Once the installer is downloaded, install it to the machine to test.
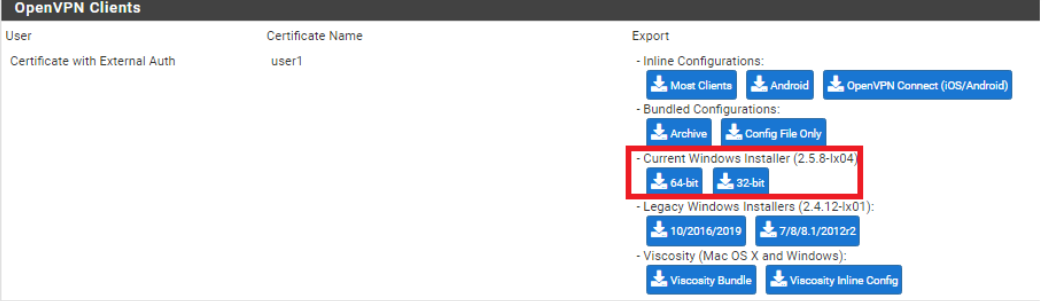
Authentication Testing in OpenVPN
- Type in the Username and Password + GRS OTP to the field and log in.
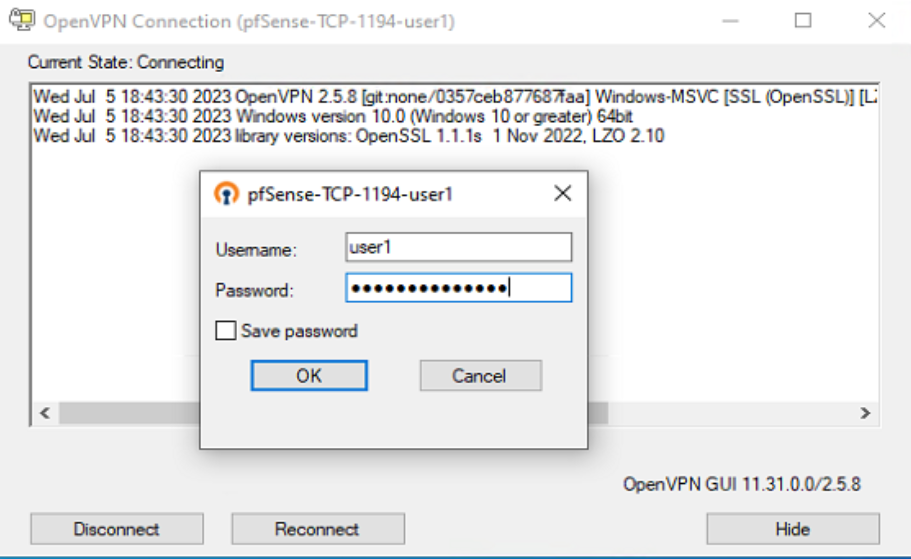
- Showing OpenVPN status as connected.
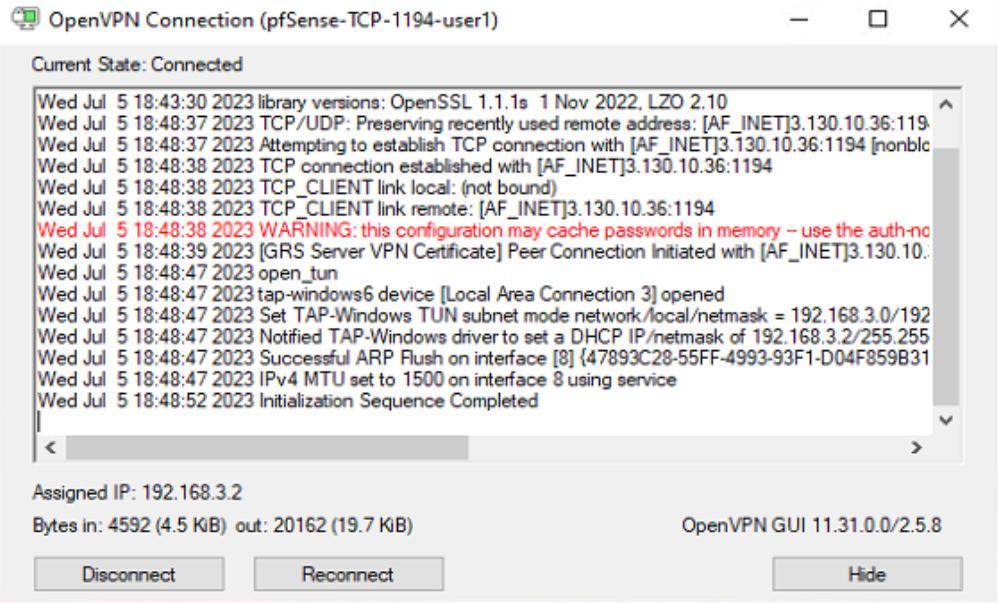
- Go to GreenRADIUS server and check Authentication Reports to confirm sign-in
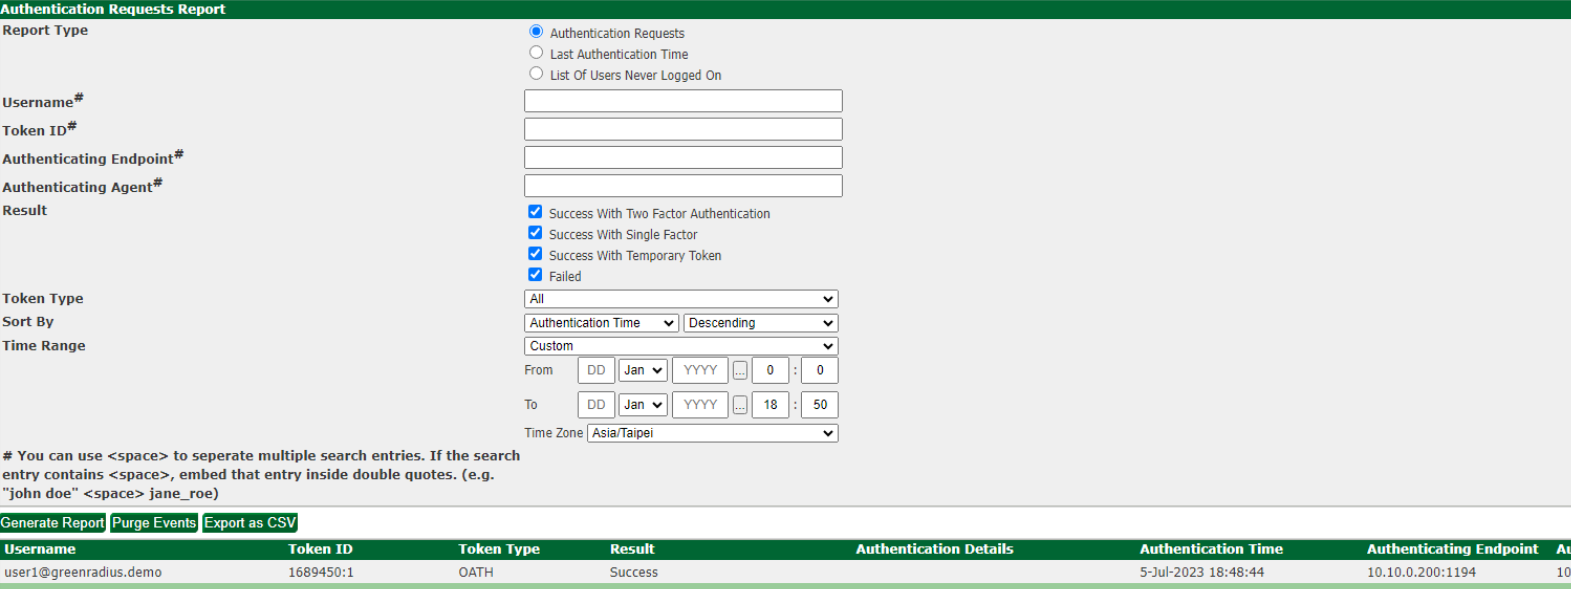
© 2026 Green Rocket Security Inc. All rights reserved.